Raid Setup
Introduction
Welcome to our Heroic Dimensius, the All-Devouring Boss Guide, the final boss of the Manaforge Omega Raid. Learn about the fight mechanics, the strategy we recommend to defeat this boss on Heroic difficulty and how to avoid flying into asteroids!
At first I thought I had queued into Interstellar. The swirling void, collapsing stars, the sense that you were about to witness something beyond comprehension, it was all there. That illusion didn’t last long though.
This encounter is cinematic, overwhelming, and a little cruel. Every mechanic feels like it’s designed to pull the floor out from under you, literally in some cases, before giving you just enough tools to crawl back from the brink. It’s a spectacle on the surface, punishment underneath, and somehow both of those things mesh together beautifully.
If WoW ever had a “blockbuster” raid boss, this is it.
Fight Style: Single Target fight (with occasional cleave in earlier phases)
Recommended Setup: 2x Tank / 4x Healer / 14x DPS
Required utilities: Dragonriding
Hero/Lust usage: Phase 3
Method Boss Review
This fight is a visual masterpiece, easily comparable to other modern games. Sure, it tanks the FPS on even the best modern PCs, but it’s absolutely worth it, showcasing just how stunning WoW can look when it’s firing on all cylinders.
More importantly, it’s not just pretty. The encounter is well-crafted with a smooth, engaging flow, pulling from the best of modern boss design without feeling bloated. Every phase has a clear purpose, and the intermission flight section adds something fresh without dragging the pace.
If Mythic execution lives up to even half of what Heroic delivers, Dimensius could easily go down as one of the greatest encounters Blizzard has ever designed.
Method Boss Rating: (5/5)
Easy Mode
P1 - Excess Mass & Add Control:
- Split raid into two groups; cloak at pull.
- Kill both adds quickly, pick up Excess Mass.
- Stack together for Devour. Have Excess Mass players form the zone to resist the pull.
- Massive Smash in the middle; stay near the circle for the knock.
- Rotation: Adds and puddles, Shattered Space soak, Reverse Gravity near edge (Mass frees them) then Smash in middle.
- The second set includes a Devour; stack with your group.
- The third set mirrors the first; ends with teleport to Intermission.
P2 - Flying:
- Mount up, fly through rings to the platform.
- Avoid Black Hole, meteors and beams.
- Grab Stellar Core to chunk the big add when you land.
P2 Platforms 1 & 2 - Voidlord Packages:
- Create a gap by killing one Voidwarden; grip Nullbinders into it and cleave.
- Tank big add, pick a corner for the meteor, then stack for Gamma Burst pushback.
- Repeat the small-add setup once; big add dies after the second arm cast.
- Platform 2 is the same, but the big add drops a large puddle instead of a line.
- Kill the big add and you’re sent to Phase 3.
P3 - Final Burn and Movement:
- Boss takes increased damage for the first 15 seconds; burn hard
- Darkened Sky: three meteor waves; get hit by wave one, then two, then three as your 3s debuff falls off each time.
- Devour: enter a Voidstar well just before the cast finishes.
- Supernova turns one Voidstar into a Black Hole; reposition.
- Cosmic Collapse: heavy tank hit and raid grip; be close to the tank or you’ll be dragged through the boss and die.
- Fists Of The Voidlord: tank stands away from the raid due to melee splash.
- Repeat: Waves, Devour, Tank Grip and reposition until the boss dies.
Mechanics
Heavy tank hit that deals huge Physical and Cosmic damage, applies Mortal Fragility, which increases damage taken by this ability by 100% and a knock-back to the raid.
Spawns Living Mass.
Living Mass
This is an add that pulses cosmic damage on the entire raid every 2 seconds. When killed, it will regenerate in 8 seconds, unless all Living Masses are killed.
Drops Excess Mass when killed.
When a Living Mass dies, it drops an orb of Excess Mass. Players who pick this up gain two key abilities: Resisting Devour and saving players hit by Reverse Gravity.
During Devour at 100 energy, the raid must form a Collective Gravity zone. The number of Excess Mass carriers required equals Dimensius’ current stacks of Growing Hunger. For example, if Dimensius has 4 stacks, 4 players with Excess Mass must stack together, and the rest of the raid must stand inside their zone to avoid being pulled into Dimensius.
For Reverse Gravity, Airborne players have a small ring under them. A player holding Excess Mass can stand in that ring to pull them back down. As the fight goes on, Anomalous Force increases, meaning more carriers are needed to rescue a single Airborne target.
Xal'ataths Aid
Xal’atath gives players the Soaring Reshii buff during the intermission. This protects you from Endless Darkness and lets you use flying mounts.
To keep the buff active, fly through the Umbral Gate she spawns. Passing through a gate refreshes Soaring Reshii, restores one point of Vigor, and gives a short speed boost.
Stay on top of refreshing the buff to avoid being pulled into Oblivion.
Any player without Soaring Reshii is consigned to Oblivion.
Deadly radiation beam across the map. Crossing its center means instant vaporization.
Hidden orbs (3) around the meteors that can be picked up. Will deal massive damage to the add once the player holding it lands on the platform.
Platform Mechanics
While fighting on the platform, you’ll need to deal with a mix of big boss abilities and summoned adds.
- Extinction: Dimensius throws a massive world fragment in a straight line. Getting hit deals heavy damage and stuns you for 4 seconds.
- Gamma Burst: A 4-second channel that deals raid-wide Cosmic damage and pushes everyone back.
- The Devoured Lords: Dimensius summons rival Voidlords as adds. These need to be killed fast before they can cast Eclipse, which wipes the raid.
Devoured Lords Adds
You are fighting an add on each platform.
Artoshion: Uses Mass Ejection, a line-shaped attack that deals Cosmic damage, knocks players back, and leaves a slowing/damaging puddle (Debris Field).
Pargoth: Uses Stardust Nova, a large AoE explosion around himself, but otherwise has the same puddle (Debris Field).
Both Voidlords also apply Touch Of Oblivion, a stacking Shadow DoT on the tank. At 15 stacks, the tank is instantly sent to Oblivion (dead).
Voidwardens
Put up a deadly aura that knocks players back and deals heavy Shadow damage if you’re too close. They spawn in a line, and the only way to push forward is to kill one of them and open a gap.
Nullbinders
Applies shadow dots on the entire raid and slows down players, so they need to be controlled and killed fast.
The best approach is to grip them together and cleave them on top of a Voidwarden you’re already burning down. Just don’t leave them alive too long; after a bit they become immune to CC, which makes handling them much harder.
Dimensius takes 50% increased damage after Xal’atath's strike for the first 15 seconds of Phase 3.
Cosmic Collapse is a heavy tank hit that deals massive Physical and Cosmic damage and applies a debuff that increases the tank’s damage taken, which forces a swap.
The hit also grips every player in toward the tank’s position. To handle this safely, the raid should already be standing close to the tank; if you’re too far away, you risk being pulled straight through the boss and dying.
Spawns 8 Voidstars that orbit the boss and project Gravity Well. Standing within one will deal damage to the player, but protect them from getting gripped by Devour.
Each Devour increases Cosmic Radiation damage by 100% (stacks).
Calls down three massive meteors one after another. Each impact sends out a shockwave across the platform that deals moderate damage, but it also applies a debuff that increases damage taken from the next wave by 300% for 3 seconds.
The way to handle this is to "ride" the waves in order: get hit by the first one, wait for the debuff to fall off, then move into the second, and finally the third. If you overlap the debuff and take two waves back-to-back, you’ll probably die instantly.
Voidstar explodes after 5s for massive raid-wide damage reduced by distance. Turns a Voidstar into a Black Hole for the remainder of the fight. Players standing in Black Hole instantly die.
Makes every melee swing splash Shadow damage around the tank and knock nearby players back. Because of this, the tank needs to position themselves slightly away from the raid, so that no one else gets clipped by the splash damage.
Strategy
This fight is all about executing mechanics properly. Unlike earlier heroic bosses, there aren’t any strict damage or healing checks, survival and clean execution matters far more.
The fight is very long, so staying alive all the way to the end is the biggest factor. Losing several players early will make things messy fast. That said, the boss heals back to 100% at the start of Phase 3, so you’re not actually behind on boss damage if people die earlier. What it does mean is that surviving P1 and P2 cleanly is much harder if you’re missing players.
Phase 1
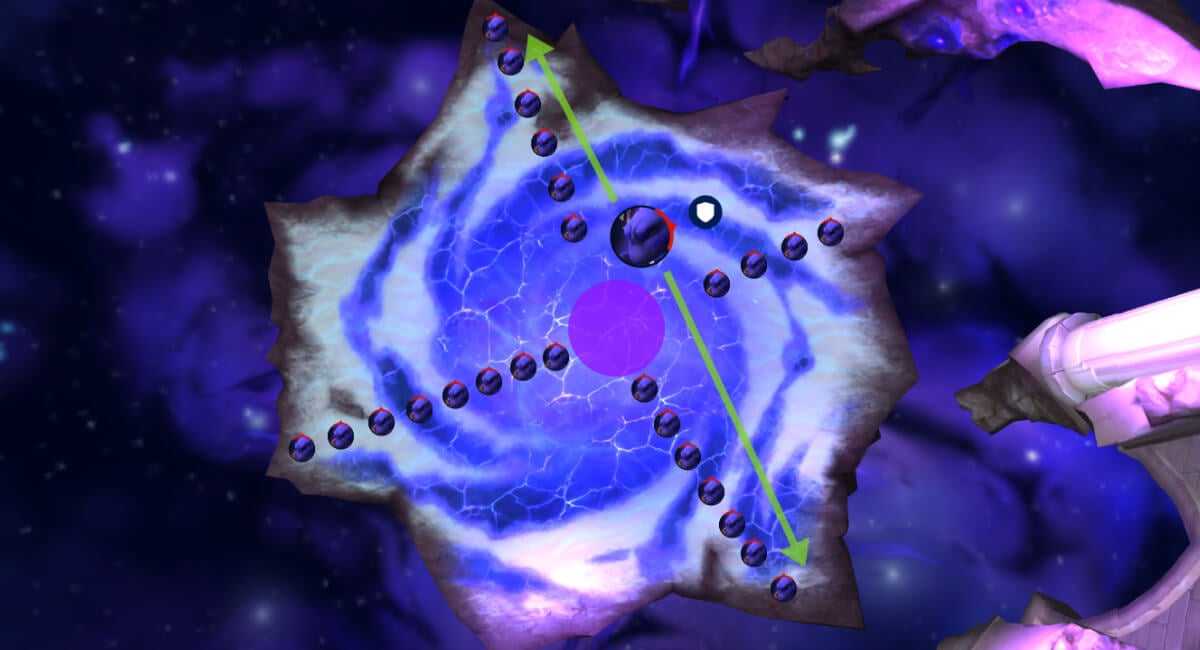
Split the raid into two equal groups. When pulling, both groups should stand in front of their assigned gate and use the cloak when the timer hits zero.
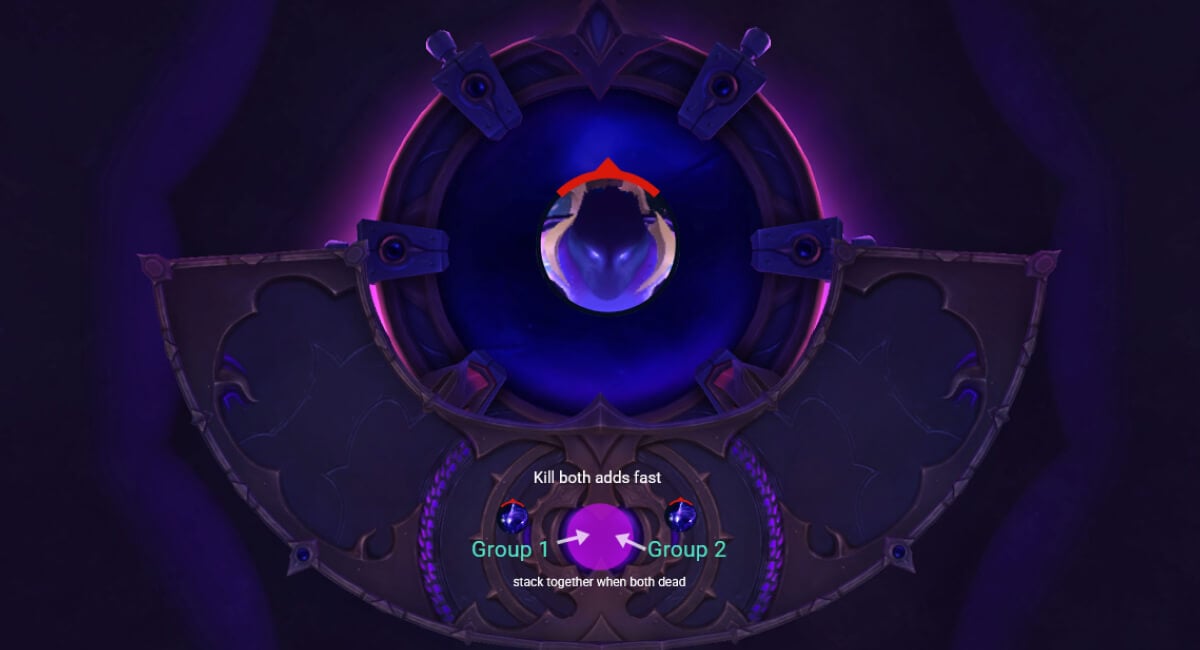
Kill both adds quickly, then stack up together to survive Devour.
Here’s how Devour works: every cast, the boss gains Growing Hunger stacks. These stacks represent how much Excess Mass you need to survive the next Devour.
The simplified version: if you always kill the add and pick up the mass it drops, you’ll always have enough stacks. The only way you fail this check is if a Mass carrier dies or somehow ends up on the wrong side of the room.
After the first Devour, move back toward the middle. Stay close, because the boss will use Massive Smash, a big knock in the center that everyone should be ready to soak.
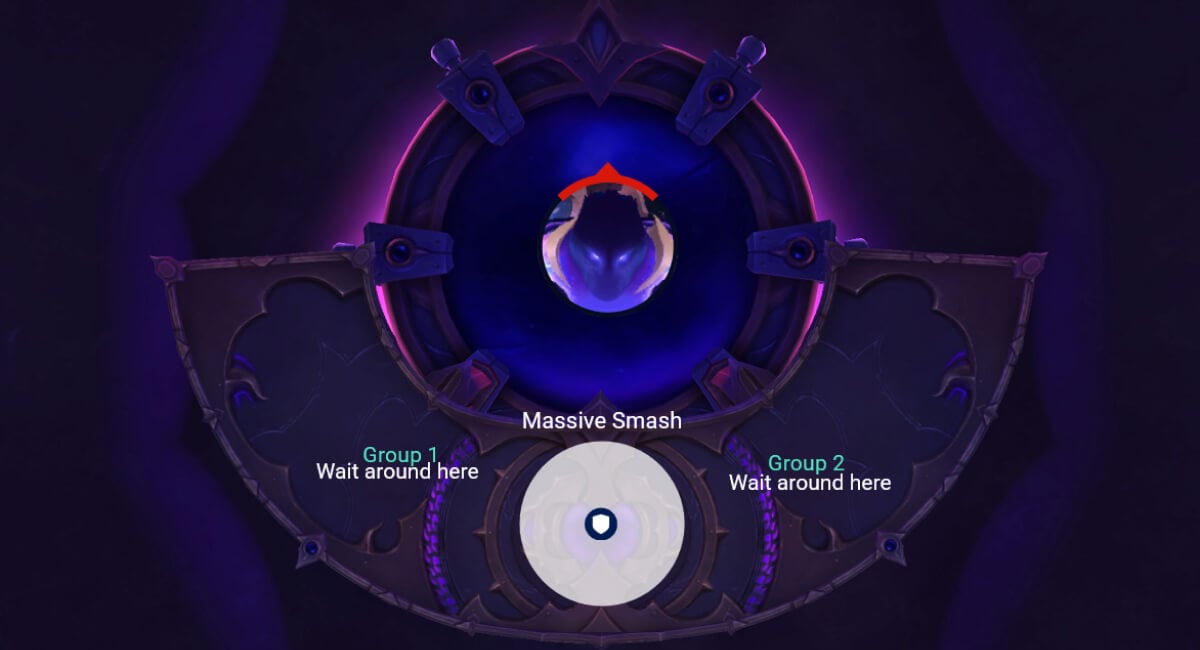
Once the knock is done, the real Phase 1 begins, and the fight rotates through the same sequence of mechanics.
Adds and Puddles: Ranged players run to the edge and wait for Dark Matter puddles to drop. Melee stay near their edge while burning the add. Everyone’s focus is killing the add quickly.
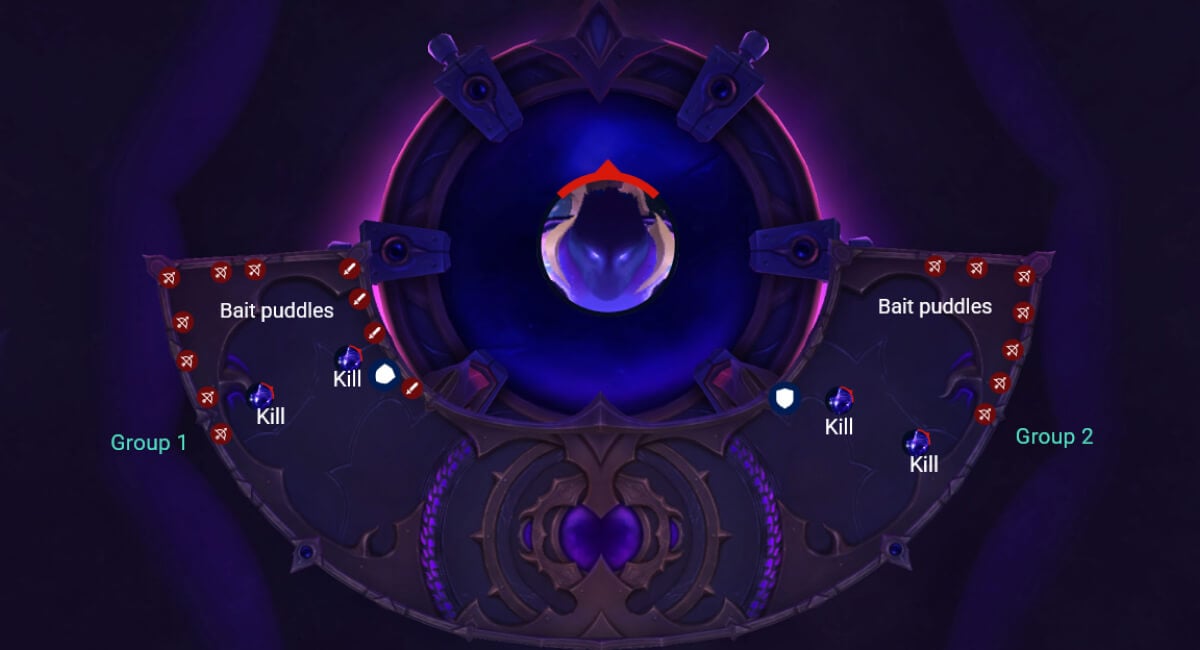
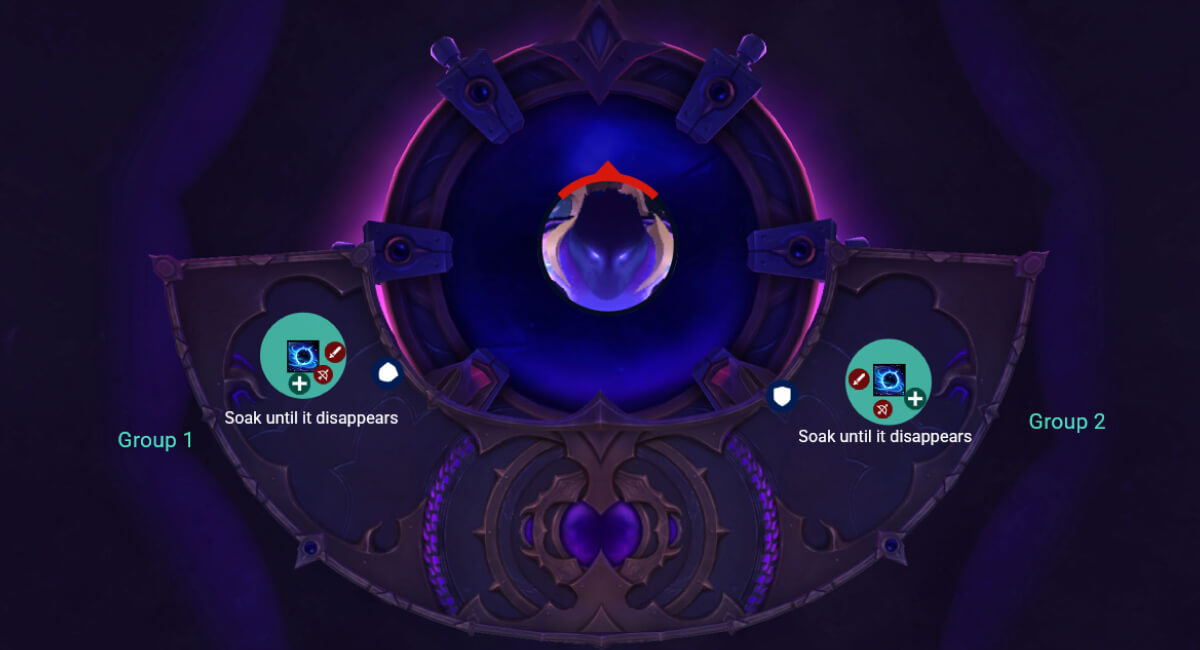
Big Soak: The boss casts Shattered Space, creating a large circle. After the explosion, it leaves a soakable circle that everyone on that side must stand in to clear.
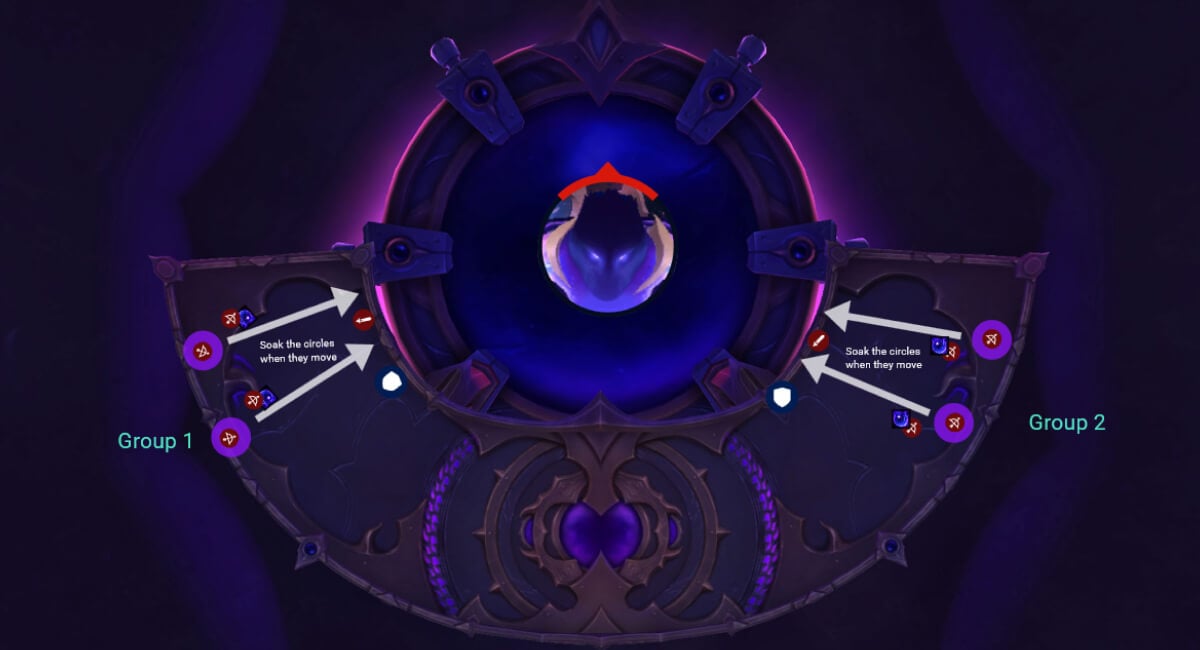
Gravity Soak: Two players per side get marked with Reverse Gravity. Place this close to the edge. When it goes off, those players get launched into the air. They can’t move, so players holding Excess Mass need to stand under the falling ring to pick them back up before they drift into the boss. More Mass players make it faster, but one is always enough.
After that, another Massive Smash happens in the middle, and the cycle repeats.
The second set is the same, but you’ll also get one Devour cast. Stack with your group and survive it.
The third set mirrors the first, and your goal is to kill the boss shortly after this one, to trigger Phase 2.
Phase 2
This phase is simpler mechanically, but extremely punishing if you mess it up.
You start floating in space, mount up, and fly through rings to reach the platform; avoiding Black Hole and beams on the way.
Optional: pick up Stellar Core (3) hiding near meteors. These let you deal bonus damage to the big add once you land.
Platform 1
Begin in the top-left section. The main goal is to create a gap by killing a specific Voidwarden and gripping two Nullbinders into it, then cleaving them down.
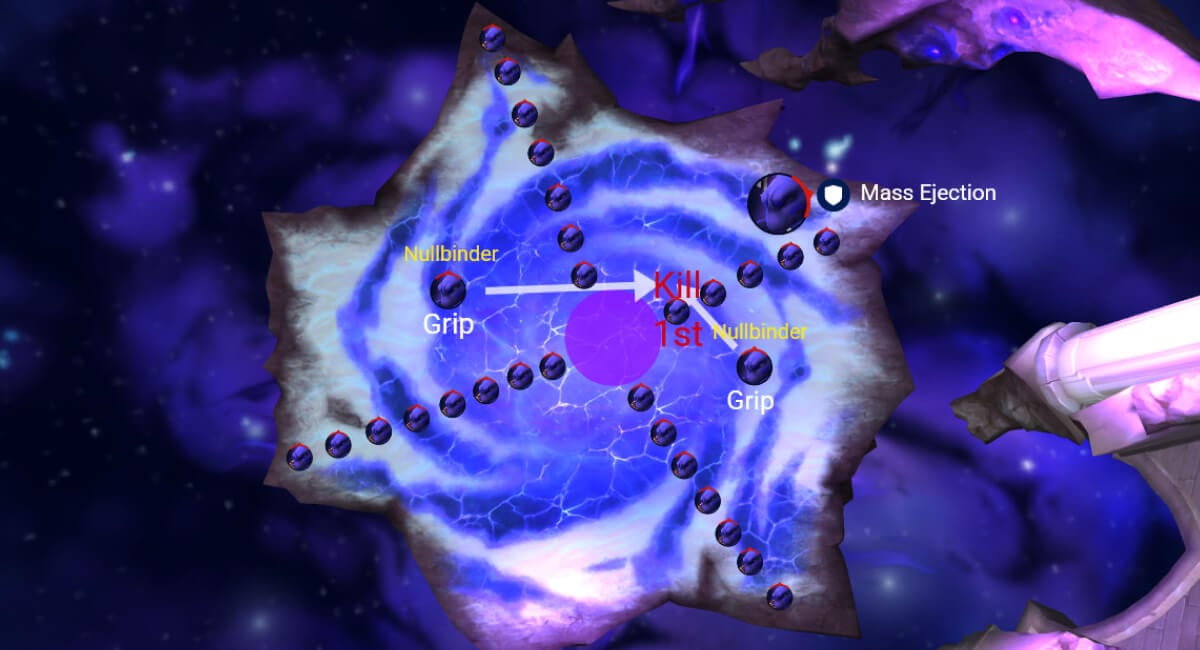
The tank picks up the big add and holds it at the edge until it casts Mass Ejection, which drops a puddle. Right after this, the boss raises his arm to cast Extinction. That’s the tank’s cue to decide which corner to move toward to dodge the meteor.
This is why the gap is needed.
After dodging, the tank positions the big add at the edge. Stack tightly for Gamma Burst, a pushback that you need to resist or risk being shoved into Voidwarden zones.
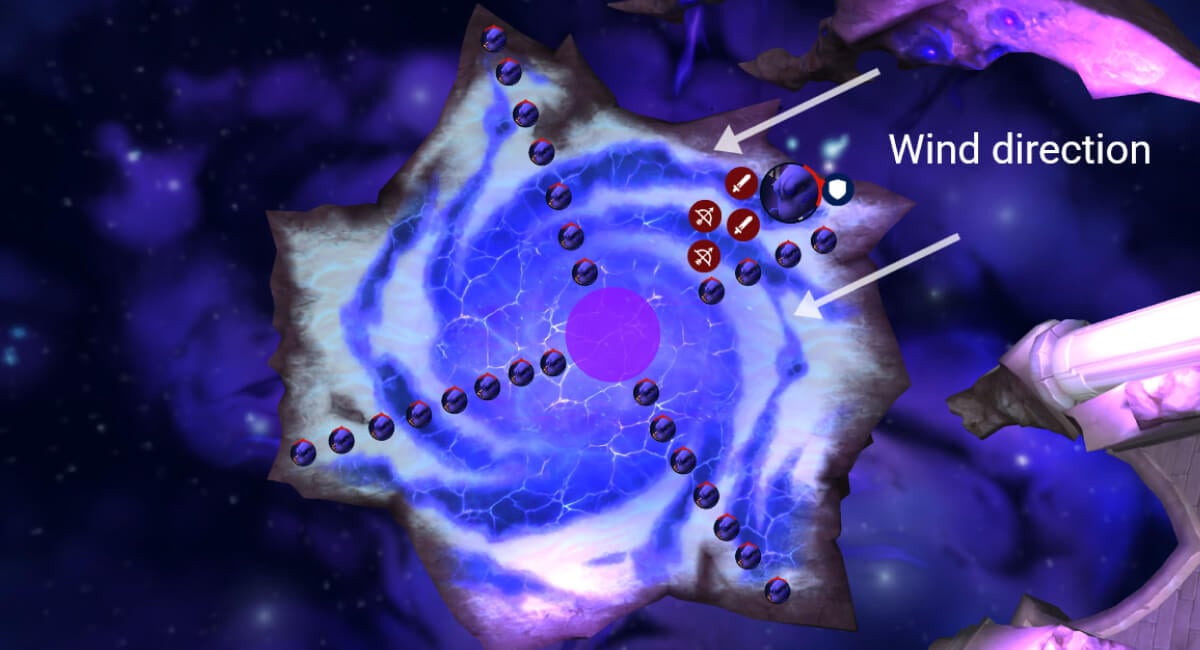
Small adds will respawn, repeat the same process as before. The big add should die after the second arm cast. Once it’s dead, the platform clears and you can fly again.
Platform 2
This platform works the same way, except the big add’s ability is slightly different. Instead of a line Mass Ejection, you get Stardust Nova which drops a large puddle around the add. The mechanics otherwise play out the same.
When the add dies, everyone is teleported to the final platform and Phase 3 begins.
Phase 3
At the start, the boss takes 50% increased damage for 15 seconds. Pop cooldowns and Hero and blast here.
Shortly after, 8 Voidstars spawn and begin orbiting the boss. Standing in them deals ticking damage, but they protect you from Devour, so you’ll need them later.
But first, you deal with Darkened Sky: three meteors fall one after another, each sending out a wave; the waves apply a 3-second debuff that increases damage from the next wave by 300%.
The goal is to always let the debuff drop before taking the next wave. The best way is to run to the first meteor as it spawns, get hit immediately, then move to the second meteor as your debuff falls off. Finally, take the third wave safely.
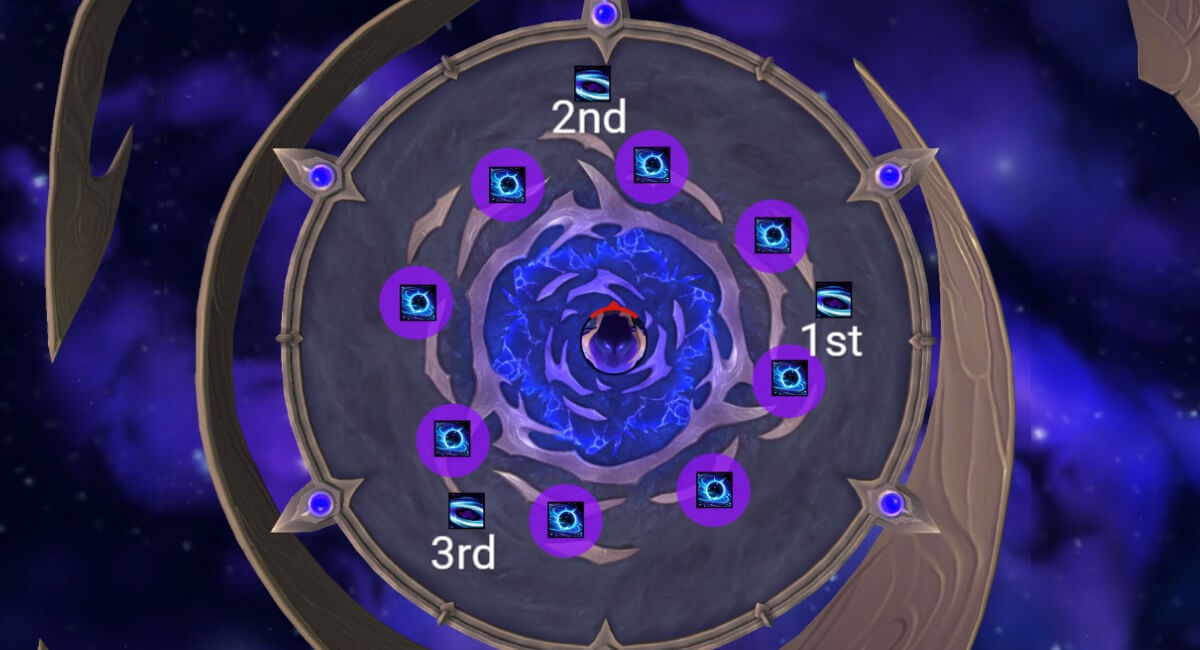
After that, the boss casts Devour. To survive, step into a Voidstar’s Gravity Well before the channel ends. Don’t rush in too early though, the damage inside is nasty.
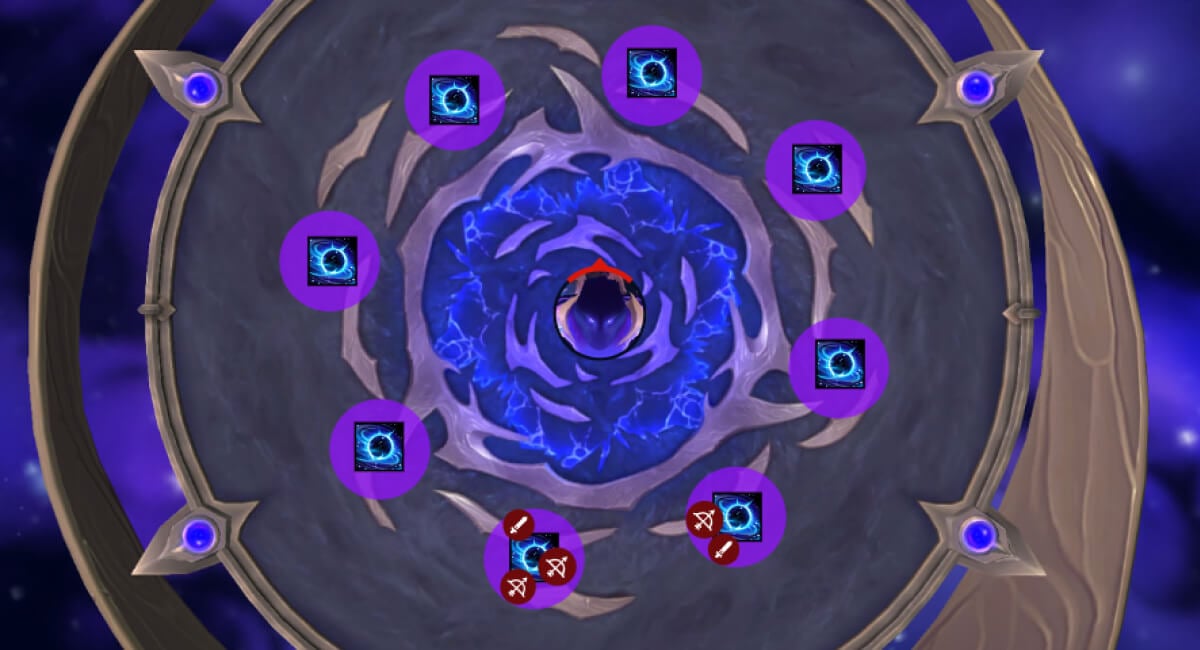
Things now escalate.
One Voidstar turns into a permanent Black Hole via Supernova. This makes it unusable and forces the raid to reposition because it deals distance based damage, but also conveniently lines up with where you want to be for tank mechanics.
Move clockwise towards the tank for the first grip.

Tanks deal with Cosmic Collapse, which requires everyone to stand close to the tank. When the grip happens, if you’re too far away and get pulled through the boss, you die.
Meanwhile, tanks also suffer from Fists Of The Voidlord (splash melee damage). Nobody else can stand near them at any time.
The movement pattern is key. After the first grip, move counter-clockwise to move far away from the Supernova cast that just happened around the area you were standing in, and get into position for the next set of waves.
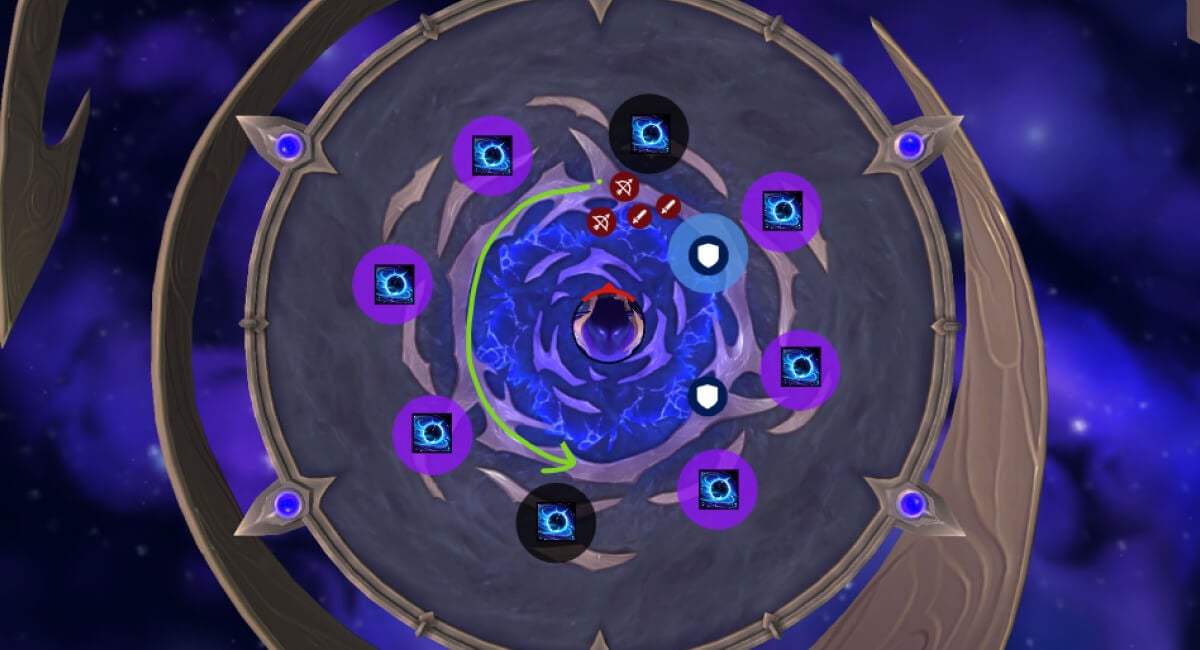
After waves are done, you’ll be gripped again to the other tank, make sure you’re close. Then run clockwise and repeat: waves, Devour soak, tank grip.
This cycle continues until the boss finally goes down.
WeakAuras
Northern Sky: Manaforge Omega WeakAura Pack
This WeakAura also requires the Northern Sky Anchors WeakAura and the Northern Sky Raid Tools Addon.
https://wago.io/NSManaforge