Raid Setup
Introduction
Welcome to our Heroic Fractillus Boss Guide, for the Manaforge Omega Raid. Learn about the fight mechanics, the strategy we recommend to defeat this boss on Heroic difficulty and how to avoid getting deleted by arcane swirlies five seconds in!
Fractillus isn’t here to fight, he’s here to build! Unfortunately, his dream project is a collapsing crystal prison made entirely out of you.
As the cosmic architect with anger issues, Fractillus has one goal: stack his walls just right and obliterate anyone who messes up the pattern. No symmetry? No survivors.
This isn’t just a boss fight. It’s like some cursed Tetris minigame, and if your raid doesn’t know how to rotate a block, things are going to fall apart fast.
Every wall matters. Every pin is sacred. And every time someone accidentally eats a wall they weren’t targeted by, a healer sheds a tear.
Fight Style: Single Target fight
Recommended Setup: 2x Tank / 4x Healer / 14x DPS
Required utilities: None
Hero/Lust usage: On Pull
Method Boss Review
What can I say, bravo Blizzard. A Tetris-inspired boss that somehow manages to feel fresh, satisfying, and not at all annoying to play. There’s no bloated filler, no unnecessary movement gimmicks, just a super clean, scripted fight where everyone has a job, and doing it well actually feels rewarding.
Once the wall strategy clicks for your raid, the whole encounter flows like Sludgefist, punchy, repeatable, and extremely fun to execute. I’m fully expecting Mythic to crank things up to chaos, and honestly? Bring it on. If tuning holds, this could go down as one of the most memorable fights in recent history.
Method Boss Rating: (5/5)
Easy Mode
Wall Management is the fight. Don't stack 6 walls on one pin.
Phase Flow:
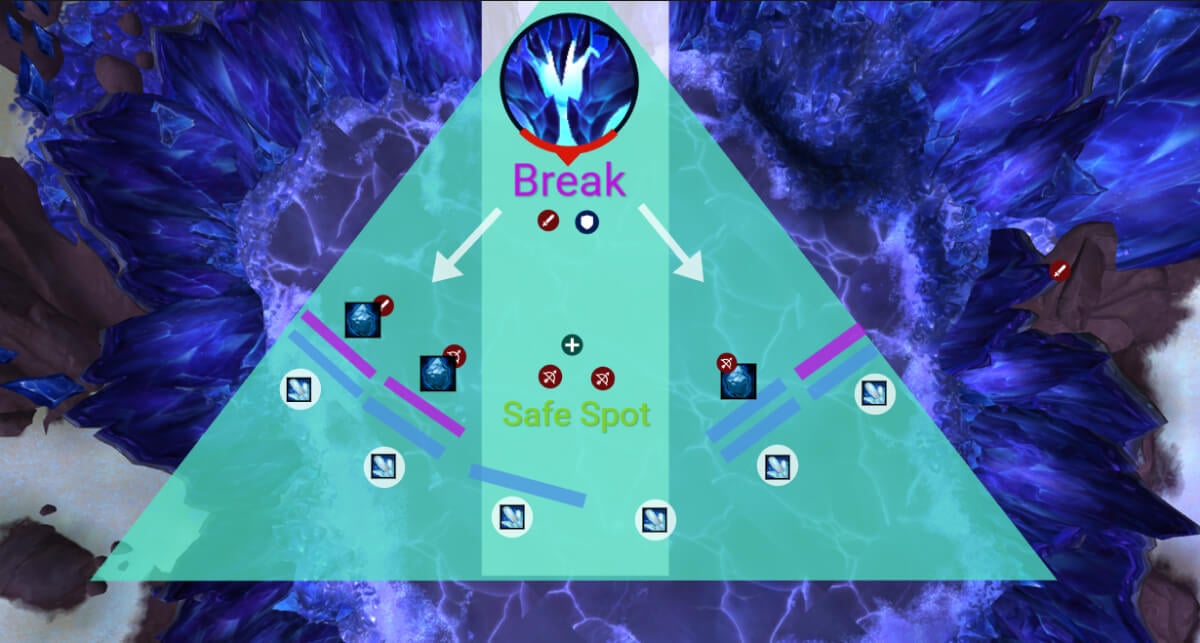
- Start the fight stacked in the middle
- First 4 wall targets: send 2 left and 2 right (one per pin)
- Everyone else stays mid (safe from wall path)
- Tank places wall mid, everyone moves out
- Second wall set: 2 left and 2 right (avoid stacking on same pin again)
- Everyone else mid
- Shattering Backhand at 100 energy:
- 3 players get launched; stand in front of walls to break them
- Prioritize high-stack pins (especially Void walls)
Repeat the rotation:
- 4 players: wall the sides
- Tank: wall mid
- 4 more players: wall the sides
- Break 3 walls again
Enrage Planning:
- If you don’t track wall stacks, the boss will enrage
- Always break at least 1 wall per side rotation
- After 2 full loops, sides are near capacity
- After 3 loops, you MUST start placing walls mid
Extra Reminders:
- Void wall: spread with Null Consumption.
- Wall breaks: avoid the swirlies.
- Don't get hit by someone else’s wall. Just don’t.
- Shockwave Slam: tank buster. Swap and don’t place in a stacked lane.
- Refracted Entropy ramps with each wall alive. Don’t leave extras up too long.
Mechanics
Fractillus marks multiple players with a black orb above their head and white arrows pointing from himself. After a few seconds, he slams the ground in their direction with Crystalline Shockwave, launching a Crystal Nexus at them.
Players hit are afflicted with a ticking DoT that lasts 12 seconds.
A Crystal Nexus wall is created behind the player in the direction of the slam.
A basic crystal wall spawned by Entropic Conjunction or Shockwave Slam.
Each wall increases passive raid damage via Refracted Entropy.
Can be destroyed by knocking Hardened players (Crystal Encasement) into it during Shattering Backhand.
If 6 walls are stacked on top of each other, the boss enrages (do not let this happen).
When destroyed, shards explode and send out small puddles that deal moderate damage to players hit by it.
A darker blue version of the standard wall.
Destroys like a normal wall, but also afflicts several players with Null Consumption.
Affected players take ticking damage for 6 seconds.
Afterward, they explode in a Null Explosion, dealing ~5 million Shadow damage to anyone within 10 yards.
Players must spread out when afflicted, to avoid chain explosions.
At 100 energy, Fractillus starts a combo:
- Applies Shattershell to 3 players, a ticking DoT for 8 seconds.
- After the DoT, players become rooted for 4 seconds.
- Fractillus knocks all rooted players backward, and if they hit a Wall, it is destroyed.
Massive tank buster. Deals extreme Physical damage and applies a 500% vulnerability debuff for 55 seconds.
Also spawns a Crystal Nexus behind the tank.
Strategy
This fight is basically crystal Tetris, and you’re the person trying to place the blocks correctly. The entire encounter revolves around managing wall placements and not eating walls that weren’t aimed at you.
Wall Management 101
There are six pre-placed crystal pins in the room (Nether Prism), and whenever the boss targets a player with Crystalline Shockwave, a wall will be launched toward them and automatically snap to the closest pin in its path.
So what’s the catch? If six walls stack on one pin, the boss enrages, and it's time to go again.
Fight Flow & Strategy
Pull & First Set
Start the fight with everyone stacked in the middle. The first wave will mark 4 players with Entropic Conjunction, these are your first wall targets.
Send 2 left and 2 right. Make sure it's one wall going to each pin. No one should be anywhere near the firing lane except those 4 players, so everyone else should be in the middle.
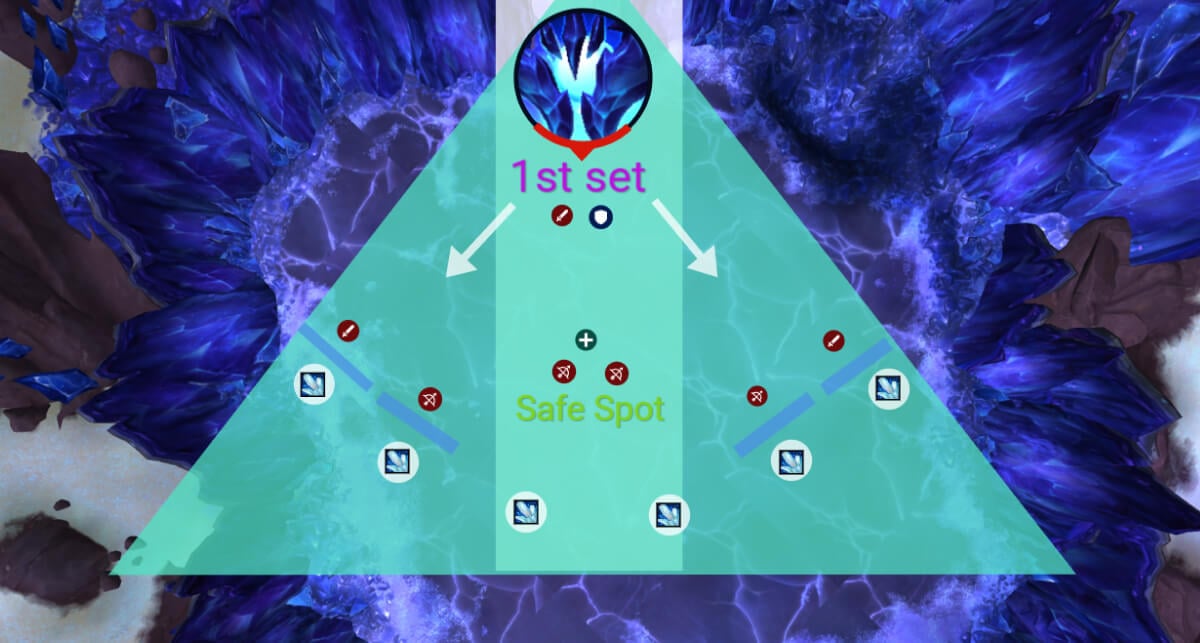
Once walls are down, everyone moves out of the middle to let the tank drop their wall right in the center.
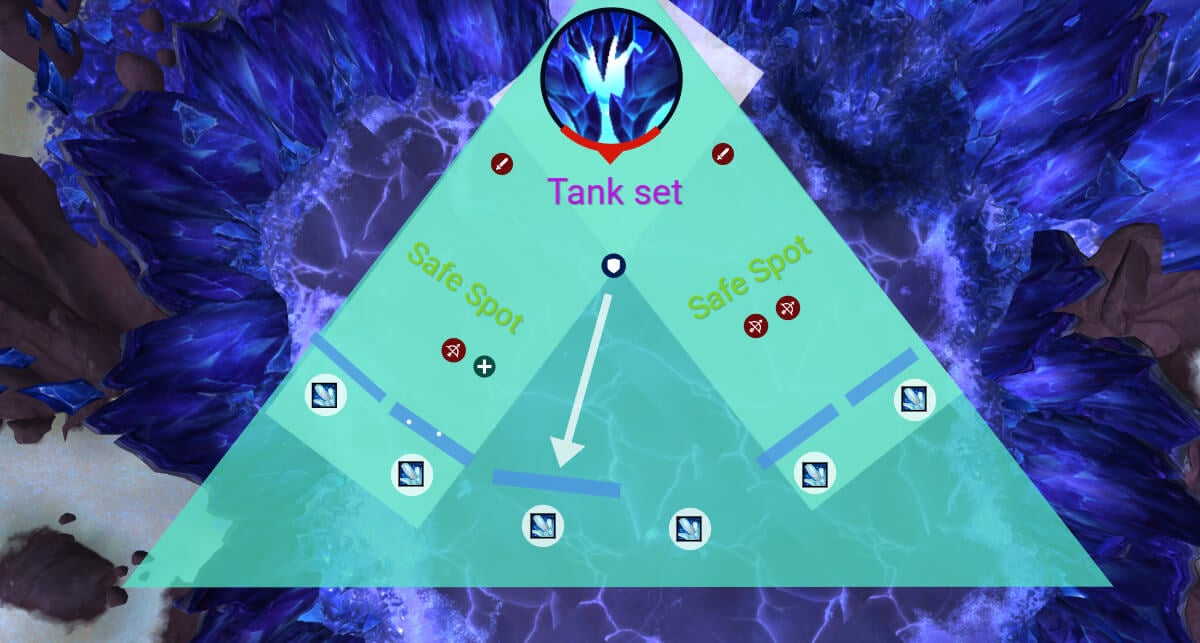
Now that’s 5 walls placed: 4 on the sides and 1 in the middle.
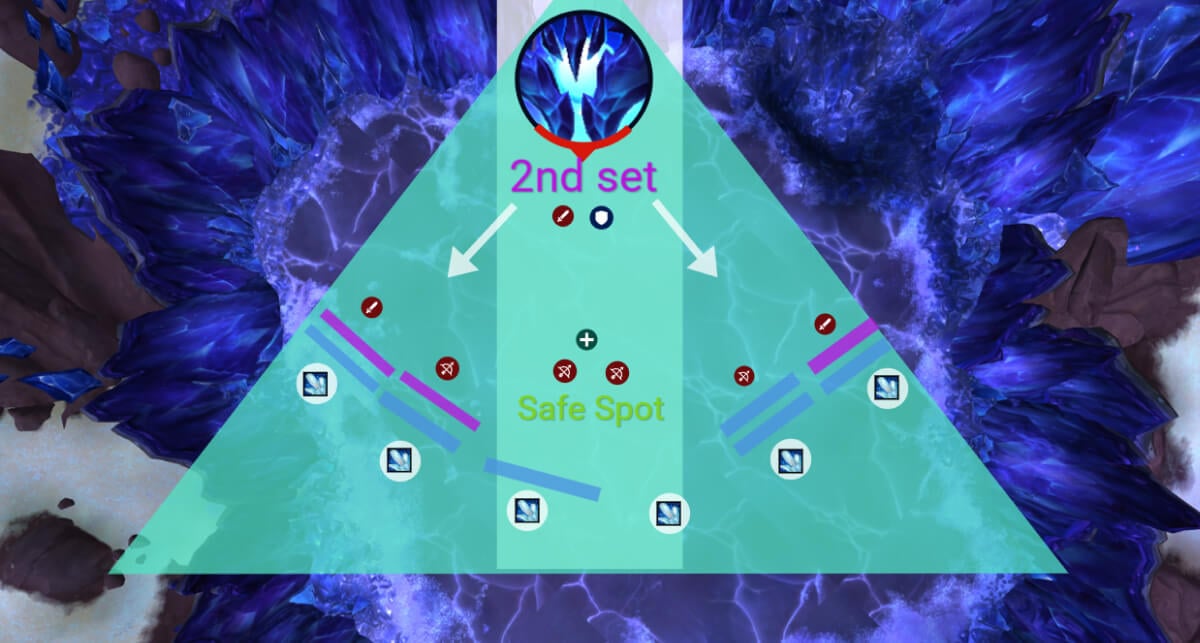
Second Set
Right after, 4 more players get wall debuffs, with 3 of them being Void-Infused Nexus Walls.
It’s the same idea for this set: split 2 left and 2 right, avoid doubling up on previous pins when possible.
Everyone else should go back to middle, for safety while the wall squad handles placement.
Wall Break
At 100 energy, Shattering Backhand happens. 3 players get Shattershell, and when rooted (Crystal Encasement), they’ll be launched backward, this is how you destroy walls.
Each player should stand in front of a wall (distance doesn’t matter).
Break the walls on the Left and Right pins, prioritizing pins that are starting to stack up.
Try to avoid breaking all 3 Void walls in one go, it helps smooth out future Void spawns.
And Repeat!
Once the slam clears 3 walls, you start the pattern over:
- 4 players go left and right with wall debuff
- Prioritize pins with the least amount of walls on them
- Everyone else go back to middle (safe spot)
- Tank wall goes to middle, everyone else move away from middle
- Second set of walls (left and right again), with middle being the safe spot for the rest of the raid
- Do the Wall break
Wall Tracking & Enrage Planning
After the second full rotation, if you’ve done it cleanly, your pins might look something like:
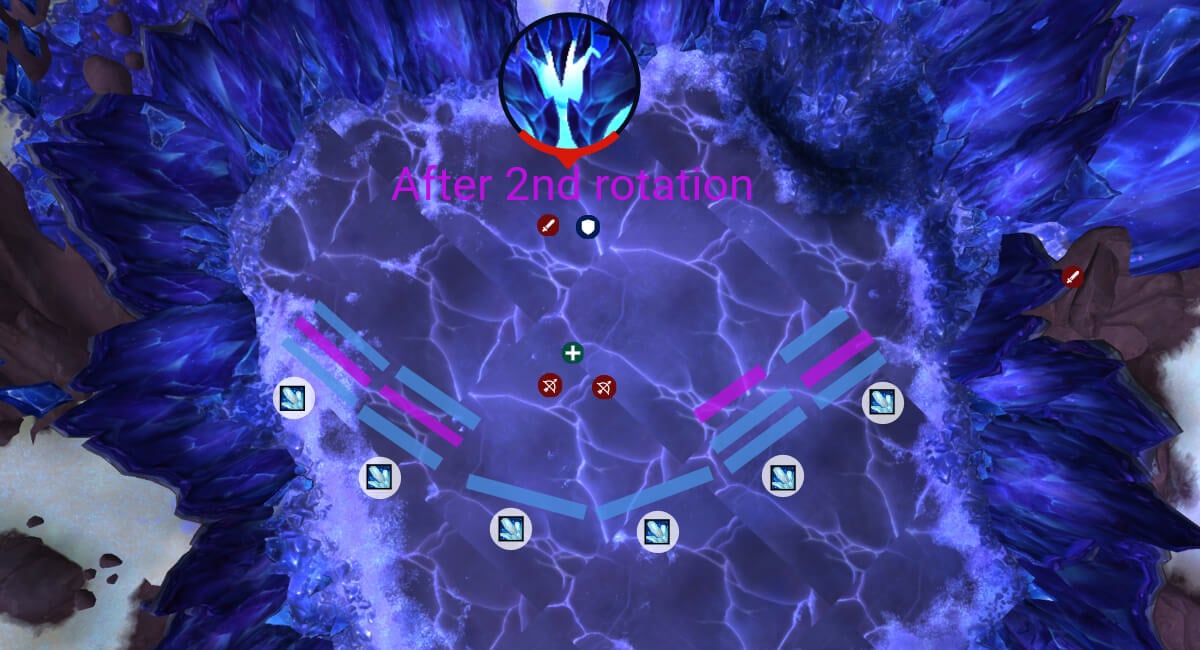
- LEFT: 3 walls (1st round) + 3 walls (2nd round) = 6 total
- RIGHT: 3 walls + 4 walls = 7 total, BUT if you broke 1 during wall break, it's down to 6 max
Make sure to always break one from the highest stack, this is what prevents the enrage.
After the third rotation:
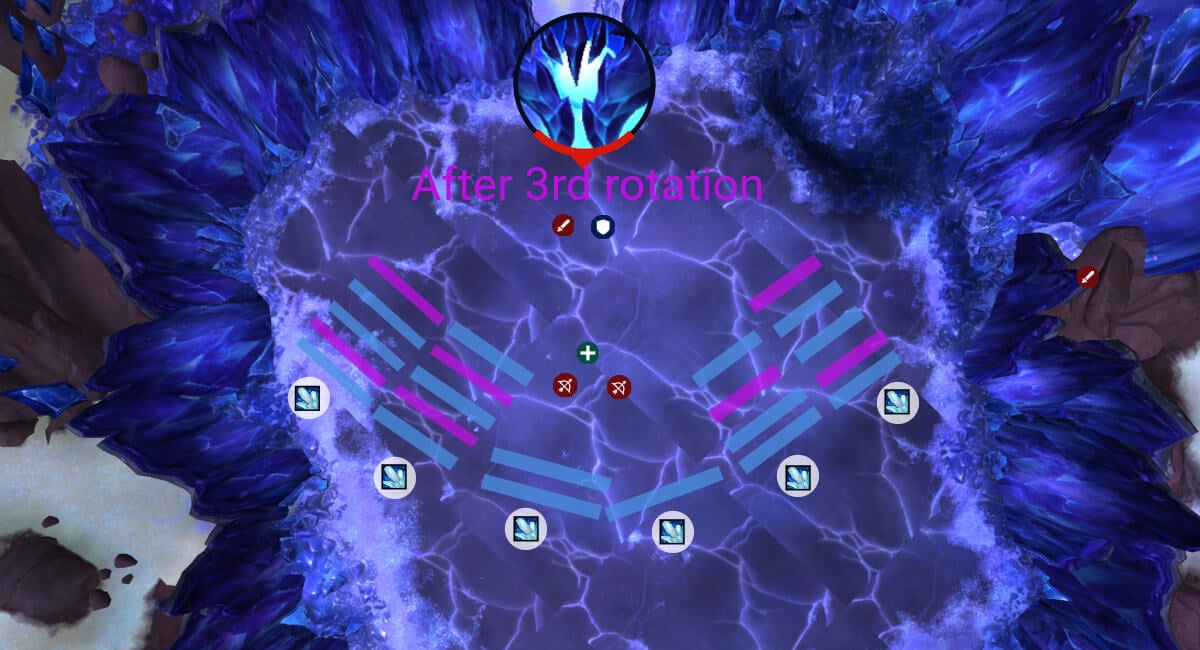
- LEFT: 5 + 5 = 10 total
- RIGHT: 4 + 5 = 9 total
At this point, you MUST have 1 player break per high stack(5) wall (aim to break both sides each time).
After this, you’ve fully saturated your side pins, you now have to start placing them in the middle pins, while the tank places on the sides. This becomes your race against the enrage, before the 6th wall can ever land there.
Other Stuff to Not Die To
- Null Consumption (Void wall explosions): Spread when you get it
- Crystal Nexus explosions: Break a wall? Don’t stand in the swirlies it leaves.
- Crystalline Shockwave: Only the targeted player should be in the wall’s path. Everyone else, be in the safe spots.
- Shockwave Slam: Tank buster, tank swap and never drop it in a stacked pin lane.
- Refracted Entropy: The more walls are alive, the more raid damage goes out. Don’t be greedy on wall breaks.
WeakAuras
Northern Sky: Manaforge Omega WeakAura Pack
This WeakAura also requires the Northern Sky Anchors WeakAura and the Northern Sky Raid Tools Addon.
https://wago.io/NSManaforge