
Raid Setup
Introduction
Welcome to our Heroic Loom'ithar Boss Guide, for the Manaforge Omega Raid. Learn about the fight mechanics and the strategy we recommend to defeat this boss on Heroic difficulty!
Once a masterful construct built to stabilize arcane threads across the Nexus, Loom’ithar was designed to weave order from chaos. Unfortunately, after a few thousand years alone with nothing but leyline static and a room full of silk, it’s gone from “guardian of balance” to an “arcane spider grandma”.
Now it’s less about stabilizing magic and more about trapping intruders in layers of glowing thread and arcane ichor. Step too close, and you'll find yourself rooted, silenced, or soaked in enough purple goo to ruin any chance of clean movement.
You're not here to fight a boss, you're here to unravel one.
Fight Style: Single Target fight
Recommended Setup: 2x Tank / 4x Healer / 14x DPS
Required utilities: None
Hero/Lust usage: Phase 2 - When the Cooldowns line up
Method Boss Review
This fight fails to deliver in many ways. While the visuals and theme are cool enough, there’s a noticeable lack of engaging mechanics to keep players on their toes, even on Mythic difficulty. Phase 1 quickly becomes repetitive, and Phase 2, while slightly more intense, still boils down to a predictable soak and rotate routine.
That said, it’s not all bad. The final burn phase will at least feel satisfying for DPS players chasing big numbers, and coordinated groups can enjoy squeezing value out of cooldown rotations.
Method Boss Rating: (2/5)
Easy Mode
Phase 1:
- Tank aims Piercing Strand through Woven Ward to make it attackable
- Break the ward to create a gap in the collapsing silk ring
- Players with Infusion Tether should:
- Blink/teleport out early if possible
- Otherwise, wait for the gap, run out, and break safely
- Don’t stand in Living Silk puddles (they stun and tick hard)
- At 100 energy: run to the edge to avoid Overinfusion Burst
- Watch for puddles blocking your path
Phase 2 (55% HP):
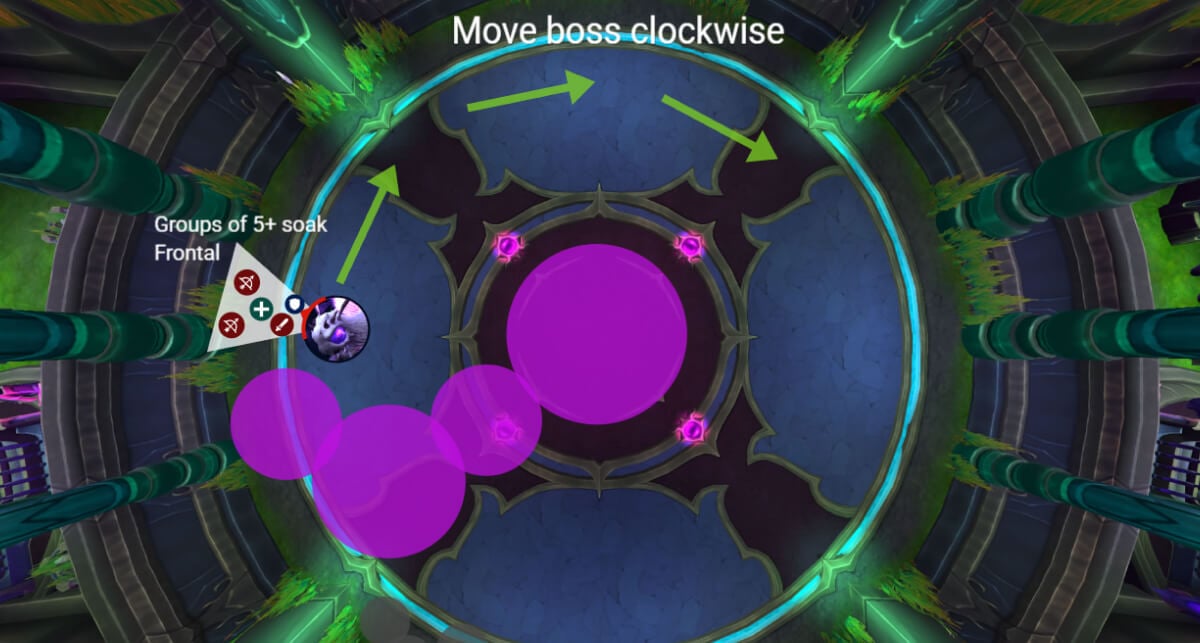
- Boss becomes mobile, drag her clockwise along the outer wall
- Don’t stand in purple Arcane Ichor puddles
- Alternate soak groups for Writhing Wave (5+ players per wave)
- Use Hero/Lust and burn boss before room fills up or raid collapses from soft enrage
- Use cooldowns on Writhing Wave + Arcane Outrage overlaps
Mechanics
Loom’ithar creates a shrinking ring of arcane silk that roots any players hit for 8 seconds.
- Getting caught deals moderate Nature damage and locks you in place.
- The ring disappears as Infused Tangles are destroyed.
On Heroic, each Infused Tangle is shielded by a barrier that prevents all damage.
The only way to break the shield is by hitting it with Piercing Strand.
A tank mechanic that fires a massive arcane line through the current tank.
- Hits all players in the path for huge damage and applies a 1000% vulnerability.
- Must be solo-soaked and requires an immediate tank swap.
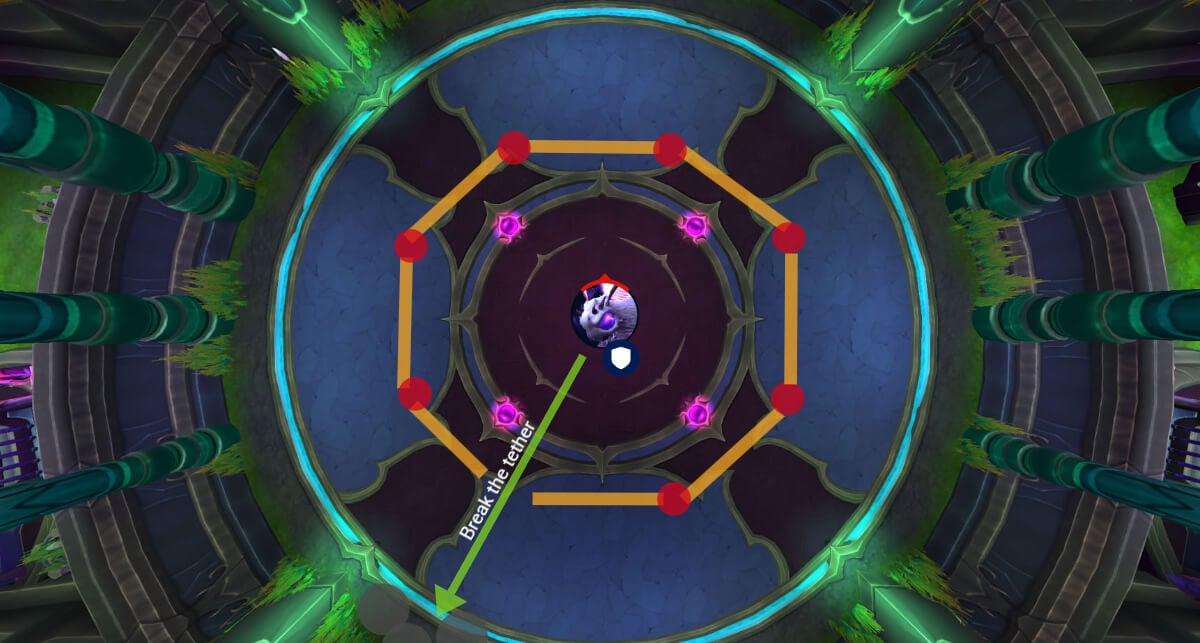
Several players are pulled toward the boss and tethered with silk strands that deal increasing Arcane damage over time.
- Running 40 yards away snaps the tether and drops a puddle of Living Silk.
- Standing in Living Silk when the tether ends will stun the player with Silken Snare.
Puddles left behind after tethers snap. Deals ticking Nature damage and slows movement by 25%.
Deals heavy raid-wide damage over 8 seconds, then ends with a massive explosion. The explosion hits all players within 45 yards.
Small swirlies rain down randomly from above. Standing in them deals moderate Arcane damage.
Pulsing AoE that ticks on the entire raid throughout the fight. Increases in frequency and intensity in Phase 2.
When Phase 2 begins, Loom’ithar crashes down and knocks everyone away.
Also increases damage taken by the boss by 33% for the rest of the fight.
Frontal cone split between players.
- Deals massive Nature damage, then a DoT for 25 seconds.
- Must be soaked by at least 5 players.
- Anyone hit takes 350% increased damage from the next Writhing Wave.
- Split the raid in 2 groups for this and alternate each time.
Phase 1
The boss stays locked in the middle of the room the entire phase, and your only job is to handle two mechanics properly.
Lair Weaving & Piercing Strand
Lair Weaving is a big ring of silk that slowly closes in around the boss. Getting hit by it roots you and deals big Nature damage.
You can create a gap in the ring by destroying a Woven Ward, but it’s protected.
The tank needs to aim Piercing Strand through the ward to break its shield and make it hittable.
Once it's attackable, burn it fast to create a safe passage and run out.

Infusion Tether
Several players get tethered (Infusion Tether) to the boss and are slowly dragged in. The damage increases over time, and when the tether breaks, you drop a puddle.
If you're still in the puddle, you get stunned and ticked to death.
Ideal players (with teleports/blinks) should break early to reduce strain on healers. Everyone else: wait for the Woven Ward gap, then run out and snap the line.
Overinfusion Burst at 100 Energy
Loom'ithar casts Overinfusion Burst, a giant blast, covering most of the arena. Run to the edges to avoid it.
It gets tricky if too many puddles are near the walls, so place puddles with some foresight.

That’s all of Phase 1. The ring comes in, you break a ward, players break tethers, boss explodes, you run out of it, repeat until Loom'ithar hits 55% health.
Phase 2
At 55%, Loom’ithar breaks free, smashes the ground for raid-wide damage, and becomes fully mobile. This is when the real fight starts.
From here on out, the boss is constantly dropping Arcane Ichor; massive purple puddles that persist and deal extreme damage to anyone standing in them. To manage space, you’ll want to move the boss toward the edge of the room and kite her slowly clockwise as the floor fills up.
Meanwhile, she casts Writhing Wave, a massive frontal cone that needs to be soaked by at least five players. Anyone hit by it gets a nasty DoT for 25 seconds and takes 350% increased damage from the next wave. If fewer than five people soak, the boss shields herself instead.
This means you’ll need assigned soak groups alternating every cast, no winging it here or you’re wiping.
The longer this phase goes on, the more damage the boss deals. Arcane Outrage pulses through the raid and starts stacking up fast. Eventually, the room becomes nearly unplayable with puddles and random spellstorm swirlies.
This is your burn phase, use Heroism/Bloodlust here and throw every cooldown you have to finish the boss before the room finishes you.
WeakAuras
Northern Sky: Manaforge Omega WeakAura Pack
This WeakAura also requires the Northern Sky Anchors WeakAura and the Northern Sky Raid Tools Addon.
https://wago.io/NSManaforge