
Raid Setup
Introduction
Welcome to our Heroic Forgeweaver Araz Boss Guide, for the Manaforge Omega Raid. Learn about the fight mechanics, the strategy we recommend to defeat this boss on Heroic difficulty and how to avoid getting deleted by arcane swirlies five seconds in!
Forgeweaver Araz is where arcane energy is so unstable that even standing still feels like a poor life choice. This boss is basically a magical Roomba gone rogue, vacuuming up energy from everything it can to power up a forge that clearly should’ve been shut down.
You'll spend most of the fight dodging swirlies, soaking explosions, and herding adds, all while making sure the boss doesn’t accidentally high-five his own Echo and go Super Saiyan. And just when you think you’re getting the hang of it, Araz decides it’s time to open a black hole and slowly pull everyone into it. Fun!
Strap in, because nothing says “great raid design” like managing spatial awareness and babysitting energy blobs at the same time.
Fight Style: Multi-Target fight
Recommended Setup: 2x Tank / 4x Healer / 14x DPS
Required utilities: None
Hero/Lust usage: Phase 2 or during Intermission Damage AMP
Method Boss Review
Being positioned as the 4th boss of the raid, this is an overall decent experience. There isn’t much innovation here, but fights with lots of easy cleave targets and big damage amp windows are always more fun to play. The pacing feels solid, and the fight flows well once you understand the rotation.
There’s definitely potential for this to be a bit of an early DPS check, especially with how the last phase works, getting pulled toward a black hole with a ramping enrage effect is a cool mechanic, but it could get spicy if tuning is tight.
Method Boss Rating: (3/5)
Easy Mode
Phase 1:
- Pull the boss to the left (orange) to activate the first collector.
- Soak Arcane Obliteration at bottom (blue) and spawn the big add there.
- Astral Harvest targets go to blue to stack small adds with the big one.
- Move the boss to the right (purple) to activate the next collector.
- Repeat the Arcane Obliteration soak and Astral Harvest at blue.
- After 2 soaks, spawn the remaining small adds in the center and cleave them down.
- Keep Echoes 20+ yards from the boss.
- Dodge Tempest swirlies.
- Slow or kill Manifestations before they reach a collector.
Intermission:
- Split the raid into two groups; send one to purple and one to orange.
- Kill both Collectors before Arcane Convergence.
- Focusing Iris: At 100 Energy, a Collector channels a beam. Tank Shielded Attendants close to the Collector and in the beam, everyone else avoids the beam.
- Once Collectors are dead, drag the adds to the boss and blast them during the 12 second damage amp.
- Kill the adds after the damage amp ends to avoid Tank deaths from stacking attack speed.
Repeat Phase 1:
- Same as before; reuse blue for soaks and Harvests.
- Spawn the remaining adds in the middle once all Collectors are active
Second Intermission:
- Same as the first Intermission, but now you’re dodging circle impacts instead of lines.
- Kill Collectors, burn the boss during the damage amp and clean up adds.
Phase 2 (Burn):
- Constant pull toward central Singularity. Use movement to resist.
- Kill Manifestations before they reach the edge.
- Spawn them on top of the boss for cleave.
- Avoid swirlies.
- Hard focus the boss before the pull kills you.
Mechanics
The boss applies a stacking Arcane DoT to the current tank that ticks every 2 seconds for 46 seconds. A tank swap is required at around 5 - 6 stacks.
Targets the current tank with a massive raid-wide blast. Damage is reduced based on how many players are within 10 yards of the impact location. Anyone soaking also receives a healing absorb and Astral Mark, which prevents them from soaking the next Arcane Obliteration.
Additionally, Arcane Echo will be spawned.
Arcane Echo
Spawns at the location of Arcane Obliteration and mimics all of Araz’s casts.
If the boss and an Echo are within 20 yards of each other, both gain 75% increased damage done and 90% reduced damage taken. Keep them separated at all times.
Fires Arcane blasts at random player locations over 3 seconds.
Getting hit deals damage and pacifies the player for 6 seconds.
This cast comes from Arcane Echo.
Same effect as Echoing Tempest, but cast directly by the boss.
Knockback combined with moderate raid-wide Arcane damage. Players must be mindful of positioning to avoid getting thrown into bad stuff.
A debuff is applied to several random players, dealing Arcane damage over 4 seconds. When it expires, an Arcane Manifestation spawns at the player’s location.
This add moves towards the closest Arcane Collector. If it reaches the Collector, it triggers Astral Surge which deals a large burst of Arcane damage followed by a 16-second raid-wide DoT. Manifestations can be cc’d but need to be killed before they become cc immune.
If a Manifestation touches the boss, it becomes immune to crowd control and moves 99% faster.
Arcane Collector
The boss will activate the Collector closest to it, or a random one if tanked in the middle.
Once active, the Collector begins casting Prime Sequence, sending out waves of Arcane Energy that deal heavy damage and must be dodged.
While active, Arcane Siphon applies a ticking Arcane DoT to the entire raid. This makes each P1 deal more damage towards the end, because you will have 3 active Arcane Collectors.
Arcane Manifestations will attempt to reach the active Collector, triggering Astral Surge if successful. Preventing this is critical to avoid heavy raid-wide damage.
During intermission, the Collector’s Arcane Barrier drops, making it vulnerable. If not destroyed in time, the boss casts Arcane Convergence, dealing 4 million Arcane damage per active Collector. A maximum of 3 can be active.
During this phase, it also casts Photon Blast, a frontal line attack that must be dodged.
Triggers during the first intermission. Applies a stacking Arcane DoT to the raid over 6 seconds.
Triggers during the 2nd intermission. AoE circles. Players hit gain Astral Burn, a stacking DoT that lasts 10 seconds.
When a Collector reaches 100 energy during the Intermission, it will channel a beam (Focusing Iris) into the middle of the room, this beam deals massive raid wide damage. If there are adds in between, they will interrupt the beam and soak the damage instead.
Tanks should move adds close to the Collector and into the beam to interrupt the beam and soak the damage instead. Everyone else should move out of the way of the beam when this happens.
Two adds that have a massive absorb shield, and gain attack speed the longer they hit the same target (Ramping Power), so if they live too long, they will absolutely delete your tanks. Tanks need to swap adds to keep the stacks as low as possible.
Spawns on the side of the arena and begins pulling all players toward it. The pull intensifies over time.
Any player who reaches the Singularity is instantly killed by massive Shadow damage.
Debuff that deals Shadow damage over 4 seconds. Once it expires, a Void Manifestation spawns at the player’s location that triggers Void Surge if it reaches the Singularity.
Strategy
Phase 1
Start the pull by dragging the boss over to the left side collector (orange marker). This will activate that collector first, which is what we want. The fight always opens with the same sequence: first comes a group soak (Arcane Obliteration), then a debuff that spawns little adds (Astral Harvest).
Once the collector is active, move the boss to the middle of the room. When the group soak comes out, have everyone soak it at the bottom side (blue marker). This spawns the big add (Arcane Echo) there, and since it's far from the boss, it won’t trigger the buff that happens if boss and Echo are too close (you really don’t want that).
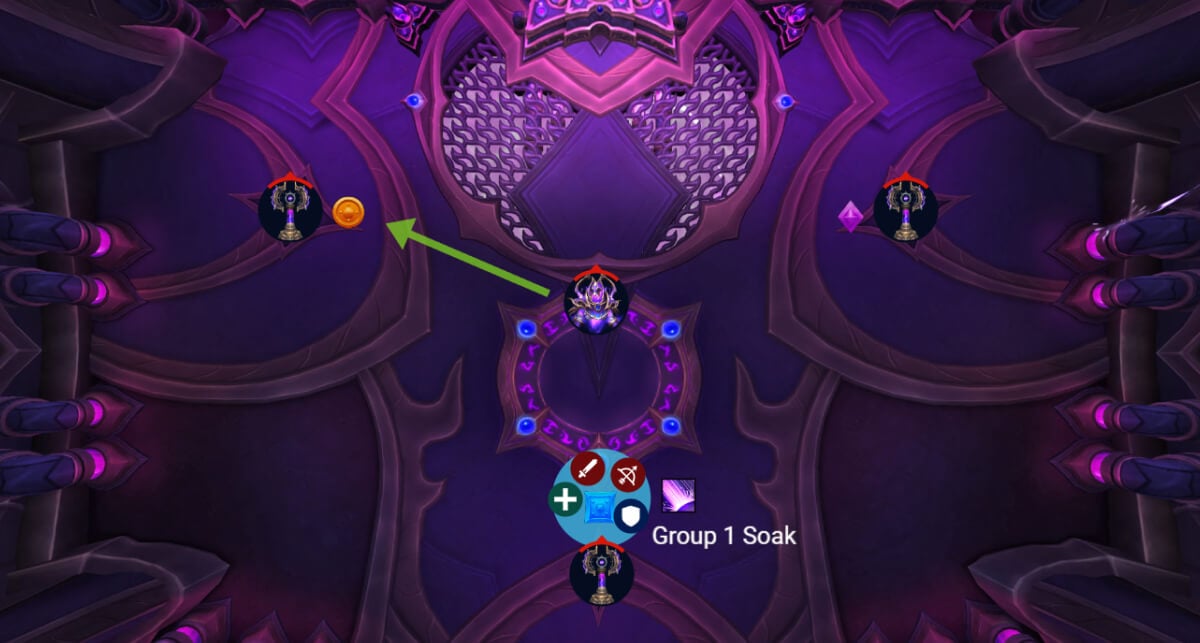
After that, the boss targets 3 players for Astral Harvest. They’ll each spawn a small add (Arcane Manifestation) at their location. Have all 3 players go down to blue as well, so all the adds stack up with the big Echo. Makes it easier to cleave and keeps things neat for the next collector.
Positioning Round 2
Once all that’s out, move the boss to the right side (purple marker) to activate the second collector.
The next group soaks and the next Astral Harvest should also go to blue, just like before. So we’re basically funneling all the danger into the same corner and not scattering chaos all over the room.
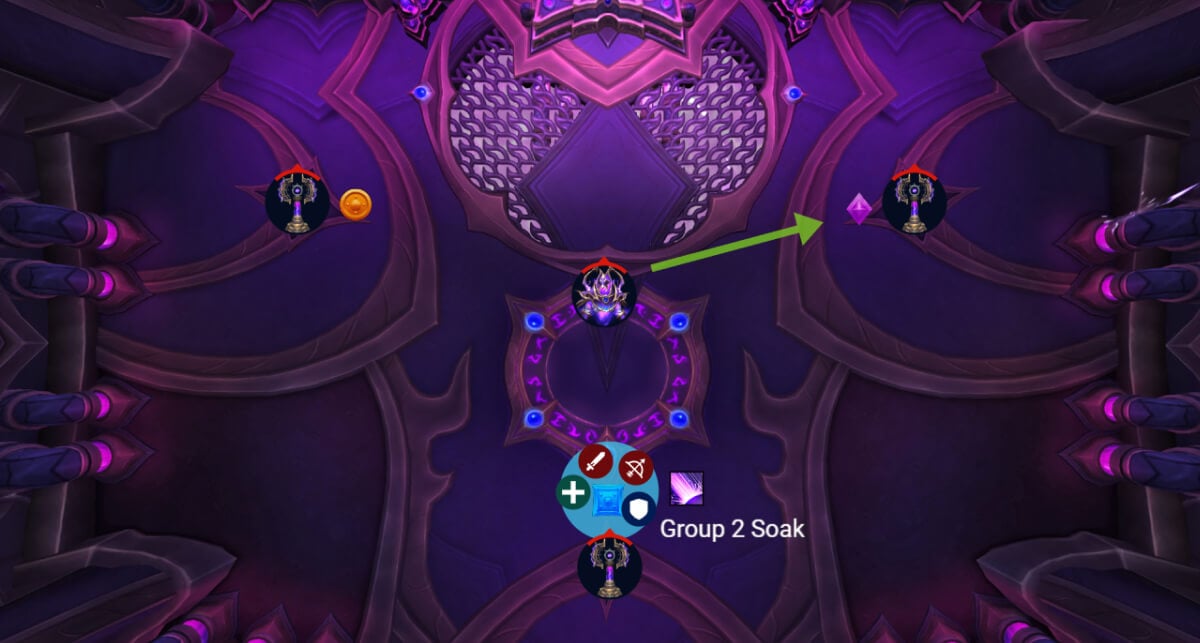
You’ll only get 2 Arcane Obliteration in this phase, but you’ll get several Astral Harvest. That means once all 3 collectors have been activated (left, right, bottom), any further small adds should be spawned in the center of the room. Just gather them up and nuke them down ASAP before they cause issues.
First Intermission
At 100 energy, Araz starts the intermission.
Split the raid into two equal DPS groups. One goes to the purple collector, one to orange. You want to kill these two before the Arcane Convergence cast goes off, otherwise the raid takes 4 million damage per surviving collector; not ideal. Once Focusing Iris is cast on a random collector, players need to move out of it as it deals massive damage for a few seconds.
At the same time, two big adds (Shielded Attendant) spawn. Tanks should grab them and move them to a collector with the highest energy, because when it reaches 100, it will channel a beam (Focusing Iris) into the middle of the room, this beam deals massive raid wide damage. If there are adds in between, they will interrupt the beam and soak the damage instead. The collector that starts with highest energy is random, but from there, you see which one is the next that is going to get energy, so just move the adds around accordingly.
Everyone else should make sure to avoid the beam.
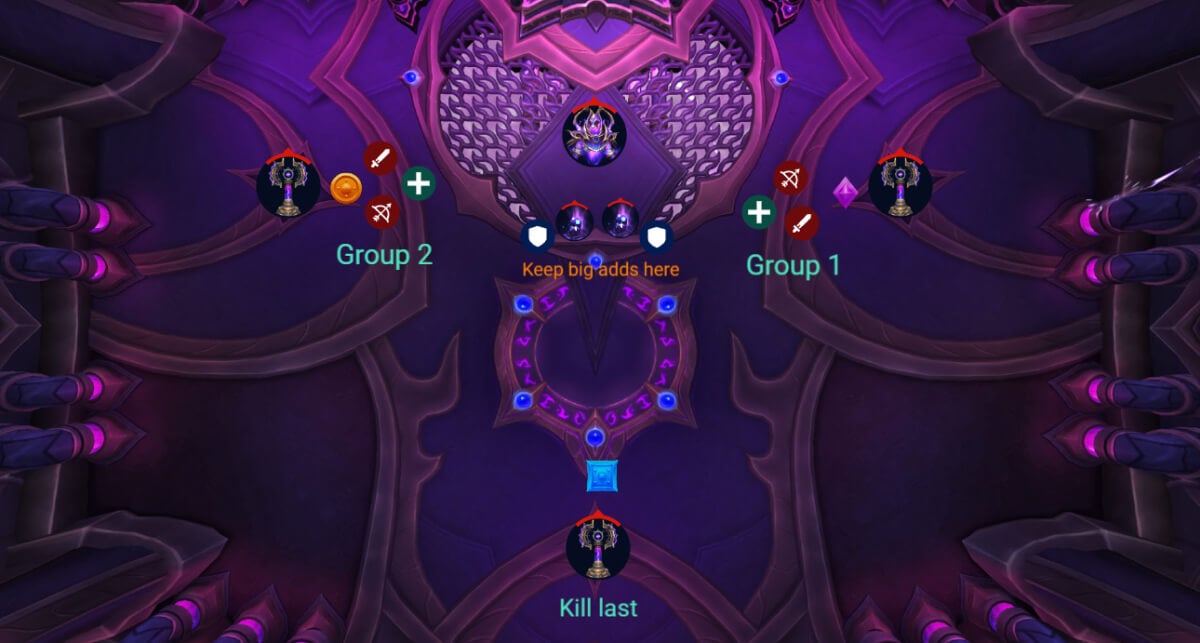
Once all three collectors are dead, drag both Shielded Attendants to the boss, because Araz enters a 12-second 100% damage taken phase. This is your burn window. Use everything.
After the burn ends, swap full focus to the Attendants. They gain attack speed over time while hitting the same target, so if you leave them alive too long, they’ll absolutely flatten your tanks.
Reset and Repeat
After the intermission, the fight repeats from the start. You’ll do the collector activation and add management just like before.
Second Intermission
Same idea as the first intermission, but this time you’re dodging circles instead of lines. Otherwise, split and burn collectors just like before. Use the burn window, then kill Shielded Attendants again.
Phase 2
Once all that’s done, you enter the final phase. It’s a full burn.
Everyone is constantly being pulled toward the edge of the arena by the Dark Singularity. If you get sucked in, you die. Use movement abilities.
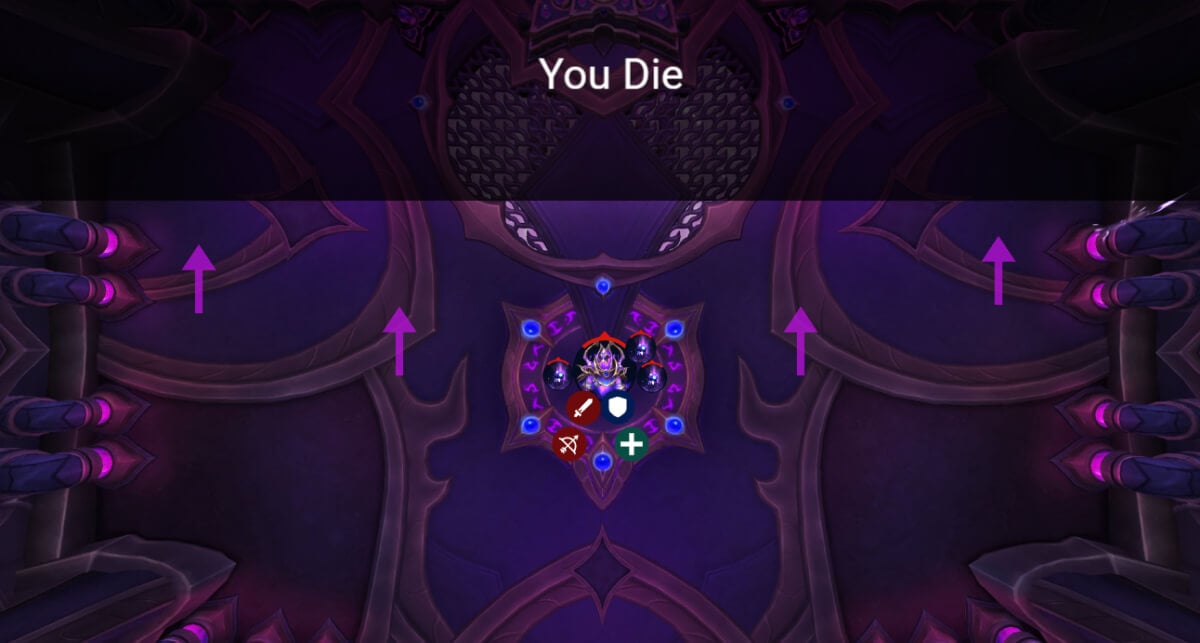
Astral Harvest is still happening here too, but now the small adds spawn and start running toward the edge. If they make it, they explode the raid, the same as if they had reached a collector in phase one. Just spawn them on top of the boss, and cleave them down while you burn.
WeakAuras
Northern Sky: Manaforge Omega WeakAura Pack
This WeakAura also requires the Northern Sky Anchors WeakAura and the Northern Sky Raid Tools Addon.
https://wago.io/NSManaforge