Raid Setup
Introduction
Welcome to our Mythic Loom'ithar Boss Guide, for the Manaforge Omega Raid. Learn about the Mythic specific fight mechanics and the strategy we recommend to defeat this boss on Mythic difficulty!
This guide focuses on a Mythic strategy, and won’t explain the basics of the fight, so make sure you read through the Heroic version of the guide for this boss if you are unfamiliar with the encounter.
Fight Style: Single Target fight
Recommended Setup: 2x Tank / 4x Healer / 14x DPS
Required utilities: None
Hero/Lust Usage: Phase 2 (safer) or on Pull
Easy Mode
Phase 1:
- Arcane Pylons spawn over time
- Start with 1 active, eventually all 4 before P2
- Stand in beam to intercept, 2 players per pylon is enough but you need 2 groups of 2 players per pylon
- Swap at 5-7 stacks, stacks drop after 45s
- 1 beam into boss = light damage, multiple beams = heavy raid damage
- Lair Weaving now has two collapsing rings
- One Woven Ward on the inner ring, and the one on the outer has to be destroyed
- Wards are immune until hit by Piercing Strand
- Each tank has to hit one Woven Ward now
- Infusion Tether break
- Snapping tether deals extra damage to its targets
- Healers must top players before breaking
Phase 2:
- Save Hero / Lust and DPS cooldowns
- Arcane Outrage
- Heavy raid damage during channel
- On end, all players explode in 6-yard radius
- Spread immediately after cast finishes
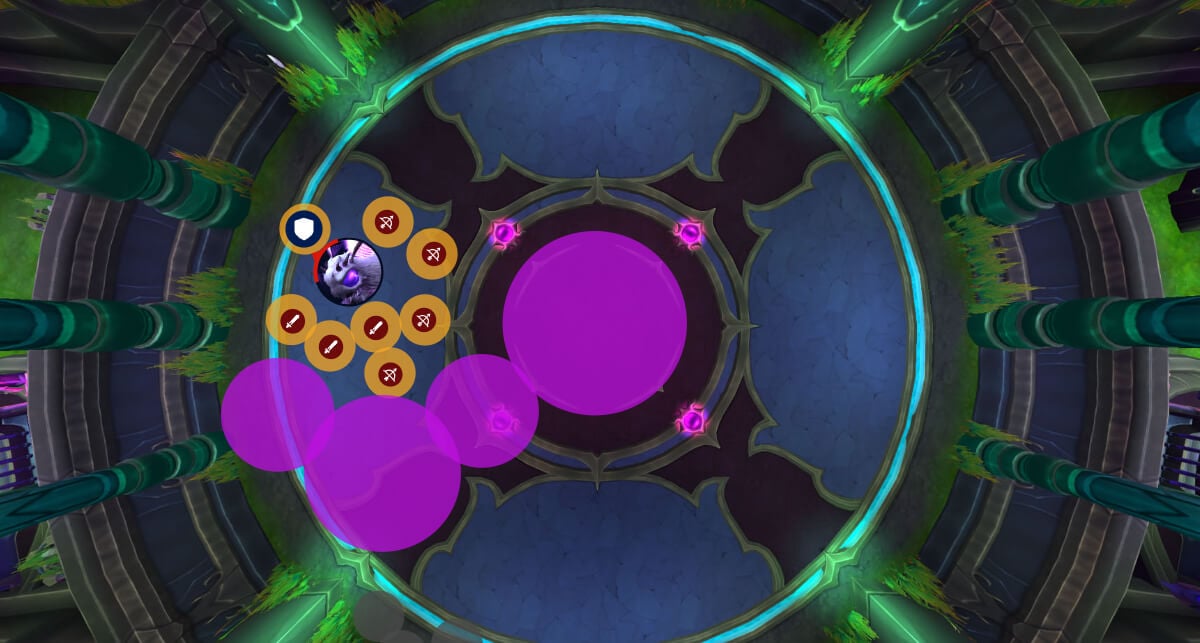
- Writhing Wave
- Minimum 5 players soak initial hit
- Fail = Deathbound (stacking absorb shield on boss)
Mechanics
Arcane Pylons around the room become active and start a channel towards the boss.
If the beam is not intercepted by a player, it channels into Loom’ithar, causing Arcane damage to the entire raid every 1 sec for 25 sec instead.
Player intercepting takes a stacking DoT (Hyper Infusion) instead, it is suggested to rotate players at around 5-7 stacks of this debuff.
Infused Tangles spawn with two wards, one on the inner ring and one on the outer ring that prevent all damage until struck by Piercing Strand.
This requires two consecutive tank hits to remove both.
On expiration, it additionally inflicts Arcane damage to the tethered player; make sure the players are topped before breaking the Tether.
When the channel ends, players erupt with Arcane Energy, inflicting damage to themselves and allies within 6 yards, so spread out for this.
If Writhing Wave fails to hit at least 5 players, Loom’ithar gains a stacking damage absorption shield.
Strategy
This encounter mostly plays out the same as on Heroic difficulty, but Mythic introduces several key changes that increase coordination requirements and punish small mistakes more heavily.
Phase 1
The first big change is the addition of Arcane Pylons around the room.
These activate gradually, starting with a single pylon and eventually all four becoming active before Phase 2 begins. If a pylon beam is not intercepted by a player, it will channel into the boss.
A single pylon channeling is not dangerous, but the damage ramps up significantly with each additional beam. If all four are channeling at the same time, the raid will quickly be overwhelmed.
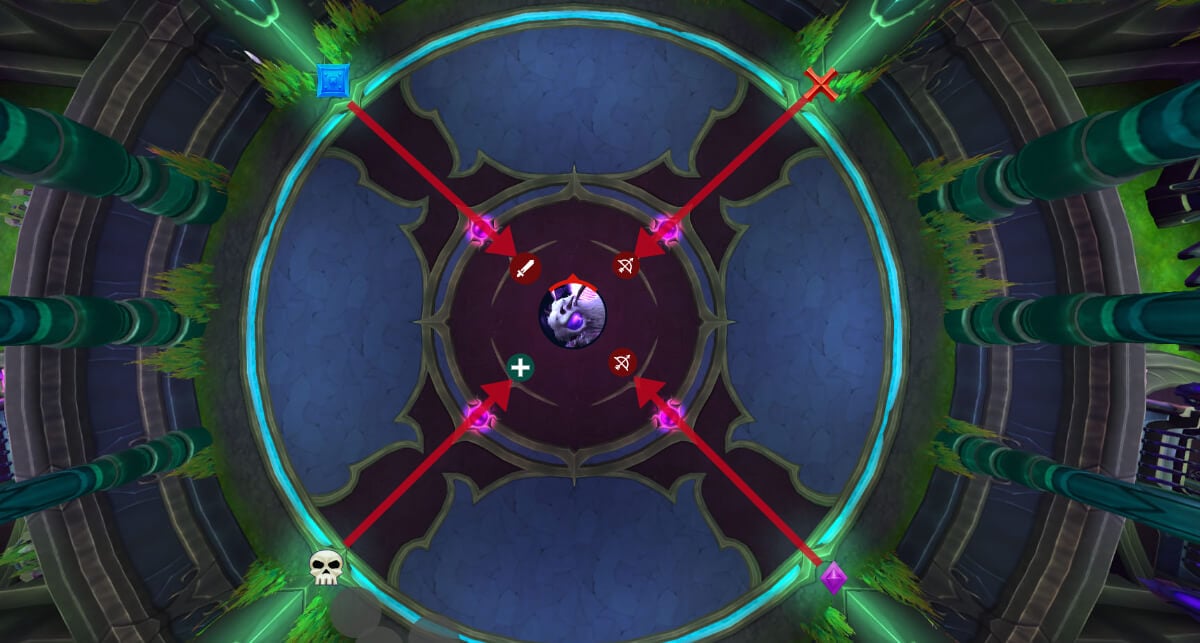
To intercept, players stand in the beam, which applies a stacking DoT (Hyper Infusion). This DoT begins to hurt around 5-7 stacks, so players should swap before it reaches that point. The debuff fades after 45 seconds.
A team of two players per pylon is enough to handle the mechanic safely. However, you need to assign two groups of 2 players per pylon marker, due to the randomness of how they activate. If the same pylon is active twice in a row, the previous two players that soaked will still have the debuff. This is where the 2nd group takes over.
Example Pylon Group:
- Player 1 & Player 2
- Player 3 & Player 4
And so on for each marker.
The second change is that each Lair Weaving pattern now consists of two collapsing rings instead of one.
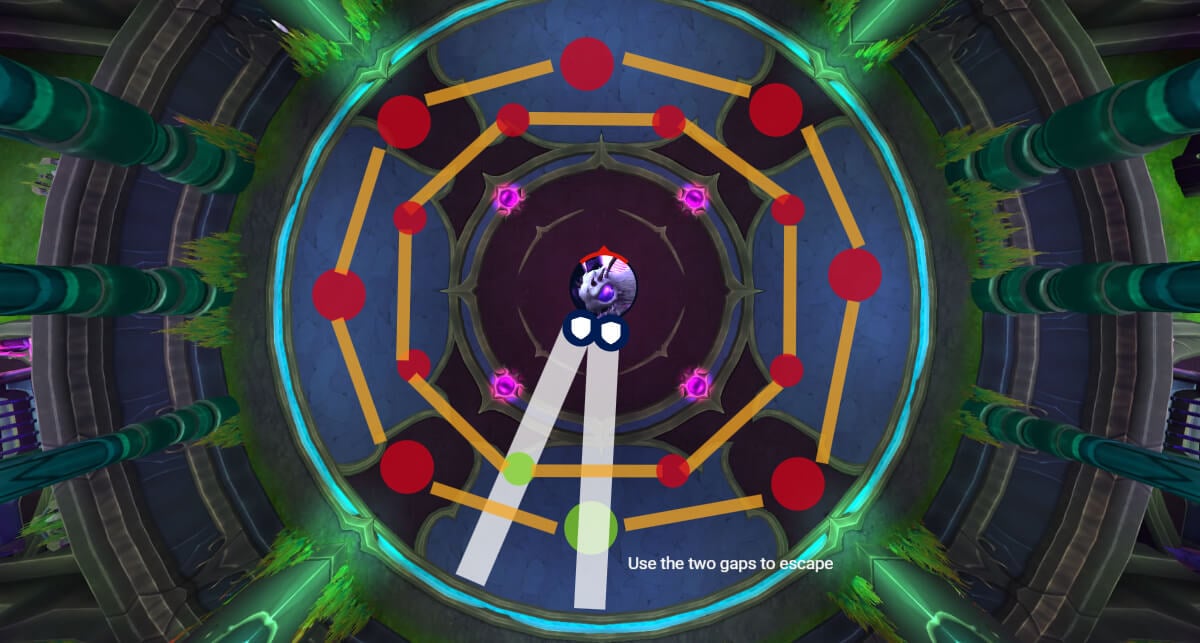
Each ring contains a Woven Ward that must be destroyed in order to pass through. On Mythic difficulty, one ward needs to be destroyed on the inner, and one on the outer ring. These wards are immune to damage until struck by Piercing Strand, just like on heroic difficulty.
This simply means that both tanks have to hit a ward, since both tanks get Piercing Strand on them (one after the other).
There is also an extra risk with Infusion Tether in Mythic. When the tether snaps, it deals an additional burst of damage to the tethered player. Healers should ensure these players are topped before they break free.
Phase 2
It is very important that you save up Hero / Lust for this phase, and have your DPS cooldowns ready.
Healers also need to make sure that the biggest ramps are ready for each Arcane Outrage.
Arcane Outrage still deals high raid-wide damage on its own, but on Mythic, when the channel ends, every player erupts in a small explosion that hits allies within six yards.
When the cast ends, the entire raid must spread immediately, to avoid overlapping damage.
Writhing Wave continues to require a group soak.
If fewer than five players are hit by the initial blast, the boss gains Deathbound. This is an absorb shield that stacks and can slow the kill significantly. Even if players are low on health, enough soakers must be in position to avoid giving the boss the buff.
The fight, just like on heroic repeats until the boss is defeated (or you).
Soak frontal, spread for circles, move boss clockwise to not stand in puddles.
The damage taken ramps up as the fight goes on, so you really want to kill the boss as soon as possible in this phase.
WeakAuras
Northern Sky: Manaforge Omega WeakAura Pack
This WeakAura also requires the Northern Sky Anchors WeakAura and the Northern Sky Raid Tools Addon.
https://wago.io/NSManaforge