Raid Setup
Introduction
Welcome to our Mythic Forgeweaver Araz Boss Guide, for the Manaforge Omega Raid. Learn about the Mythic specific fight mechanics and the strategy we recommend to defeat this boss on Mythic difficulty!
This guide focuses on a Mythic strategy, and won’t explain the basics of the fight, so make sure you read through the Heroic version of the guide for this boss if you are unfamiliar with the encounter.
Fight Style: Multi-Target fight
Recommended Setup: 2x Tank / 3x Healer / 15x DPS
Required utilities: None
Hero/Lust usage: 2nd Intermission Damage Amp
Easy Mode
Phase 1:
- Move boss to Void Tear, spawn adds, kill adds + Echo.
- Soaks: 10-12 players each. Use immunes (Mages, Paladins, Rogues, DK AMS) for double soaks.
- 6 add sets total. Last set overlaps with knock + intermission - stack in melee, use raid CDs, burn adds fast.
- Dodge Silencing Tempest circles at all costs.
Intermission 1:
- Split raid evenly to Collectors. All must die within 10s.
- Multi-dotters on separate sides.
- Use defensives at 5-6 Astral Burn stacks.
- Kill Attendants + Echo after damage amp.
Phase 2:
- Only 3 Void Tear + 1 soak. Same handling as P1.
- Don’t kill Echo, just farm resources from it.
- Last Tear: stack in melee, heavy AoE on adds.
Intermission 2:
- Same as first but with more circles.
- Pop Hero/Lust early (when Collector ~20–30%).
Phase 3:
- Start against a wall for knock-back.
- Spawn adds on boss and kill before they reach black hole.
- Keep Echo away and ignore it.
- Burn the boss before push-backs overwhelm you.
Mechanics
On Mythic, Arcane Manifestations are immune to damage and have movement speed increased by 99% unless they touch a Void Tear, which is a purple puddle on that ground that spawns in random sections of the room.
Players are supposed to either knock the adds into the Tear, or spawn them behind the tear so they naturally walk through on their way to an Arcane Collector.
Deals heavy damage to players standing inside the tear.
All 3 Arcane collectors have to die within 10 seconds of each other, otherwise the raid takes lethal damage.
Strategy
This fight is a clear step up from the heroic version, but thanks to several nerfs already in place, you shouldn’t have too much trouble getting through it quickly.
The biggest change is the addition of Void Tear. This mechanic forces your raid to either knock Arcane adds into the tear or spawn the adds behind it so they walk through while trying to reach a collector.
This fight is also very generous when it comes to healing requirements so we suggest playing 3 heals, because an additional dps makes the fight much easier compared to an additional healer.
Markers

Phase 1
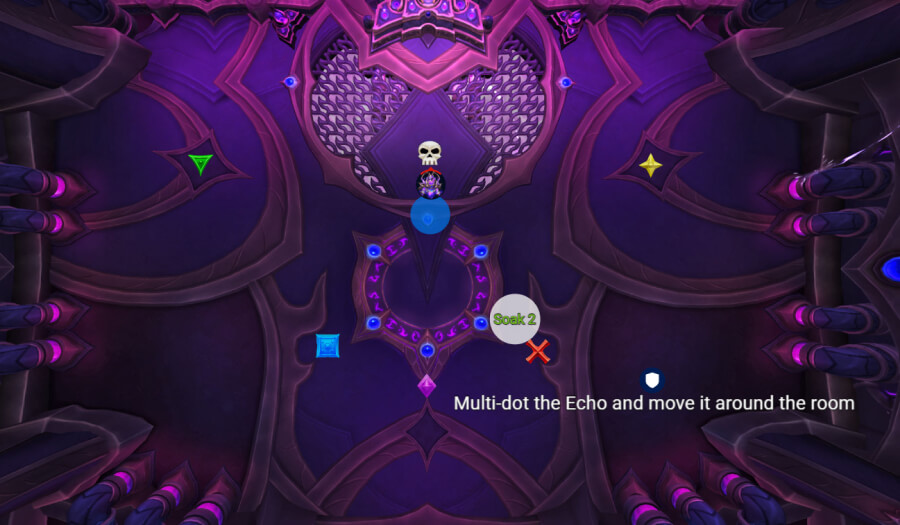
When the boss is pulled, there are three possible Void Tear spawns:
- Skull
- Blue
- Cross
Let’s assume the first Tear spawns on Blue. Move the boss there, spawn the adds, and kill everything. Finish off the Echo before swapping back to the boss, but make sure to move the boss away once the Echo spawns.
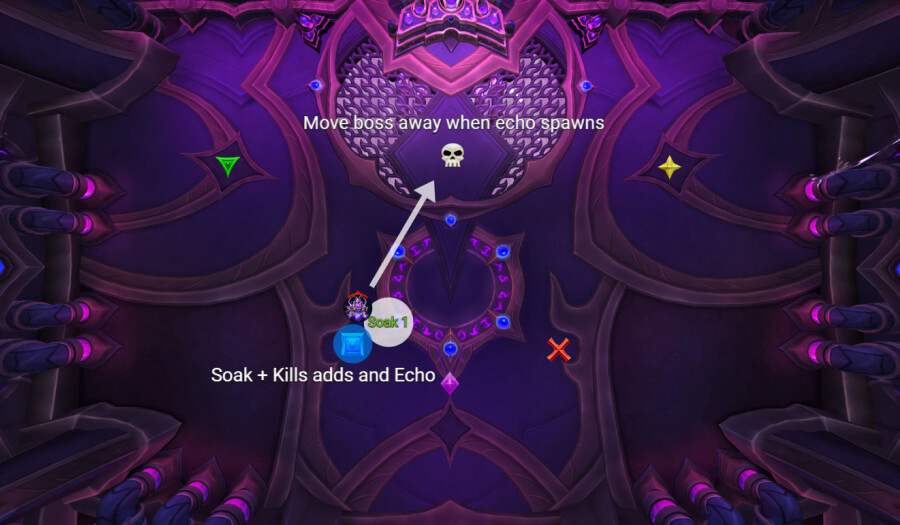
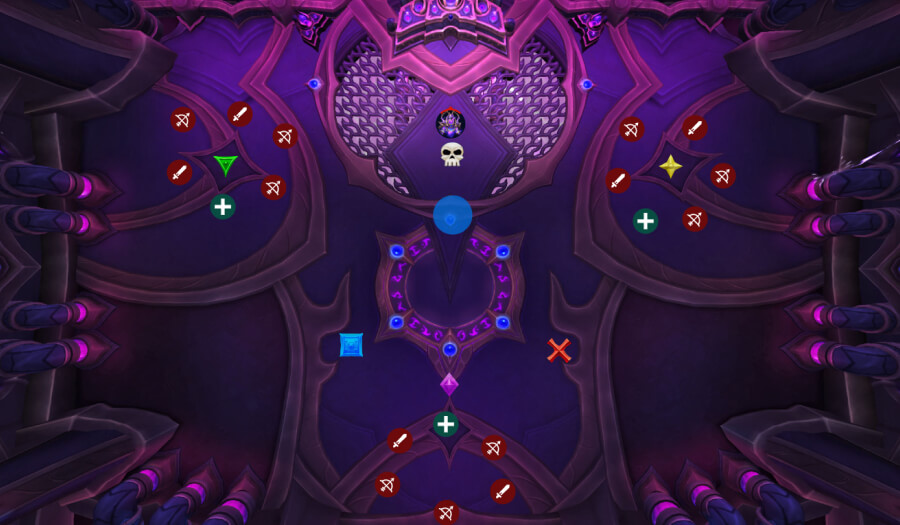
Soaks (Arcane Obliteration)
Each soak requires around 10-12 players. The problem is that some soaks overlap with add spawns, making it tricky to split the raid evenly without weakening add control.
To solve this:
- Use double-soak players with immunities. For example, DKs with AMS won’t get the debuff on the first soak and can help on the second. Mages, Holy Paladins, and Rogues are great for this.
- This lets you stack 12+ players on the first soak (taking little to no damage) and still have 10-12 on the second.
- The third soak happens in Phase 2. Everyone should be ready again, so just assign the group with the easiest path to it.
Void Tears and Add Spawns
The second Void Tear will spawn at one of the remaining markers (not the same as the first). Move the boss to it and spawn the adds there. At the same time, the second soak goes out; place this on the opposite marker, and Group 2 should head there immediately.
This Echo is ignored. Tanks keep it moving around the room while it gets multi-dotted and passively cleaved. It should die just after the first intermission.
After the second soak, you’ll deal with four more Void Tear but no more soaks in this phase. Just move the boss, Void Tear, then kill adds.
CC Assignments
If you’re doing the knock strat, each set of adds should have:
- 1x Knock
- 1x Stun
- Optional: Oppressing Roar
- Optional: Vortex/Binding Shot/Spear
Knock + stun is usually enough, but strong AoE is mandatory.
Players should pixel stack in front of the Void Tear and knock the orbs in as soon as they spawn.
Be careful not to get clipped by circles that players are dropping, because those silence and will prevent you from knocking.
Note: On the 6th set (last of P1), the boss knock overlaps with the intermission start. Stack in melee, use AMZ/Darkness to reduce damage, and burn the adds hard so you can start on Collectors quickly.
Also, be very careful with Silencing Tempest from Collectors, these circles are lethal on Mythic. Dodge them at all costs.
After the 2nd soak has been completed, you have 4 more sets of Void Tear happening but no more soaks in this phase.
This means from here, you simply move the boss from tear to tear and kill adds.
Intermission 1
Similar to heroic but with higher damage and deadlier beams/puddles. The key difference is all Collectors must die within 10 seconds of each other, or the raid wipes.
Split evenly, making sure your multi-dotters are on different sides. Adjust based on your comp.
Tanks handle this like heroic, but remember there’s still an Echo from P1 moving around. Don’t drag it onto the boss during the damage amp.
Use strong defensives around 5-6 stacks of Astral Burn. All Collectors must be dead before 8 stacks or the raid will crumble.
Once they’re down, blast the boss, clear the Shielded Attendants, then finish off the Echo from P1.
Phase 2
At this point, you already know the fight. This phase is much shorter: 3 Void Tear sets and 1 soak. Handle them exactly like P1, except you don’t kill the Echo anymore, just keep it for free resources via DoTs.
On the 3rd Tear (last of the phase), stack in melee for healing during the knock and burn the adds fast for a clean transition into Intermission 2.
Intermission 2
Plays the same as the first but with extra circles to dodge.
The key here is to commit Hero/Lust a bit earlier, usually when a Collector is at 20-30% HP. This shortens the phase, eases the healing burden, and stabilizes the raid.
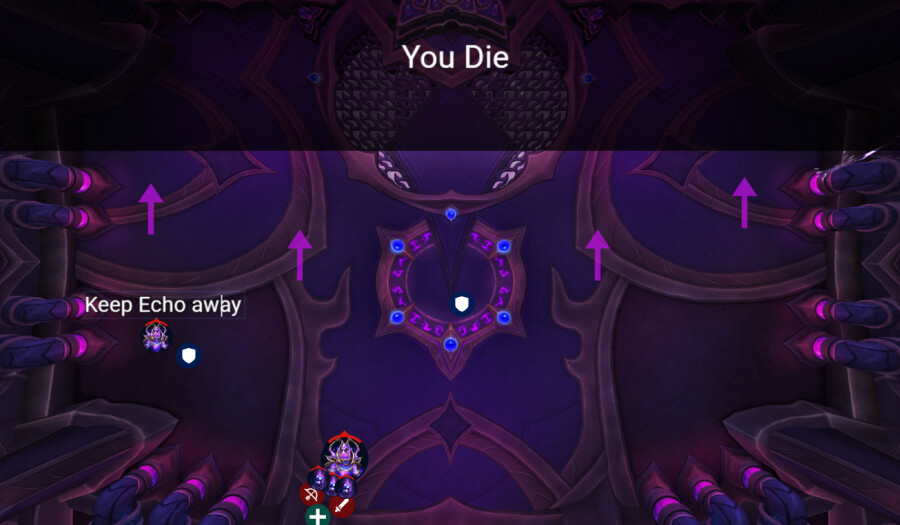
Phase 3
With current gear levels and renown buffs, this phase shouldn’t last long, the boss should already be low.
Start the phase hugging a wall to handle the knock-back.
Spawn the adds on top of the boss and kill them quickly before they can reach the black hole (they are not immune when they spawn).
Keep the Echo away from the boss and ignore it.
Burn the boss before push-backs overwhelm you.
WeakAuras
Northern Sky: Manaforge Omega WeakAura Pack
This WeakAura also requires the Northern Sky Anchors WeakAura and the Northern Sky Raid Tools Addon.
https://wago.io/NSManaforge