Raid Setup
Introduction
Welcome to our Mythic Dimensius Boss Guide, for the Manaforge Omega Raid. Learn about the Mythic specific fight mechanics and the strategy we recommend to defeat this boss on Mythic difficulty!
This guide focuses on a Mythic strategy for Dimensius, and won’t explain the basics of the fight, so make sure you read through the Heroic version of the guide for this boss if you are unfamiliar with the encounter.
Fight Style: Multi-Target fight in P1 + P2, but full ST in P3
Recommended Setup: 2x Tank / 4x Healer / 14x DPS
Required Utilities: 2x Warlock gate, 3x Death-Grip, 1 Knock
Hero/Lust Usage: Phase 3
Easy Mode
General:
- Fight is easier post-nerfs but still punishes mistakes.
- Run 2 Warlocks for double gateway in P1.
- Heavy on pre-assignments, handle them phase by phase.
Phase 1:
- Split raid evenly (balance DPS + utility).
- Push to P2 around 4th knock-back, ignore after that.
- Living Masses:
- 1st: 4 healers.
- 2nd: 2 melee + 2 ranged.
- 3rd: same as 1st.
- Kill adds ASAP, raid damage, orb timing, and wipes depend on it.
- Shattered Space: Everyone except tank soaks instantly.
- Reverse Gravity:
- Only players without Mass get lifted.
- Excess Mass frees front → then back.
- 1st & 3rd: 2 soakers, 2nd: 4 soakers (must all hit same target).
- Knockbacks:
- Knock normally, drop puddles.
- Cancel/Rescue, drop puddles.
- Normal again, adjusted positions.
- Cancel/Rescue and push boss.
Phase 2:
- Assign 5 Stellar Core collectors (7% each, 35% total add burn).
- Healers grab top/bottom orbs, tank grabs under-platform ones.
- Everyone else flies to the platform.
Platform 1 (Artoshion):
- Drop Mass Destruction lines in bait zone.
- Stack Nullbinders on Voidwarden (DK grips + knock).
- Prio: Voidwarden > Nullbinder > Big Add.
- 2 stuns per Nullbinder set, missed = wipe.
- Handle Gravitational Distortion (stand small circles inside big).
- Kill before 2nd winds.
Platform 2 (Pargoth):
- Same mechanics but with Starshard Nova (assign 6 soakers).
- Reversed gravity formations (L first → line second).
- Kill after 2nd winds if needed, players knocked off get gripped back.
Phase 3:
- Stack in melee, burn boss, watch for star spawn damage.
- Waves:
- 1st: Get hit fast.
- 2nd: Wait for debuff to drop.
- 3rd: Let it come to you.
- Devour:
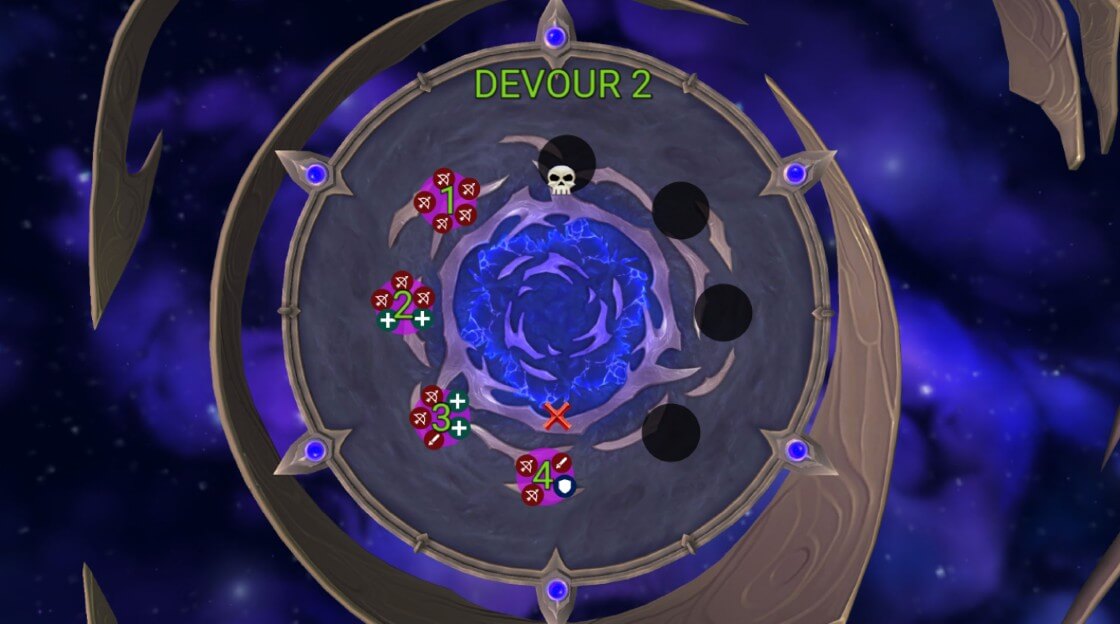
- Groups 1-2 left of marker, 3-4 right. (Check strategy section)
- Enter star ~1.5s before cast ends
- Final Devour: 4 stars left, count 1-4, soak accordingly.
- End flow: Gravity > Waves > Gravity > Waves > Kill boss.
- For last two waves, room is tight, call first wave and play safe.
Mechanics
To free a player from Reverse Gravity, all Excess Mass orbs must be picked up and used to soak the same target.
Unlike Heroic, where multiple soakers simply speed up the process, on Mythic you cannot free the player at all unless every Excess Mass carrier is soaking the same target.
A large circle that first needs to be dodged, but once it spawns, everyone (except tanks) should stand inside it to shrink it.
If not reduced in time, it will explode and deal massive damage to that side of the room.
Always targets one melee, one ranged, and one healer.
The targeted players create Inverse Gravity zones that protect others from Crushing Gravity, which would otherwise kill them if they are not standing inside one of the large circles.
Check the strategy section for detailed formation setups.
Targets four random players, firing beams that knock them back and leave void puddles dealing damage and slowing movement.
Move out of the raid to drop these, but avoid clipping other players.
Launches three orbs in the direction of one random player, forcing the raid to bait this ability to a specific side to make soaking easier.
Each orb explodes on impact, leaves a large void puddle, and applies a heavy-damage debuff lasting one minute.
If the same player soaks twice, or if an orb is missed, it triggers a massive explosion that wipes the raid.
Strategy
With the recent encounter nerfs and the power gain from gear and renown, this fight is much easier than during the RWF. However, it still demands precise execution from start to finish, since there are countless ways to die or wipe.
Running two Warlocks is still recommended for double gateway, which makes Phase 1 progression far more consistent.
This encounter is heavily pre-assignment based, but instead of listing everything upfront, each phase below includes the assignments relevant to it for clarity.
Phase 1
Split the raid into two even groups, balancing both damage and utility. Make sure each group has access to Time Spiral or Rescue if needed, depending on comp.
Most guilds will push the boss into Phase 2 around the fourth knock-back, so if you reach the 4th one, you can safely ignore mechanics after that and just push to 0%.
Living Masses
Assign three players per side to pick up the orbs dropped by the first set of adds on pull. These players will lose their stacks right after the first Devour, which happens almost immediately.
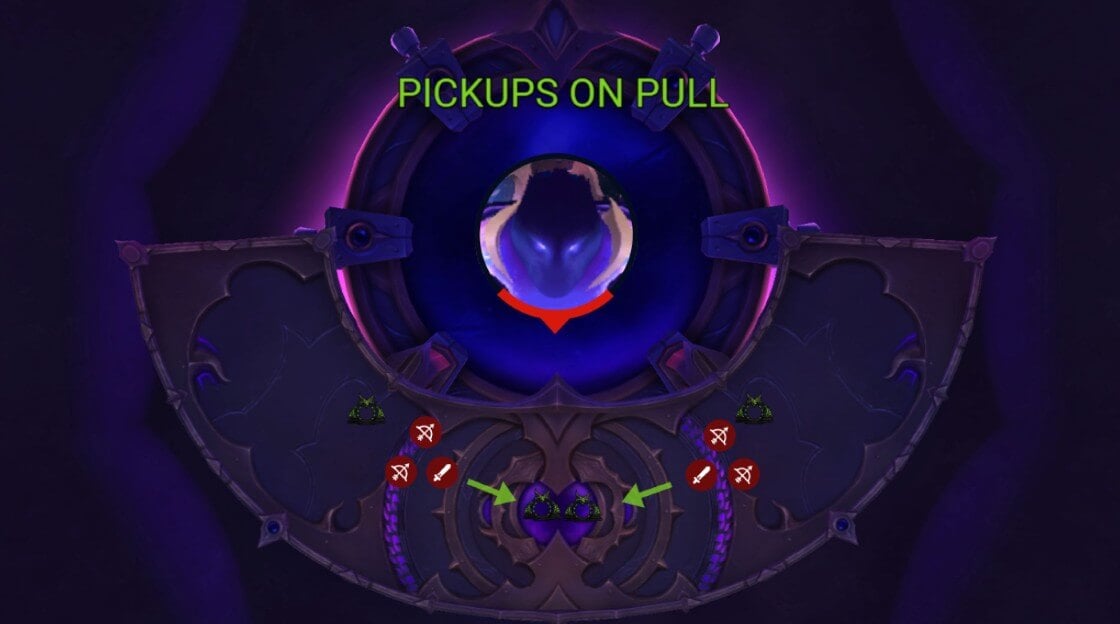
Next, assign eight players to handle all other Living Masses throughout P1:
- 1st set: 4 healers, this keeps healers grounded and healing
- 2nd set: 2 melee and 2 ranged
- 3rd set: same players as the first set
Killing Living Masses is the top priority. Boss HP is lenient, and in most cases you will even need to stop DPS for later cooldown timings. The faster the adds die, the smoother the progression.
Why this matters: Less raid damage, faster orb collection, lower chance of Living Masses healing back to full.
The second point is especially important. If adds die late, a player might pick up an orb just as Reverse Gravity goes out. If that player then gets the gravity circle, both targets are effectively dead, since you lose one of the required Excess Mass to free them.
Shattered Space
Once the large circle spawns, after the swirl is dodged, every available player except the tank should stand inside immediately to shrink it as fast as possible.
If Living Masses have been handled properly, they should die just as this mechanic starts.
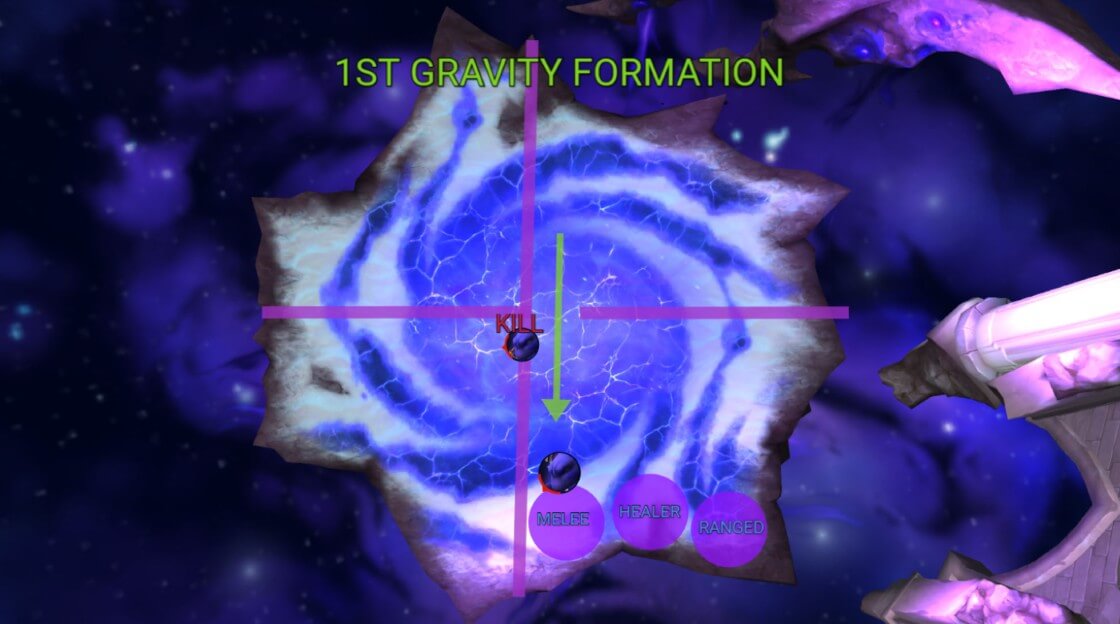
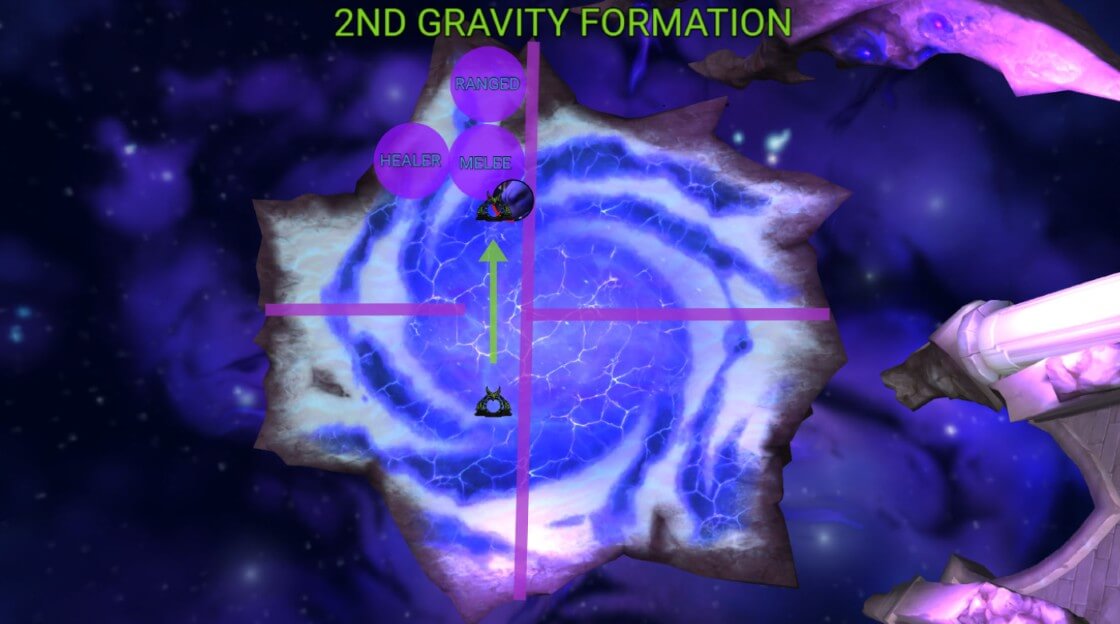
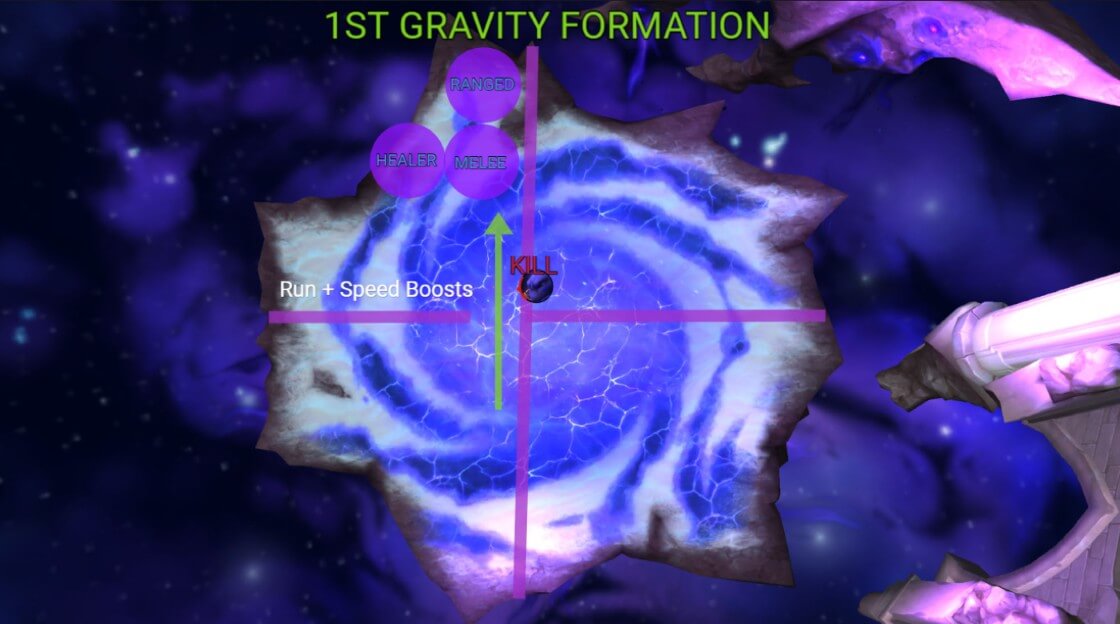
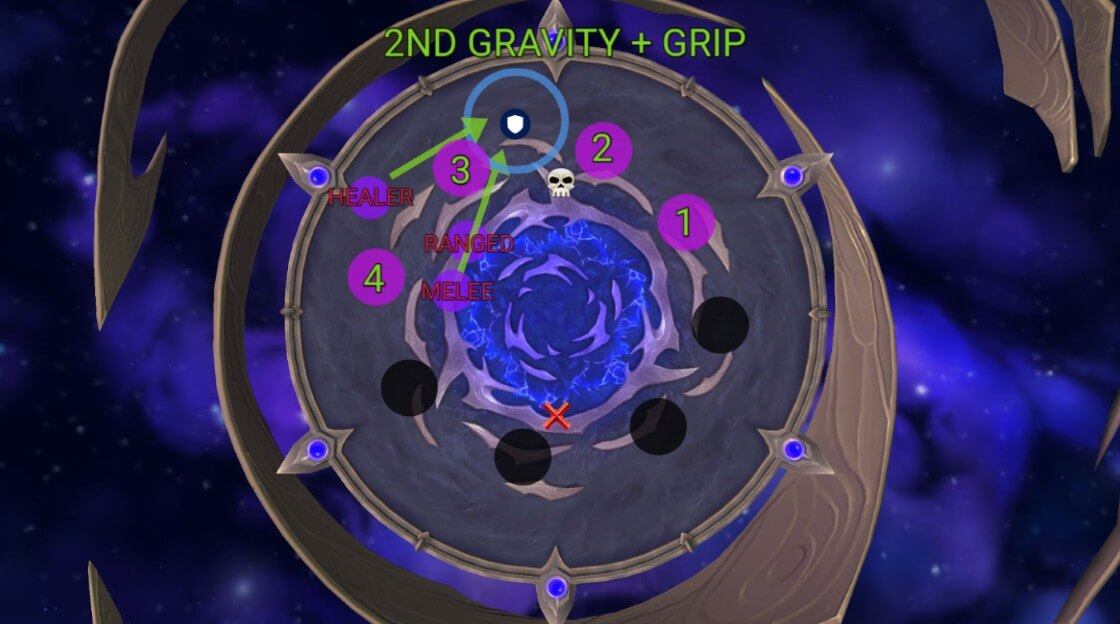
Reverse Gravity
This always targets players without Excess Mass, so ideally you have consistent rescuers each time.
On Mythic, all Excess Mass players must soak the same target to free them.
Targets should position as in your diagram, Excess Mass frees the front player first, then the back one.
- 1st and 3rd sets use 2 Excess Mass per target.
- 2nd set uses 4 Excess Mass per target.
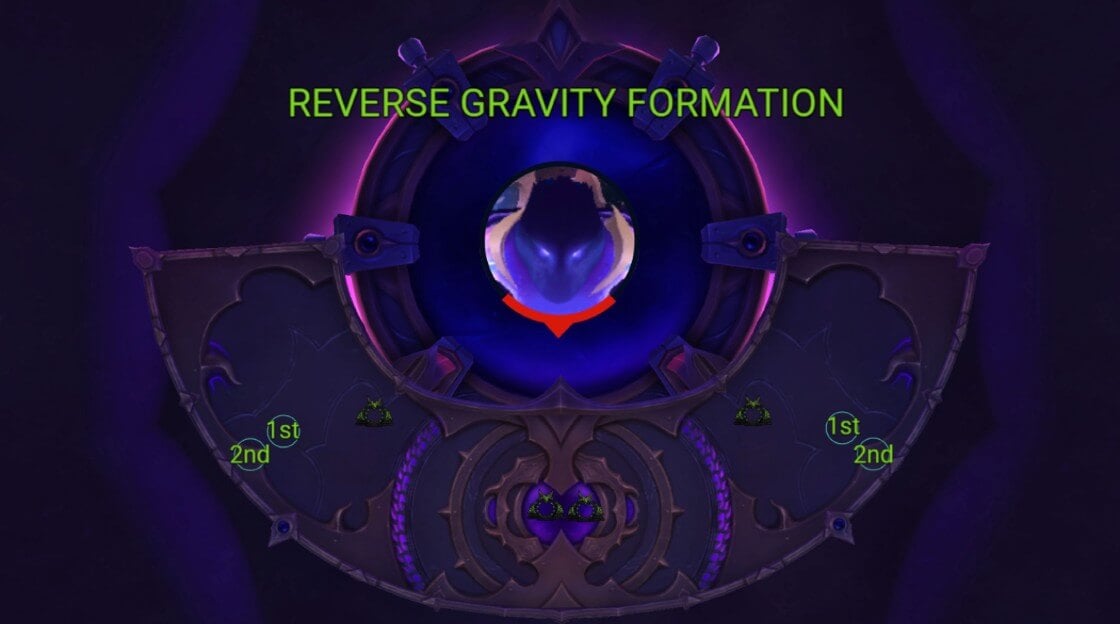
If even one player is late or out of position, no one gets freed. Every Excess Mass player must commit to soaking until the target is freed or they die. Leaving early often causes wipes.
Knock-backs
You will have three main knock-backs to play correctly, with a potential fourth where you can go “yolo” and push the boss.
1st knock: everyone gets knocked to assigned spots and drops puddles there.
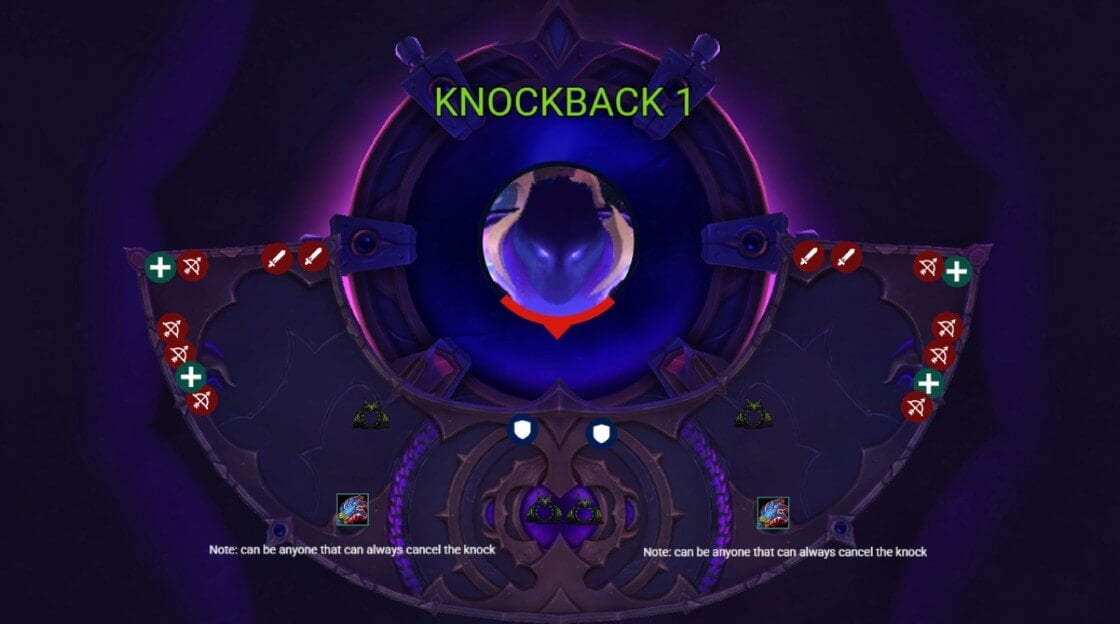
2nd knock: cancel, grip, or Rescue the knock, then place puddles in your assigned area.
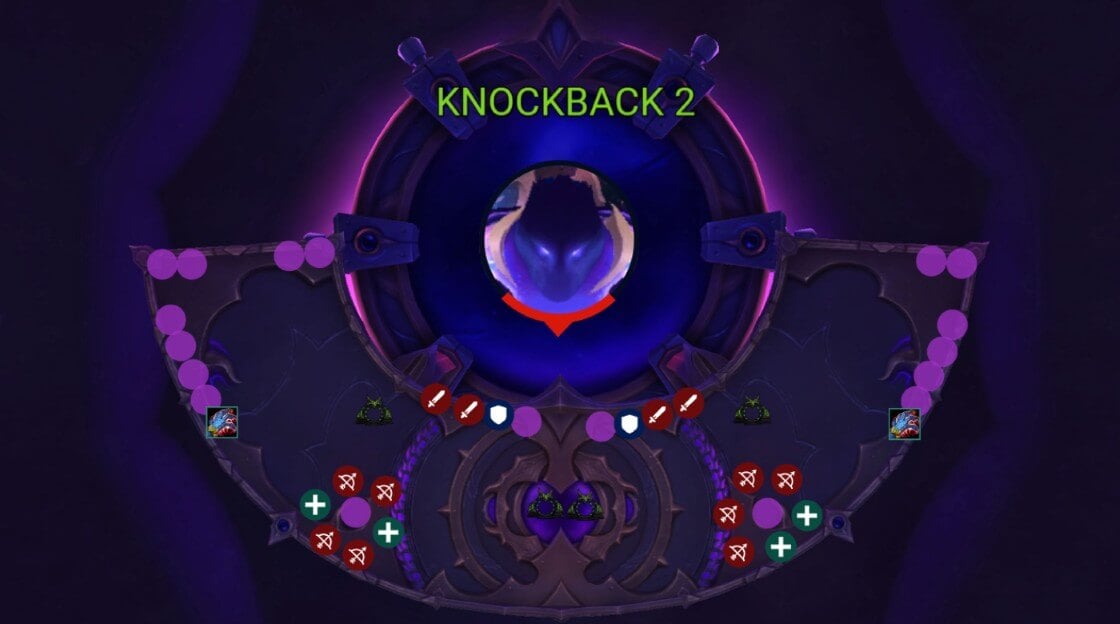
3rd knock: normal knock again, positions adjusted since previous zones are covered.
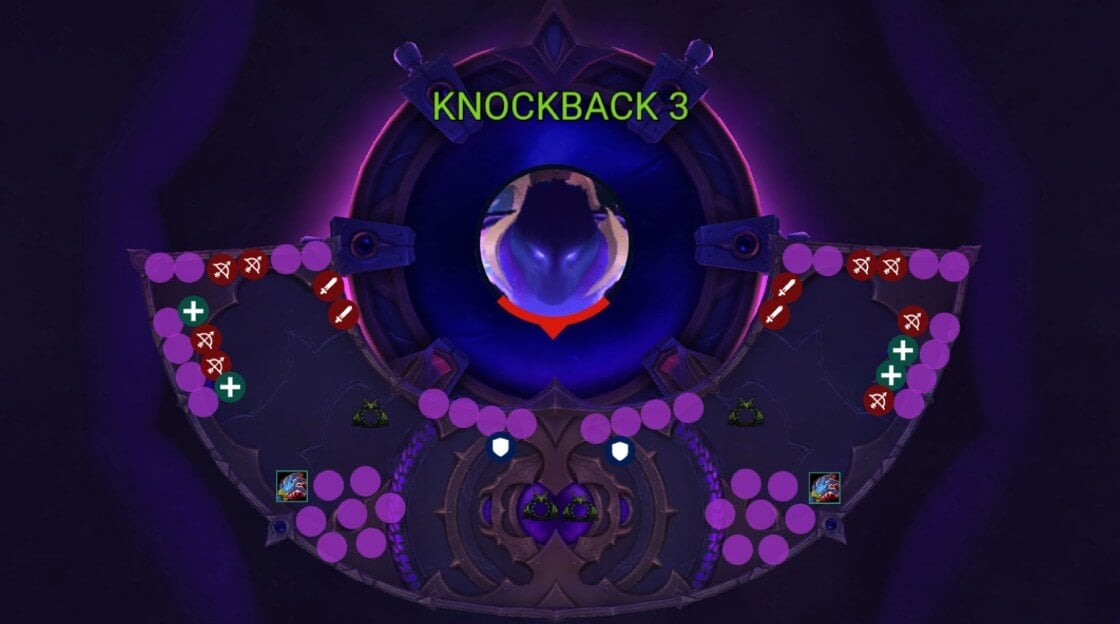
4th knock, cancel or get rescued, then push the boss, avoid puddles. FFA how you want to drop the puddles.
Putting P1 Together:
- Take your portal to the assigned side. Kill the six adds, three on each side, pick up orbs, and stack mid.
- After the first Devour, move to your sides and prep for the first knock-back, normal. Drop puddles and kill the two new adds per side. Interrupt their healing or it is a wipe.
- Assigned players grab orbs, everyone soaks Shattered Space, Reverse Gravity targets get into position.
- Excess Mass frees the front player, then the back.
- On the second knock-back, cancel or Rescue, drop puddles, and repeat. Four players with Mass per side must soak together.
- After freeing all gravity targets, take the gate mid for Devour. Non-Mass players can take it early, Mass players wait until their job is done.
- After this, move into position for the third knock-back, mirror of the first.
- Push the boss around the 4th knock timing.
Speed Strat (Optional)
For faster kills, push to Phase 2 after the 2nd Devour, just after the 3rd knock. Ignore the rest and burn the boss.
Typical push is around 2:10.
Cooldown Usage
- 1:30 - On cooldown.
- 2:00 - Pull then Platform 1 then P3 start.
- 3:00 - Pull then hold for P3.
Phase 2
At the start, assign five players to collect Stellar Core. Each one burns 7% of an add’s HP, so you can front-load up to 35% before landing.
Early on, take all cores. Later, skip a few to extend the phase if your add damage is too high.
Core Reference Clips
Orbs Top Left:
- LEFT: Video Clip
- RIGHT: Video Clip
Orbs Bottom:
- LEFT Video Clip
- RIGHT: Video Clip
Under Platform: Video Clip
Recommended: Top and bottom one should be done by healers, while the tank should be the under platform ones.
Here are the positions of all cores flying towards Platform 2:
- Top (2 orbs Left + Right): Video Clip
- Bottom (2 orbs Left + Right): Video Clip
- Under Platform (Tank): Video Clip
Everyone else should just fly to the platform like heroic.
Platform 1 (Artoshion)
Position yourself as you would on Platform 2 for consistency.Four players are targeted by Mass Ejection, line damage, knock-back, puddles. Drop the lines in the bait zone, others dodge. Ask for grips or Rescues if you struggle to return.
Assign two DKs for three total grips, and one knock, to stack Nullbinders on top of a Voidwarden.
Priority, Voidwarden, then Nullbinder, then the big add, with DoTs on the opposite Voidwarden.
Assign two stuns per Nullbinder set, missed casts are a wipe.
Afterward, wait for the boss’s rock cast and move across the platform.
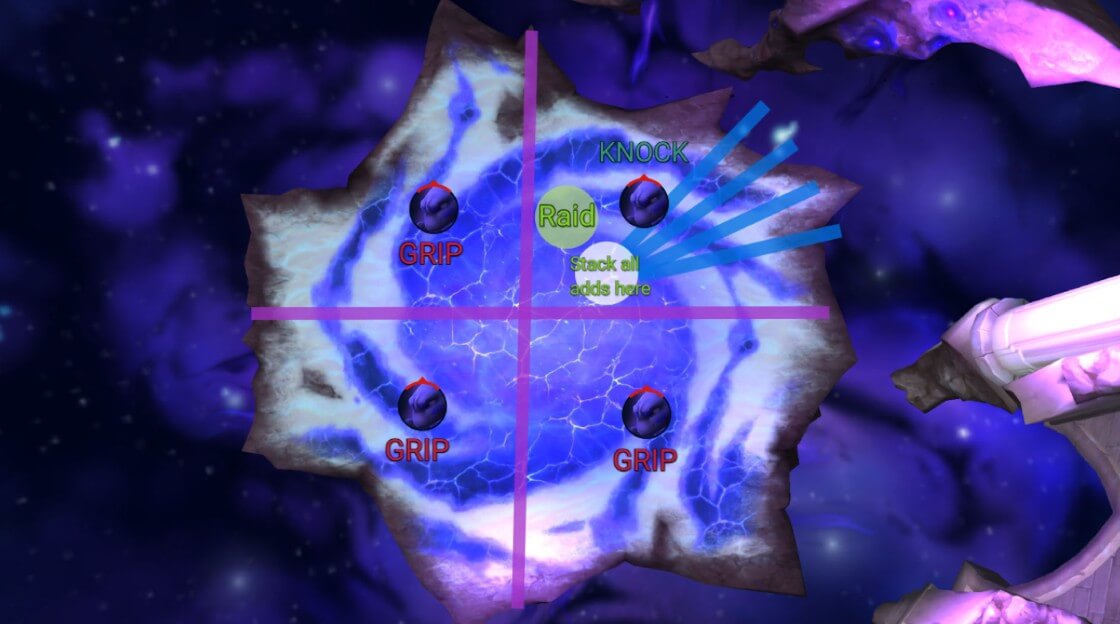
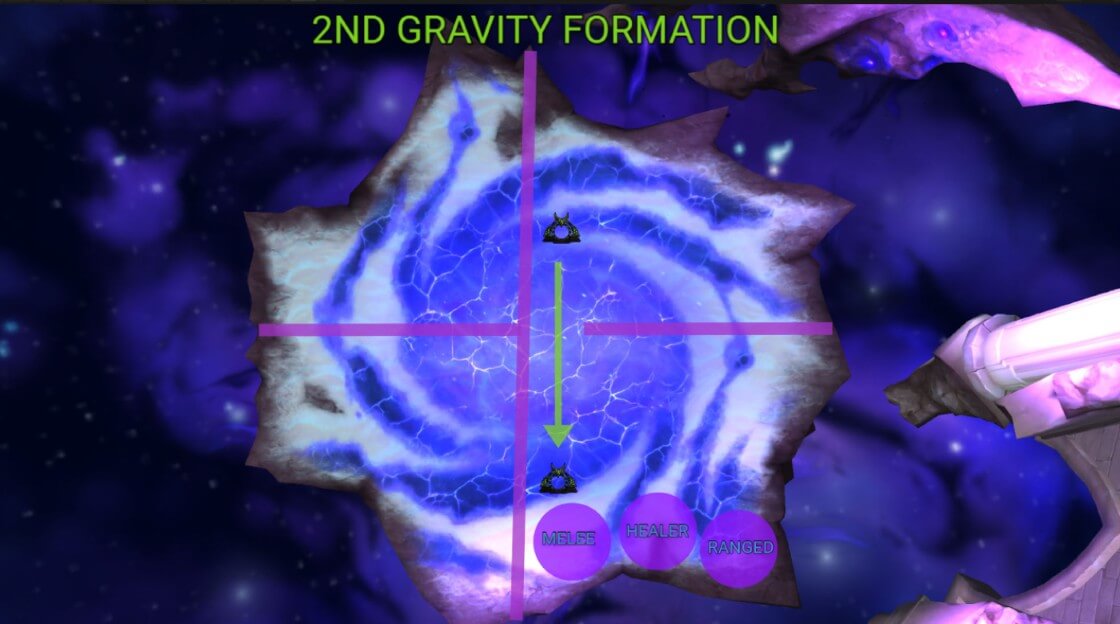
Three players get Inverse Gravity big circles, always one melee, one ranged, one healer. Everyone else gets Crushing Gravity small circles.

Small circles deal huge damage and stun if you are not standing inside a big circle, standing inside negates it.
This repeats in Phase 3 with different formations.
Depending on your comp, you might need to send either some melees to Healer group, or some Ranged into the Melee group, however keep in mind that this means those players will need to adjust on the fly.
If a ranged standing in the melee group gets the circle, they need to move to the ranged group instead with it. This is because you are guaranteed to get 1 healer 1 ranged, 1 melee, meaning if the ranged player is to go melee with his circle, then you would end up with 2 circles there since a melee with the circle will also naturally move into that position.
When the rock shoots across the platform, prepare for winds. Keep Artoshion in place until Mass Ejection finishes, some players may need Rescues.
Repeat the loop, use the Warlock gate if you reach another rock cast.
Kill Artoshion before the second winds.
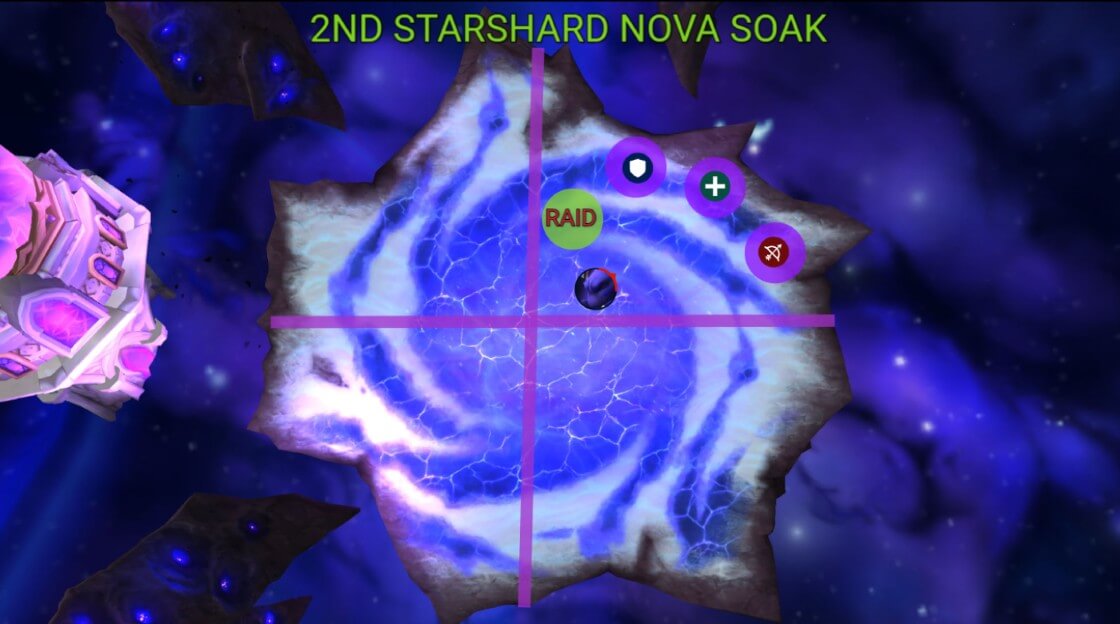
Platform 2 (Pargoth)
Plays the same as Platform 1, except Starshard Nova replaces Mass Ejection, and gravity formations are reversed.
Mark one player, everyone baits on them. Pargoth targets a random player and fires three orbs toward that direction.

Assign six soakers, two tanks, two healers, preferably an Evoker or Mage. Each takes one orb. The debuff lasts one minute, healers watch those players. 3 players per set.
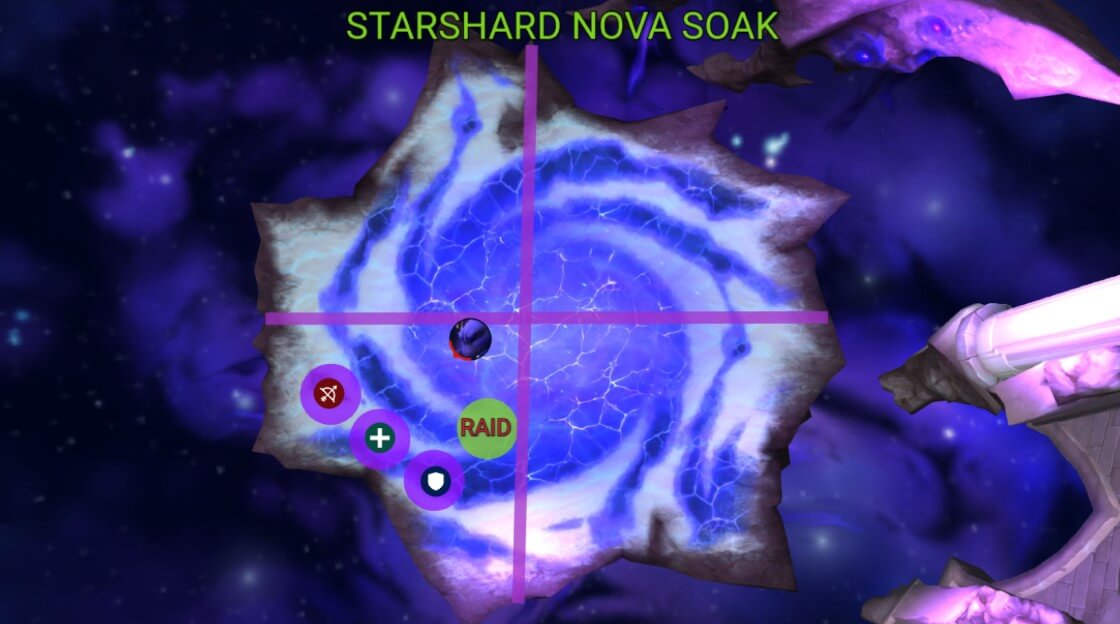
When the rock cast begins, go into L formation first, then line formation second, opposite of Platform 1.
Once you deal with the winds, you need to get into bait position asap, and deal with Starshard Nova the same way as you did the first time, but with different players this time, otherwise kaboom.
If DPS is low or you want cleaner timings, you may kill Pargoth after the second winds, which is fine. Anyone knocked off after he dies will be gripped back for Phase 3.
Phase 3
If you have reached P3, you are close to the kill. With nerfs and gear, this is the easiest phase, but mistakes are still deadly.
Start stacked in melee and blast the boss like heroic. Damage can spike when stars spawn, be ready.
Handle the first wave set. Move to the first visible wave, left or right, and get hit as soon as you can. For the second wave, wait until the debuff drops, then take the hit. For the third, let it come to you where you stand.
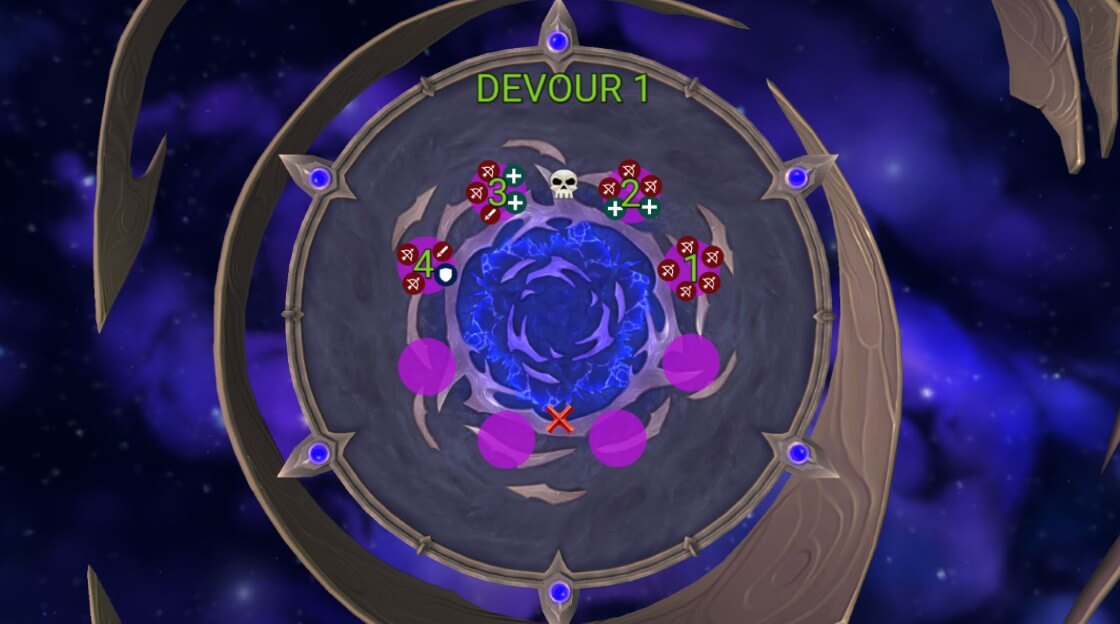
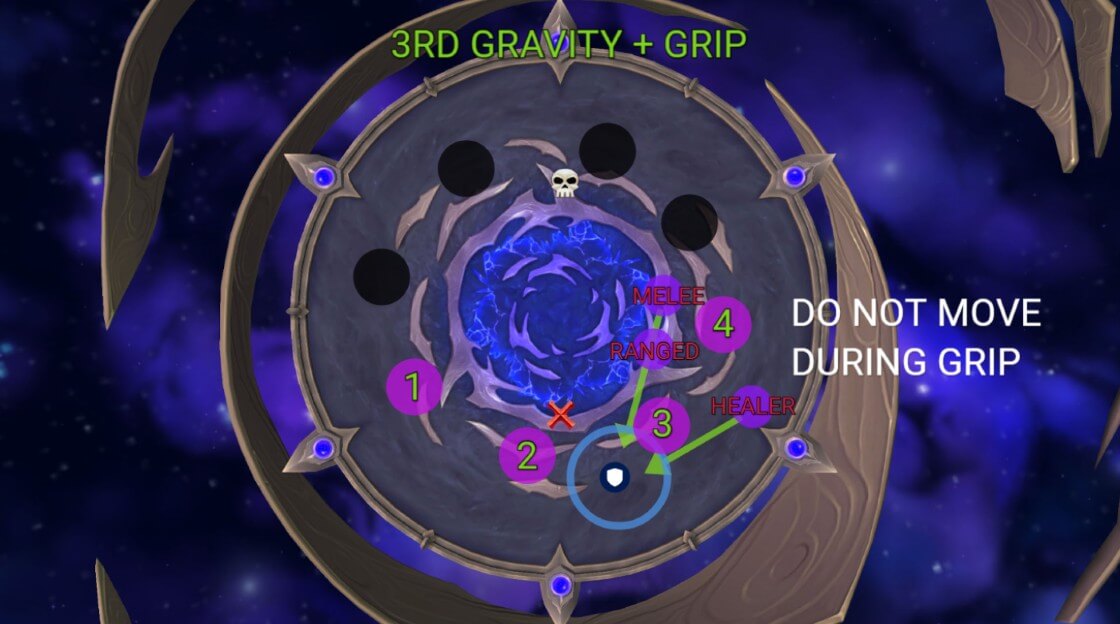
Then comes the first Devour. Place a marker opposite the melee stack from the start of P3, assign groups, 1 and 2 left, 3 and 4 right. Enter your star about 1.5 seconds before the cast ends to minimize damage.
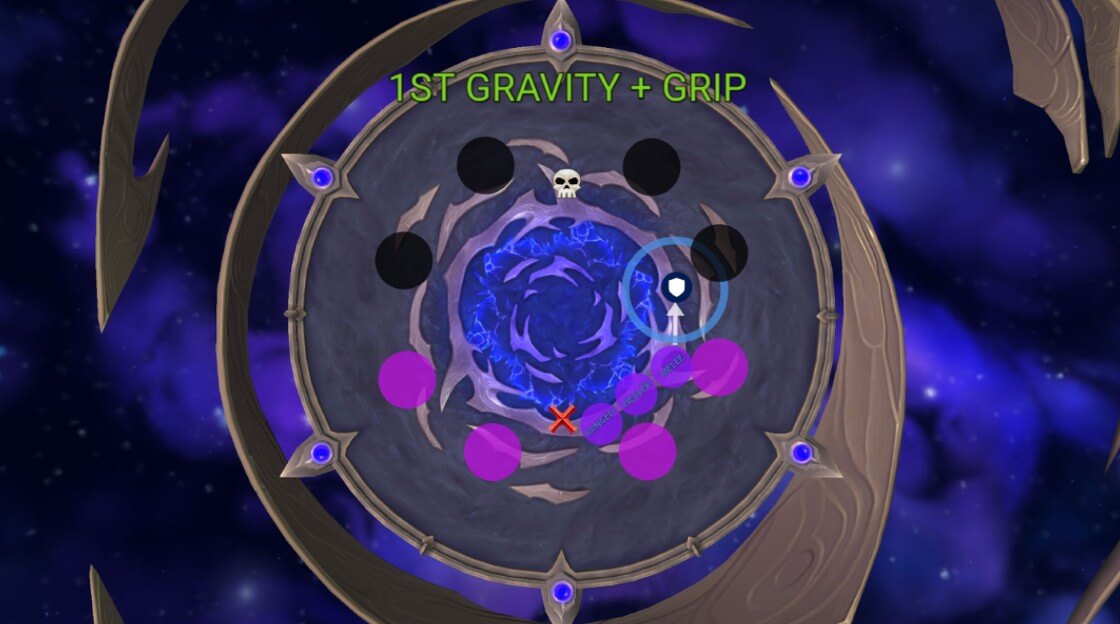
After Devour, run to the opposite side, the P3 start area. Prepare for gravity in line formation, but you will first get a tank grip. Get into position early and let the grip pull you, this keeps the formation intact. Use defensives here.
Next are more waves. Get hit by the first two quickly, then wait out the debuff for the third by standing at max range near the edge.
Another gravity set follows, this time L formation, before the tank grip. Ping the third alive star as the reference point.
You get another rings plus gravity sequence after that. Do it the same way, except this one hits during the tank grip, so once you are in position, everyone should stop moving for the grip so positions do not drift while Airborne.
For the second, final Devour, only four stars remain. Count them 1 to 4 from the first alive one. Run to the opposite side, stack, and heal through.
The last two gravities are easy. Stand in the marked spots and hold against the grip, both sets land before the tank grip.
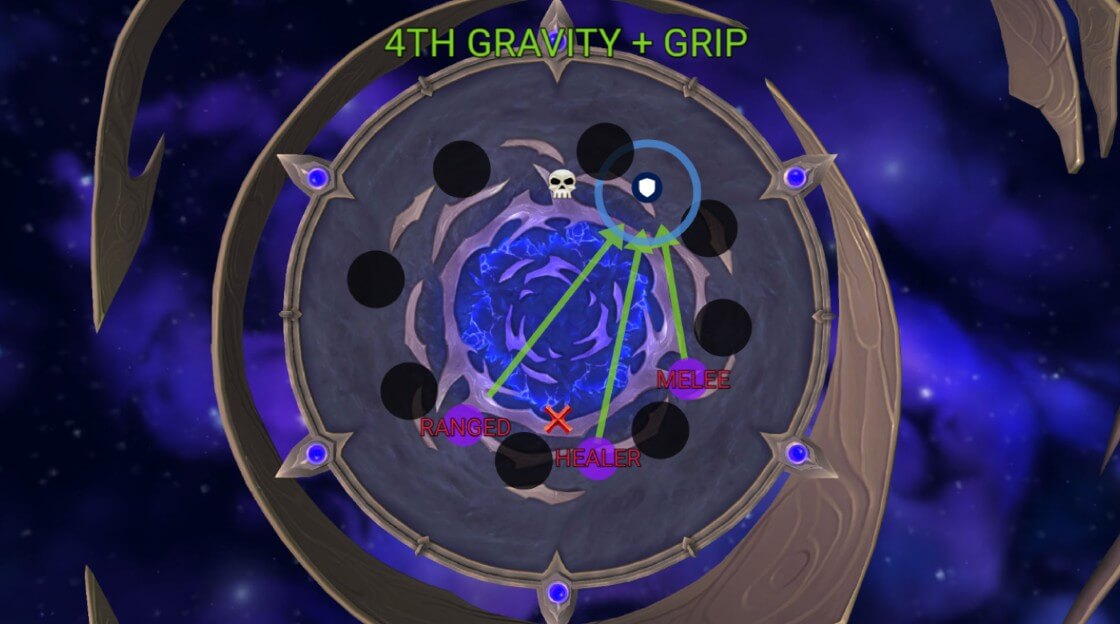
End flow: Gravity, waves, gravity, waves, kill the boss or wipe.
For the last two wave sets, the room is already small and waves can spawn in void zones. Someone calls the first wave, get close, play safe.
Once you survive that sequence, the boss dies.
WeakAuras
Northern Sky: Manaforge Omega WeakAura Pack
This WeakAura also requires the Northern Sky Anchors WeakAura and the Northern Sky Raid Tools Addon.
https://wago.io/NSManaforge