Raid Setup
Introduction
Welcome to our Mythic Nexus-King Salhadaar Boss Guide, for the Manaforge Omega Raid. Learn about the Mythic specific fight mechanics and the strategy we recommend to defeat this boss on Mythic difficulty!
This guide focuses on a Mythic strategy for Nexus-King Salhadaar, and won’t explain the basics of the fight, so make sure you read through the Heroic version of the guide for this boss if you are unfamiliar with the encounter.
Fight Style: Single Target Fight (with cleave during the intermission)
Recommended Setup: 2x Tank / 3x Healer / 15x DPS
Required utilities: Warlock Gateway
Hero/Lust usage: 2nd Intermission damage amp
Easy Mode
Prep & Setup:
- Run 3 healers (4 is fine too, no DPS check).
- Split raid into two even platform groups.
- Assign a 4-player interrupt rotation (4th = ranged).
- Orient markers based on boss facing before pull.
Phase 1 – Combos, Soaks & Spirits:
- Bait abilities in the middle; reposition before each 4-ability combo for predictable dragon lasers.
- Raid Soaks: Only soak if it’s 1st or 3rd in the combo. Missed soaks require tank soak + immunity/defensives.
- Tank Soaks: Always solo, Brew/Warrior are best. Send immunities if needed.
- Healing: Rotate DRs and externals across 3 soak sets.
- Claws: 10 total (5 + 5). Drop them behind where you stand. Banishment players pre-move.
- Spirits: Catch 1/2/3 spirits per set by facing them. Missing one = regain Oath-Bound. Final set miss = death.
Phase 2 – Laser Dance & Platforms:
- Circles spawn randomly, find a safe zone after knockback.
- Laser 3-Set:
- #1: Always on the tank.
- #2: Outward = stack & run mid. Inward = stay still. Never gate here.
- #3: If you ran mid, then gate out. If you stayed, then gate in.
- Platforms:
- Tank gathers adds before DPS.
- Kill Titan first (wipe at 100 energy).
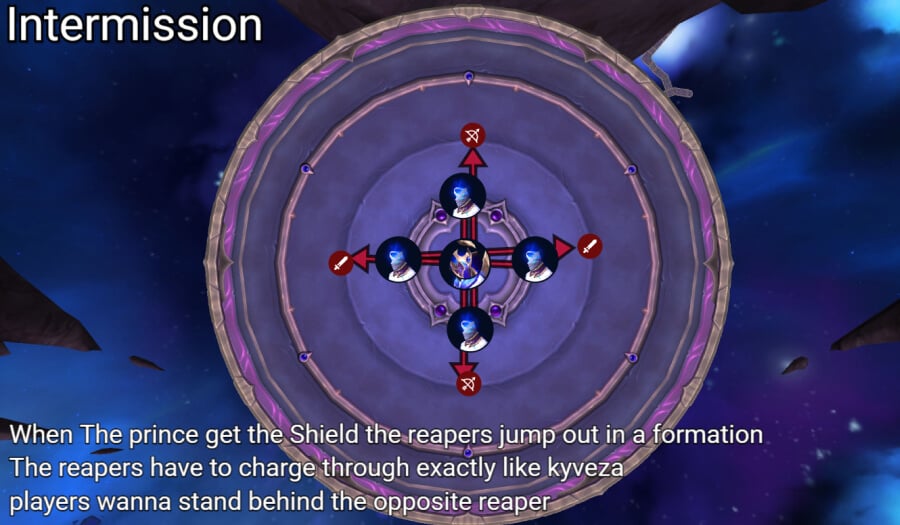
- Prince shield: Reapers must break it.
- Stack on tank to bait circle, dodge, and kill all adds to leave.
Burn Phase – Short Dragon Window:
- Pop DPS CDs, kill or heavily burn dragon.
- Spread around boss for lines and healer coverage.
- Final claws: All point forward, spread to avoid clipping.
Phase 3 – Stars, Rings & Starkillers:
- Stars: 3 melee + 3 ranged. Tank always center, others left/right. Keep gaps.
- Players placing stars use strong defensives.
- After grip: Dodge rings (Set 1 = move after 3rd pop, Set 2 & 3 = after 4th).
- Starkillers: Closest players to illusions get lasers. Tank always shoots middle star. Pre-assign targets if needed.
- Repeat star + ring + Starkiller cycle. Two more sets before ~30s soft enrage.
- Kill boss before timer.
Mechanics
For each stack of Oath-Bound that the player is missing, a Spirit will spawn and charge the player. If the player fails to face the spirit, they will get the stack of Oath-Bound back.
The portals and lasers spawn in a specific pattern on Mythic difficulty, check strategy section for more information.
Nexus-Prince Ky'vor shields himself for 50% of his max hp. Forces players to hit the Prince with Twilight Massacre in order to remove the shield more efficiently.
Shadowguard Reaper will fixate on a player and after several seconds, charge towards them.
Hitting Nexus-Prince with this ability, will deal damage to the absorb shield.
Players targeted by it should ensure that they do not get hit by more than one Reaper Charge.
The placed stars are now rotating around the platform and need to be placed properly to avoid collision and triggering Stars Collide (check strategy section).
If stars overlap or move into each other, a hard enrage is triggered, leading to a quick wipe.
Hitting the same star with multiple Starkiller Swing at the same time will inflict 30 Million damage to all players, killing most of the raid in the process.
Strategy
This fight is a significant ramp-up in difficulty compared to the previous six bosses in the instance.
It’s recommended to run three healers since incoming damage is manageable, but due to current item levels and renown, bringing four healers won’t make the fight harder, since there are no strict DPS checks in any phase.
Before you begin, split the raid into two even groups for the platforms, just like on Heroic.
If you’re running three healers, consider reducing the size of the group with only one healer to 8-9 players, just make sure that group has plenty of single-target and cleave damage.
You’ll also need to assign a 4-player interrupt rotation for the platforms. Ideally, the fourth interrupter should be ranged, since you’ll likely be out of melee range dodging circles by then.
Markers and Setup
Make sure to orient yourself based on the boss’s facing direction before the pull for proper marker placement.
The markers you’ll need for Phase 3 are:
- Ranged Stars: Yellow - Yellow - Skull
- Melee Stars: Cross - Orange - Green
Blue and Skull also serve as indicators for platform teams.

Phase 1
Pull the boss from the Red marker side and have your raid bait mechanics in the middle of the room.
You’ll repeat this repositioning every time the boss is about to use his 4-ability combo, this keeps the dragon lasers more predictable and easier to dodge.
Each combo can happen in a different order, but we recommend a simple rule: Only soak if the soak ability is the 1st or 3rd cast.
Example: If the boss casts a frontal first, you should ignore the second ability and move forward as soon as the frontal ends, the third cast will always be a soak.
Position the raid close to the metal edge on the ground; going behind it risks getting clipped by the dragon beams.
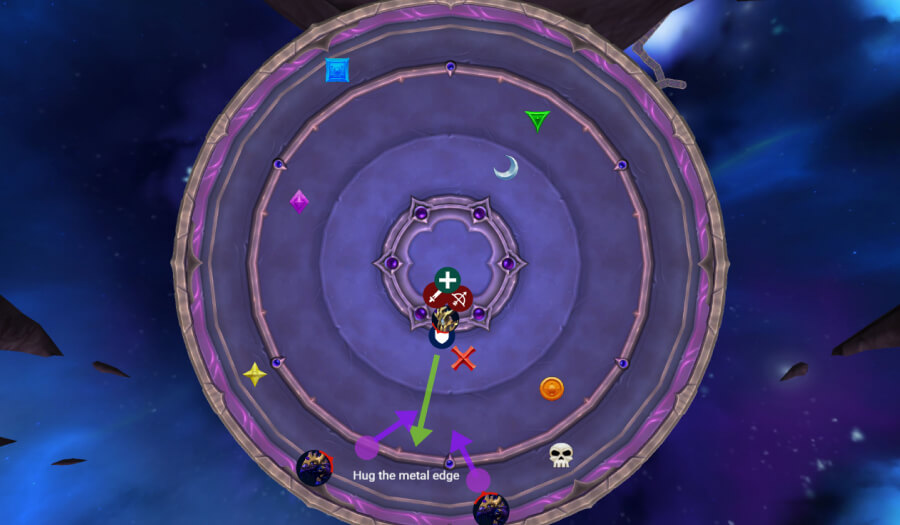
While moving, dodge as many beams as possible, but make sure you are inside the soak. If you miss it, you’ll need to fix your stacks by standing in a tank soak with a strong defensive, external, or immunity.
Tank Soaks
These are always soloed by a tank. Brewmaster and Warrior excel here, while others might need help. You can send an immunity player to assist on certain sets if defensives are weak (for example, Brewmaster often needs this on the last set).
Healing Assignments:
The Healer assignments are:
- 1st Soak: Everyone uses strong personals
- 2nd Soak: AMZ / Barrier / Spirit Link
- 3rd Soak: Rally / Ancestral Totem / AMZ
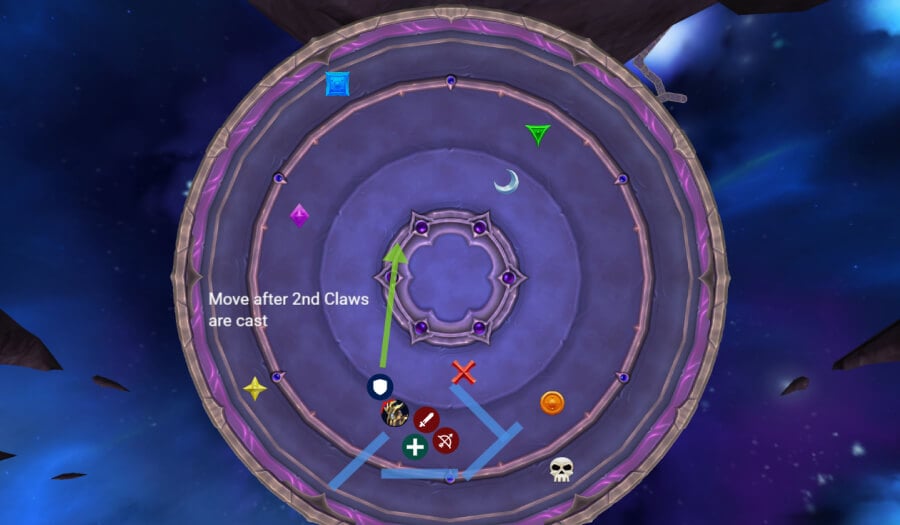
After each tank combo, the raid will get Claws.
Claws
Each Claw cast targets 10 players total, but it’s split into two waves of 5, the first five get it immediately, followed by another five a moment later.
When the second wave is about to go out, the tank should reposition the boss slightly, while the raid drops their claws behind the area you’re already standing in. This keeps the space in front of the boss clear and makes movement easier.
Don’t overcomplicate this mechanic, just drop your claw safely without overlapping and make sure you’re not hit by someone else’s. Everyone else should stay alert and dodge incoming claws.
Players affected by Banishment can’t receive claws. They should pre-move early to avoid getting clipped, since they’re already taking heavy DoT damage and another hit would likely kill them.
Spirits
Once you’ve repositioned and claws are handled, Spirits will spawn and need to be caught. The number you need to catch depends on how many Oath-Bound stacks you’re missing.
If you died and were resurrected, you’ll have 0 stacks, which means you’ll need to catch 3 spirits in every set.
If you handled mechanics cleanly, the number of spirits per set is:
- 1st set: 1 spirit
- 2nd set: 2 spirits
- 3rd set: 3 spirits
The spirits are easy to see when they spawn, but the key is to catch them in the exact order they appear. To do this correctly, you must face them with your character, not just your camera, as they charge toward you.
If you miss one, you’ll gain an Oath-Bound stack back. On the first or second set, you can fix this by soaking a tank combo with a strong defensive, external, or immunity.
However, if you miss a spirit on the third set, there’s no recovery, you will die.
Once all spirits are successfully caught and the mechanic is resolved, Phase 2 begins, playing out much like it does on heroic.
Phase 2
Circles now spawn randomly, so find the safe spot after the knockback and move the boss there once they disappear.
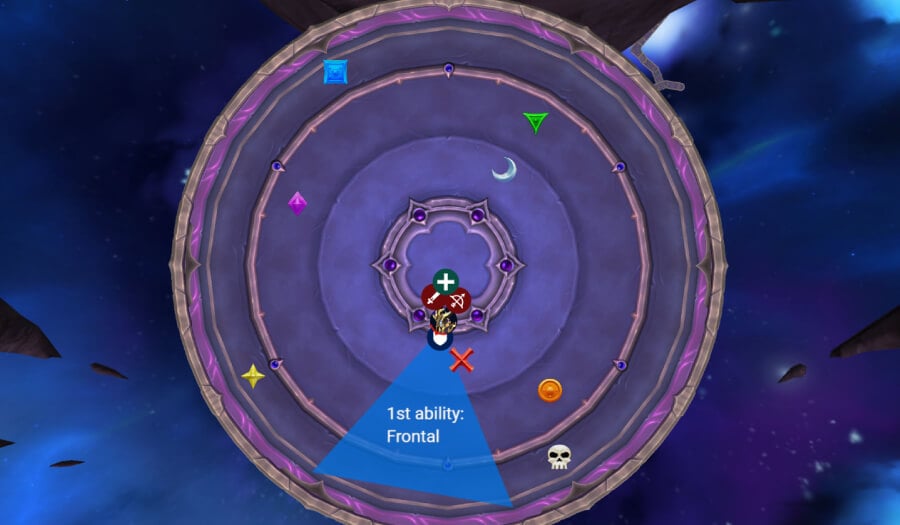
Here, you have to understand the laser 3-set combo.
The 1st one always goes on the current tank, and will be placed to the side, just next to the raid; this in most cases ends up around the green marker. These do not move and don’t need to be dodged.
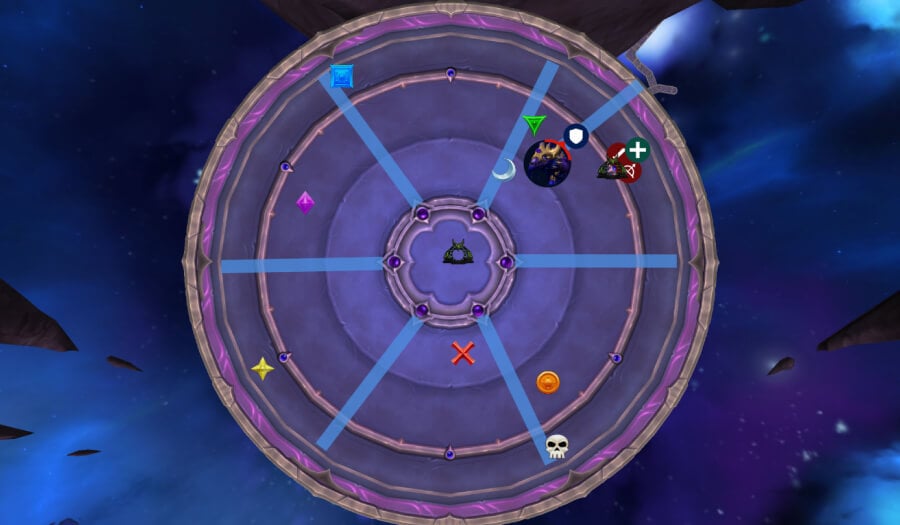
The 2nd set has two options. Either you have to stand still and be tightly stacked behind the metal line on the floor, or run into the middle.
IMPORTANT: You never take the Warlock gate on the 2nd set!
If the lasers are pointing outwards (like in the image below), then the Raid must run into the middle and you need speed buff for this. Make sure you run in a straight line while you do this since you can get clipped on the side.

If the lasers are pointing inwards, the raid stays!
The 3rd set depends on what you had on the 2nd set:
- If you had to run to the middle, then you take the gateway out of the middle
- If you had to stay, then you take the gateway into the middle
Laser Combo Recap
To summarise, the Laser combo is:
- First Laser: Always on the current tank. It’s placed next to the raid, usually near the Green marker.
- Second Laser:
- Pointing outward: Stack tightly and run to the middle (use speed boosts).
- Pointing inward: Stay where you are.
- Never take the Warlock Gate here.
- Third Laser:
- If you moved in for #2, then Gate out.
- If you stayed for #2, then Gate in.
After this combo, split into your platform teams.
Intermission Platforms
As you land on the platforms, the first and most important thing is to let the tank pick up all the adds before anyone starts DPSing. Once they have threat, your main kill priority is always the Titan, because if its cast completes at 100 energy, it will wipe the raid.
Have someone ready to mark the Prince on your side, this is necessary for interrupt WeakAuras to work properly.
The most important mechanic on the platform is the Prince’s shield. When he casts it, Reapers must charge through him to remove the shield. Without doing this, you won’t be able to kill him.
Everyone else should pixel stack tightly on the tank. This is important because you’ll be baiting a large circle immediately after. Once the circle appears, dodge it and move together with the lasers as you did on heroic.
Remember: you must kill every single add before you can leave the platform. The Titan is your top priority, but everything needs to die eventually.
Once both platforms are clear, you’ll return to the main room and Phase 2 will repeat exactly as before. That means:
- Dodge the large circles.
- Find the safe spot.
- Deal with the 3-set laser combo again.
Burn Phase
When you enter the burn phase, the most important thing is to have your DPS cooldowns ready to burn down the dragon. With current item levels, it’s even possible to kill the dragon outright, which makes Phase 3 significantly shorter.
The raid should spread evenly around the dragon to make dodging the lines easier and ensure healers are spread out so that every player always has at least one healer in range.
At the end of this phase, the entire raid will get claws, but they all point forward. That means you just need to stand alone and not in melee range, so you don’t get clipped by claws coming from the opposite side.
Phase 3
If you’ve reached Phase 3, congratulations, the boss is almost dead. This phase doesn’t have many mechanics, but every mistake is extremely punishing and can easily lead to deaths or a full wipe.
Immediately at the start, you’ll get stars. Three melee and three ranged players always receive them, with one of the melee stars always going to a tank.
The rule for placement is simple:
- For melee stars, the tank always places theirs directly on the assigned marker. The other two melee players go left and right of the tank.
- For ranged stars, one player goes on the marker while the other two adjust to create space between the stars.
Make sure there’s a gap between each star, there’s no reason to place them too close together.
First Set
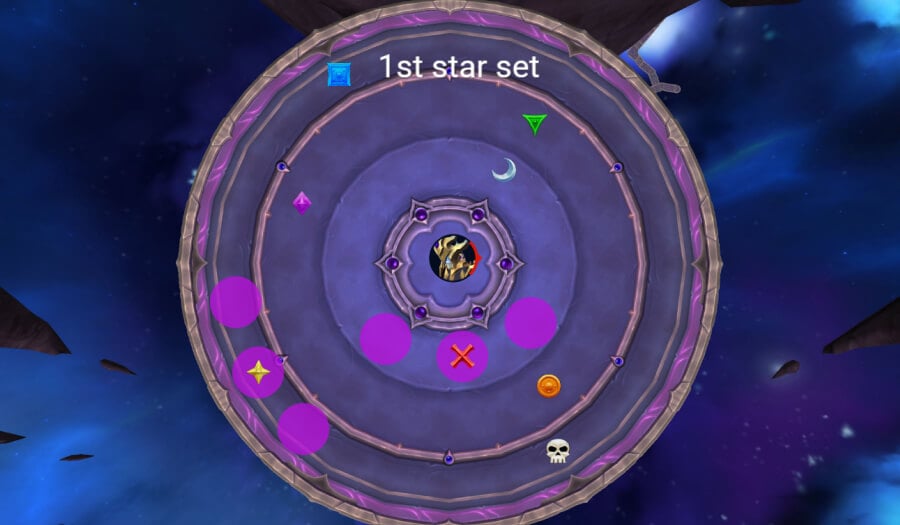
Players placing the stars need to be fully topped and use strong defensives, as the hits are nearly one-shots.
Once the stars are placed, everyone will be gripped, don’t fight the grip. There’s a grace period before the stars become active, so you won’t take damage as long as they’re placed correctly.
After the grip, you’ll begin dodging rings. There are different movement strategies here, but the most important thing is simple: just dodge the rings.
For this first set, the raid should move after the 3rd pop.
Then you’ll face your first set of Starkillers. The two players closest to the two boss images will get the lasers, so it’s possible to pre-assign players to pick them up to reduce RNG.
The real boss will always target the tank, so the tank should aim for the middle star.
The two illusions always spawn behind the boss, so you can anticipate the direction of incoming lasers, this makes aiming significantly easier.
Second Set
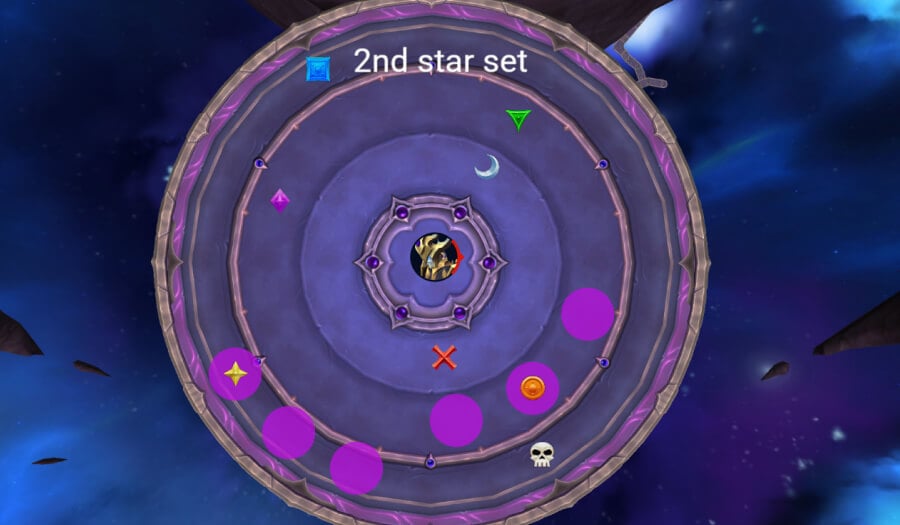
Melee players go to orange, and ranged players go to yellow again. This time, one ranged player goes directly on the marker, while the other two go to the left side of it.
For the rings on this set, you move after the 4th pop.
Third Set
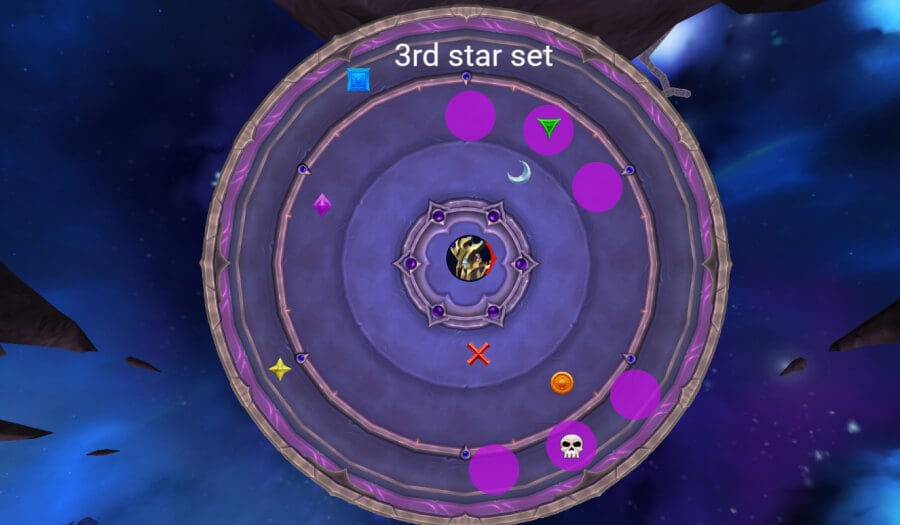
Melee players go to green, and ranged players go to skull.
For the rings, dodge after the 4th pop, but stay in the gap for two more pops before running into the middle.
After this, you’ll have two more sets of Starkillers and roughly 30 more seconds before enrage, during which nothing new happens.
Kill the boss before the timer runs out.
WeakAuras
Northern Sky: Manaforge Omega WeakAura Pack
This WeakAura also requires the Northern Sky Anchors WeakAura and the Northern Sky Raid Tools Addon.
https://wago.io/NSManaforge