Ragnaros Heroic Raid Guide
Learn how to complete Ragnaros of Molten Core (Heroic) in Warcraft Rumble. Follow our suggested build and strategy for Ragnaros.
Within the final Wing of Heroic Molten Core you will encounter Ragnaros the Firelord.
Defeating Ragnaros awards you with 100 Valor and a Golden Ragnaros Skin. For repeat clears in the subsequent cycles, one reward per cycle, you will get 500 Coins instead of the golden skin.
LFR Builds
Sneed with Gargoyle


rumblo:CE4QARoECBsQARoECCYQAhoECFoQARoECC4QABoECBEQAhoECCsQAA==
Important Talents
Lead with Greed on Sneed gives you more income from chests and Towers when Sneed takes them.
Fae Blessing on Faerie Dragon is important to make Gargoyles Resistant so that they can fight Ragnaros.
Strategy
Attack both sides so that you can take out both Flamewaker Elites within 10 seconds of each other, so that they stop respawning. You have Worgen and S.A.F.E. Pilot that can help the other side. Worgen is your main damage dealer against Majordomo Executus in the first phase: do not play it right on top of Executus or it will be spotted.
You are in the gold-making business. Try to take the chest with Sneed every time. Take as many Towers with Sneed as possible, and with Gargoyle if you do not manage to take them with Sneed. However, it is important to not let the enemy rebuild the Towers, so Dark Iron Miner or Worgen may be necessary to keep them down. Ideally, you get a Siege mini out there to get gold, but sometimes the Tower itself is enough.
It is hard to get enough damage on Ragnaros unless your levels are very high. Whelp Eggs and Worgen can work, but this build aims to deal boss damage with Resistant Gargoyles. Protect your Gargoyles with Worgen and S.A.F.E. Pilot. You can use both for boss damage too occasionally.
Steal Molten Giants and Core Hounds with Banshee. As you get control of the top Towers, use Banshee there too to grab Molten Giants when possible.
When you push into the final phase, you will need to race Ragnaros. You need a Gargoyle between your base and the chest to tank the fifth Son of Flame.
Watch it in action
Fast Drakkisath


rumblo:CCEQABoECBsQARoECFgQARoECC4QABoECB0QARoECCMQARoECEsQAg==
Important Talents
Chromatic Scales on General Drakkisath help your other minis survive Elemental damage.
Earth Shield on Frostwolf Shaman to make Drakkisath Armored.
Nature's Swiftness on Dryad to make Drakkisath Fast.
Pick Lock on Defias Bandits adds more income from the chest.
Strategy
Attack both sides so that you can take out both Flamewaker Elites within 10 seconds of each other, so that they stop respawning. You have Whelp Eggs and S.A.F.E. Pilot who can help the other side.
Defend against incoming attacks and attack Ragnaros with Drakkisath deathballs, and Whelp Eggs as needed and especially in the last phase.
You have two ways to buff Drakkisath: you can give it Armor with Frostwolf Shaman or Fast speed with Dryad. Sometimes, you can give it both, but often you just give it one or the other: Armor when it needs to fight Molten Giants or Core Hounds, and Fast when it needs to go to places. Fast is useful to kill Majordomo Executus with Drakkisath, and Fast Drakkisaths can also slip by to attack Ragnaros before it gets a chance to summon more minis. For example, you can send a Fast Drakkisath from a top Tower before the final phase transition to get it to Ragnaros and not get stuck fighting Sons of Flame.
Ragnaros will summon lava waves when it emerges, so be ready for them and retake the Towers quickly. You can use your Unbound minis to help.
When you push into the final phase, you will need to race Ragnaros. If you have Whelp Eggs next to Ragnaros at phase change, they will be popped open and the Whelps get some free shooting time while the animations are ongoing. You want to have multiple Drakkisaths at Ragnaros when the final phase begins so that they will deal the majority of the needed damage. Use one Drakkisath to tank the Son of Flame that spawns between your base and the chest.
Watch it in action
Execute Worgen Malfurion


rumblo:CDkQAhoECBUQAhoECC4QABoECAkQABoECB0QARoECFgQARoECFoQAQ==
Important Talents
Pick Lock on Defias Bandits adds more income from the chest.
Bloodthirsty on Execute buffs your damage dealers.
Strategy
Attack both sides so that you can take out both Flamewaker Elites within 10 seconds of each other, so that they stop respawning. You have Whelp Eggs, S.A.F.E. Pilot, and Worgen, who can help the other side.
Defend against incoming attacks and attack Ragnaros with Whelp Eggs, Worgen, and Execute. Play Whelp Eggs on the left side, wait for Ragnaros to use its aoe attack, play Worgen on the right, and Execute Ragnaros and Worgen. Note that you may sometimes cycle faster than Ragnaros can get its aoe attack from cooldown, in which case you do not want to wait for it.
Use Malfurion to keep your Towers alive. Play Malfurion at a Tower that does not have seeds whenever possible. The seeds will protect Towers from regular Meteors, but you will still lose them when Ragnaros emerges and at the start of the last phase.
Ragnaros will summon lava waves when it emerges, so be ready for them and retake the Towers quickly. You can use your Unbound minis to help.
When you push into the final phase, you will need to race Ragnaros. If you have Whelp Eggs next to Ragnaros at phase change, they will be popped open and the Whelps get some free shooting time while the animations are ongoing. Note that after the Flamewaker Elites spawn, you cannot use Execute unless you kill them. Use Bog Beast to tank the Son of Flame that spawns between your base and the chest.
Watch it in action
Onu with Gargoyle

rumblo:CEMQAhoECB0QARoECCYQAhoECC4QABoECAkQABoECEQQAhoECCsQAA==
Important Talents
Fae Blessing on Faerie Dragon is important to make Gargoyles Resistant so that they can fight Ragnaros.
Pick Lock on Defias Bandits is needed for extra gold from the chest.
Strategy
Attack both sides so that you can take out both Flamewaker Elites within 10 seconds of each other, so that they stop respawning. You have S.A.F.E. Pilot that can help the other side. After the Flamewaker Elites are dead, you can use Execute on Majordomo Executus.
Use Defias Bandits to take the chest whenever you can.
Your plan to damage Ragnaros is based on Onu. Onu can drop minis across the lava lake from two positions:
- Left side before the Tower: play Onu on the right side of the middle deploy zone and point the arrow left. As Onu approaches the left Tower, you can drop minis across the lake.
- Right side after the Tower: play Onu on the left side of the deploy zone at the right Tower. As Onu walks up, you can drop minis across the lake.
The preferred plan is to drop minis on the left side because it is easier to get access to. Try to drop another Onu first and then give it resist with Faerie Dragon. From here, you should be able to cycle enough to play another Onu before the previous one dies, thereby giving you constant damage on Ragnaros. Try to get a Gargoyle out there if you can, and use Execute to deal damage to Ragnaros and Bloodlust your minis.
When you push into the final phase, you will need to race Ragnaros. You usually need a Gargoyle between your base and the chest to tank the fifth Son of Flame, but remember to keep your Onu cycle going.
Watch it in action
Co-op Builds
Malfurion


rumblo:CDkQAhoECA8QAhoECDYQARoECBEQAhoECB0QARoECFgQARoECFoQAQ==
Important Talents
Germinate on Malfurion helps to protect your Towers from Meteors.
Lightning Rod on Ancient of War redirects Dark Iron Miner and Living Bomb.
Pick Lock on Defias Bandits adds more income from the chest.
Strategy
Attack both sides so that you can take out both Flamewaker Elites within 10 seconds of each other so that they stop respawning.
Take out Majordomo Executus with Worgen. Do not deploy Worgen right on top of Executus or it will be noticed. Try to time the transition so that your minis are not right next to the Tower so that they are not taken out by the Meteor when Ragnaros emerges.
Play Malfurion at Towers that need Seeds of Protection to survive Meteors.
Defend against incoming attacks and attack Ragnaros with Whelp Eggs and Worgen. Deploy Whelp Eggs on the left, wait for Ragnaros to use Wrath, and then deploy Worgen on the right side.
Use Banshee to steal Molten Giants and Core Hounds.
When you push into the final phase, you will need to race Ragnaros. If you have Whelp Eggs next to Ragnaros at phase change, they will be popped open and the Whelps get some free shooting time while the animations are ongoing.
Watch it in action
Drakkisath

rumblo:CCEQABoECBsQARoECFgQARoECDEQARoECB0QARoECF0QABoECEsQAg==
Important Talents
Chromatic Scales on General Drakkisath help your other minis survive Elemental damage.
Pick Lock on Defias Bandits adds more income from the chest.
Strategy
Attack both sides so that you can take out both Flamewaker Elites within 10 seconds of each other so that they stop respawning.
Defend against incoming attacks and attack Ragnaros with Whelp Eggs and a Drakkisath deathball.
When you push into the final phase, you will need to race Ragnaros. If you have Whelp Eggs next to Ragnaros at phase change, they will be popped open and the Whelps get some free shooting time while the animations are ongoing.
Watch it in action
Boss Strategy
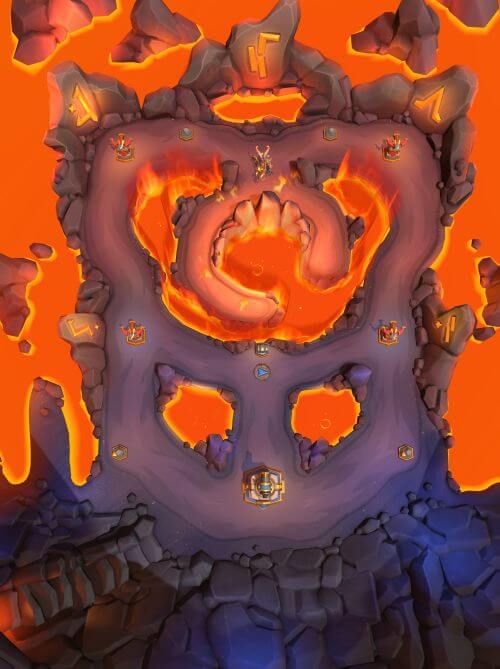
Ragnaros map (normal version)
Minis in Heroic Ragnaros’s Army
- Dark Iron Miner - Dwarven Ambition
- Firehammer - Blazing Speed
- Flamewaker - Backdraft
- Living Bomb - Blast Radius
- Molten Giant - Blood of the Mountain
- Pyromancer - Conflagrate
Living Bomb is a threat to any large groups of minis.
The Boss and Other Minis
Ragnaros
- 24,000 health
- Resistant
- Wrath: 170 Elemental damage, knockback, 12.5 range, 16.5 radius, 360 degrees, 20-second cooldown
- Melee Sweep left (Fist): 340 Physical damage, 2.7 seconds attack speed, cleave
- Melee Sweep right (Sulfuras, Ragnaros’s right hand): 340 Physical damage, 20% chance to apply Burn, 2.7 seconds attack speed, cleave
- Raid Base Meteor (phase 4 only): 500 Elemental damage, 30 seconds cooldown, targets Barracks only
Majordomo Executus
- 1500 health
- Fire Wave: 300 Elemental damage, 2.0 seconds attack speed, 18 range, 8-width wave
- Summons two Flamewaker Elites
Flamewaker Elite
- 1500 health
- Unstoppable
- Counterspells all your spells while alive
- Resurrects the other Flamewaker Elite in 10 seconds - kill both of them within that window to stop them from respawning
- Fire Wave: 250 Elemental damage, 2.0 seconds attack speed, 7.5 range
Son of Flame
- 2200 health
- Resistant
- Vulnerable to Siege damage (+100% damage taken)
- Fire Area: 200 Elemental damage, 1.8 seconds attack speed, 3.5 radius, hits ground minis only
- Immolate: Deals 30 Elemental damage every 0.5 seconds to enemy minis within a radius of 4.5
Map Mechanics
The encounter begins with Ragnaros submerged and Majordomo Executus on the board. Majordomo Executus will summon Flamewaker Elites to assist it. The Flamewaker Elites will counter any spells you attempt to play while they are alive. The Flamewaker Elites patrol the lanes and will resurrect each other unless both are killed within 10 seconds. When Executus is killed, Ragnaros emerges, and casts Phase Transition Meteors on all Towers, capturing them and dealing lethal damage to any enemies in a radius of 10 from the Towers. Ragnaros also casts Lava Wave on both lanes even if no Towers were destroyed. Finally, Ragnaros and all of its current and future minis gain Armored and deal 40 Elemental damage back to their attackers (this ability only lasts until Ragnaros submerges again).
In Heroic, there are no other Lava Waves than the phase transition ones, so you can safely attack both lanes. The Lava Wave deals lethal damage to all enemy Towers and ground minis on its path. It does not hit flying minis.
Throughout the fight, Ragnaros summons pairs of Core Hounds. The first pair spawns at 4:00 with one Core Hound spawning from the pool close to your base on the left and another from further away on the right. The next pair spawns at 3:00 with one Core Hound spawning from the pool close to your base on the right and another from further away on the left. More Core Hounds spawn at 60 second intervals, with each pair summoned every 120 seconds.
Whenever Ragnaros is not submerged, he casts Meteor on any player-controlled Towers. Meteors are only cast when a Tower is fully operational, not during building. A Meteor deals 800 Piercing damage to a Tower and minis around it on a radius of 3.5. The Meteor ability has a 10-second cooldown.
Meat Wagon with range talent is able to shoot at Ragnaros over the lava lake on the right side, if you send it towards the right Tower from the left edge of the middle deployment zone. Blizzard did not enjoy this strategy and implemented a special Meat Wagon burn zone around the area. Any Meat Wagon that enters the area takes 70 Elemental damage per second after 8.5 seconds in the zone. This damage effect lasts for 120 seconds.
Phase 3 begins at 70% health
- Ragnaros cleanses itself of Burn and Poison
- Ragnaros submerges. While submerged, Ragnaros is immune to all damage and the area around Ragnaros is on fire, dealing 30% of a mini’s health in Piercing damage every second in a radius of 10 around Ragnaros. Ragnaros also heals for 1% of its health every 5 seconds for up to 60 seconds (12%).
- Ragnaros and its minis lose Armored and the 40 Elemental damage reflection
- Ragnaros summons four Sons of Flame, two on each lane.
When all four Sons of Flame have been killed, Ragnaros emerges.
- Ragnaros gains a 90% damage shield for 5 seconds
- Ragnaros stuns all enemies within a radius of 10 for 5 seconds
- Ragnaros casts Phase Transition Meteors on all Towers, capturing them and dealing lethal damage to any enemies in a radius of 10 from the Towers
- Ragnaros casts Lava Wave on both lanes even if no Towers were destroyed
Phase 4 begins at 40% health
- Ragnaros cleanses itself of Burn and Poison
- Ragnaros gains a 90% damage shield for 5 seconds
- Ragnaros casts Phase Transition Meteors on all Towers, capturing them and dealing lethal damage to any enemies in a radius of 10 from the Towers
- Ragnaros summons five Sons of Flame, including one between your Barracks and the chest
- Ragnaros summons two Flamewaker Elites, this time much closer to your base
- Ragnaros gains the Raid Base Meteor ability and starts shooting at your Barracks every 30 seconds
In phase 4, Ragnaros will resummon any Sons of Flame that have died every 67 seconds.
General Strategy
The Heroic Ragnaros fight differs considerably from the old Normal one:
- There are no Lava Waves after losing a Tower, so you can safely push both sides (there are still Lava Waves at some phase transitions)
- There are no regular Flamewakers at the start
- The Flamewaker Elites will counterspell all your spells while they are alive, so you want to avoid spells
The Flamewaker Elites will resurrect each other after 10 seconds, but if you kill them in that time period, they will not respawn until phase 4.
You need something to take out Majordomo Executus.
- Worgen (do not deploy it right on top of Executus or it will be spotted)
- Execute (after killing the Flamewaker Elites)
- If you use a ground strategy, you can also get to Executus with ground minis
Whelp Eggs, on the other hand, are notably inefficient because Executus destroys them so quickly.
When Majordomo Executus dies and Ragnaros emerges, you will lose any Towers you had and minis that are right next to them. Try to time the transition so that your minis are not right next to the Tower so that they are not taken out by the Meteor. Be ready to retake Towers. Note that the Lava Wave starts from the middle of the lane and any minis near the top are safe from it.
Then, you start attacking Ragnaros to get to the first phase transition.
- Deploying Whelp Eggs on the left, waiting for Ragnaros to use Wrath, and then deploying a Worgen on the right side is a very effective way to deal a lot of damage to Ragnaros
- You can send ground minis like Drakkisath to hit Ragnaros
At the first phase transition, Sons of Flame will spawn. You need to be able to take them down.
- Resistant tanks are the best to keep Sons of Flame in place
- Sons of Flame take extra Siege damage, so minis like Gargoyle, Swole Troll, and Meat Wagon are highly effective against them
- Sons of Flame take full damage from Execute
When Sons of Flame die, Ragnaros emerges and meteors all the Towers again. He will also send Lava Waves down both sides. Be ready to retake Towers.
When you push into the final phase, you will need to race Ragnaros. Depending on your levels, you may want to wait until overtime to start the race. This is where spells and unbound minis are especially strong. There is no wipe at the start of the last phase, so if you have a deathball at Ragnaros, they can keep fighting him all the way to the end.
Also note that an additional Son of Flame will spawn between your Barracks and the chest, and you need to answer it immediately.