Garr and Gehennas & Shazzrah Raid Guide
Learn how to complete Wing 2 of Molten Core in Warcraft Rumble. Follow our suggested build and strategy for Garr and Gehennas & Shazzrah.
Within the second Wing of Molten Core you will encounter Garr and Gehennas & Shazzrah.
Defeating each of the bosses awards you with 100 Valor. Valor is used for upgrading an army slot to Diamond (+4 levels). Defeat both bosses to earn yourself a Mythic Tome as a reward.
LFR Builds
Drakkisath (self-sufficient deathball)


rumblo:CCEQABoECEYQABoECBsQARoECC4QABoECEwQAhoECFkQAhoECEsQAg==
This build is fully self-sufficient. You can attack from one side and defend the other.
Important Talents
Chromatic Scales on Drakkisath protects your deathball from the Firesworn explosions.
Spirit Ward on Witch Doctor also protects your deathball from the Firesworn explosions.
Earth Shield on Frostwolf Shaman makes Drakkisath much tankier.
Ritual of Rime on Skeleton Party enables you to set up static defenses. If you do not have this talent, Skeleton Party is useless. You cannot defend the other side alone without Ritual of Rime. If your partner defends, you can use another mini for the deathball, such as Firehammer.
Strategy
Build a deathball around Drakkisath. Give Drakkisath Armored with Frostwolf Shaman and add Witch Doctor and Pyromancer for dps. Try to push Garr to phase 2 with your first army, which will then get wiped by the phase-change mechanic. If you push Garr all the way to phase 3 before your army is wiped, you will have to race hard against the continuous damage to your Barracks. Therefore, the first army should not be too strong.
After your first army is wiped, build another one. Try to bait Garr’s Earthquake with a Dark Iron Miner that is ahead of your army after the phase transition so that your main group is not immediately hit with it. This second army can be as strong as possible to beat Garr.
Use S.A.F.E. Pilot to snipe Garr’s Darkspear Trolls.
Use Dark Iron Miner to gain more gold.
Use Skeleton Party to build static defenses against the Firesworn on the other lane.
Watch it in action
Cenarius (low-level support build)

rumblo:CBcQARoECAgQABoECB0QABoECBsQARoECEYQABoECEwQAhoECC4QAA==
This build is a support build that needs a deathball deck alongside it. It is a great option if your minis are low level and you cannot push through yourself: you can defend your side of the map and support the attacking player.
Important Talents
Gnomish Cloaking Device on S.A.F.E. Pilot is needed if you are at a lower level than Garr.
Ritual of Rime on Skeleton Party enables you to set up static defenses. If you do not have this talent, Skeleton Party is useless. You can replace it with Angry Chickens.
Strategy
Use S.A.F.E. Pilot to snipe Garr’s Darkspear Trolls.
Use Dark Iron Miner to gain more gold.
Use Skeleton Party to build static defenses against the Firesworn on the other lane.
Use Cenarius to provide healing to the attacking army.
Watch it in action
Cenarius (support build with solo capabilities)
rumblo:CBcQARoECA8QAhoECBsQARoECFkQARoECEYQABoECEwQAhoECC4QAA==
This build is a support build to help a deathball deck. However, it also has enough power to take the lead if your partner cannot press the attack.
Important Talents
Gnomish Cloaking Device on S.A.F.E. Pilot is needed if you are at a lower level than Garr.
Lightning Rod on Ancient of War redirects Dark Iron Miners and helps you gain access to more gold.
Ritual of Rime on Skeleton Party enables you to set up static defenses. If you do not have this talent, Skeleton Party is useless. You can replace it with Angry Chickens, but then you are more committed to the support role because you cannot defend the other player’s lane without the Skeleton Party.
Strategy
Use S.A.F.E. Pilot to snipe Garr’s Darkspear Trolls.
Use Dark Iron Miner to gain more gold.
Use Skeleton Party to build static defenses against the Firesworn on the other lane.
Use Cenarius to provide healing to the attacking army.
If you must take the lead, use a big Ancient of War as your tank and support it with Cenarius, Witch Doctor, and Pyromancer.
Watch it in action
Boss Strategy
Updated: May 2025
Minis in Garr’s Army
- Chain Lightning - Brilliant Flash
- Darkspear Troll - Headhunting
- Dark Iron Miner - Dark Iron Armaments
- Defias Bandits - Last Resort
- Drake - Roost
- Ghoul - Bone Shield
- Vultures - Tendon Rip
All of Garr’s minis are Armored.
The Boss and Other Minis
Garr
- 12,000 health
- Unstoppable, Armored, gains Resistant in phase 3
- Melee: 260 Physical damage, 2.0 seconds attack speed, 10 range
- Anti-Magic pulse: 4.0 seconds cooldown, 12 radius, removes Bloodlust and Stealth from enemy minis; removes Frost, Poison, Burn, and Living Bomb from friendly minis
Firesworn
- 4000 health
- Armored
- Unarmed hit: 140 Siege damage, 2.0 seconds attack speed, melee range, only attacks buildings and Ragnaros
- If a Firesworn destroys a building, it deals 225 Physical damage to all nearby enemies in a radius of 5
- When a Firesworn dies, it explodes for 400 Elemental damage on a radius of 6
- Anti-Magic pulse: 4.0 seconds cooldown, 9 radius, removes Bloodlust and Stealth from enemy minis; removes Frost, Poison, Burn, and Living Bomb from friendly minis
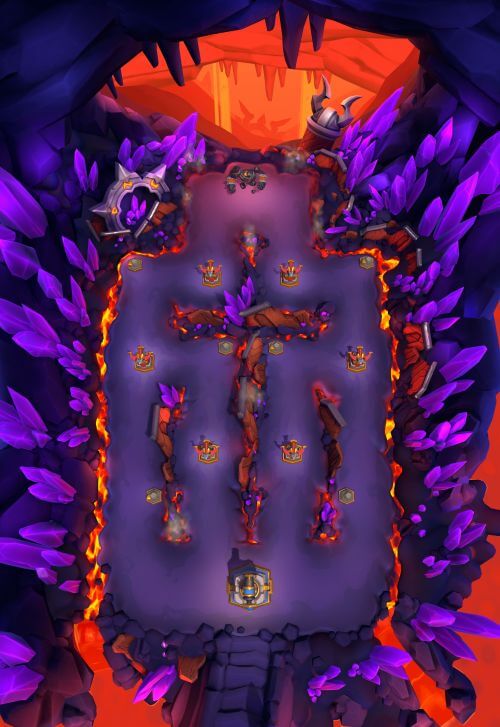
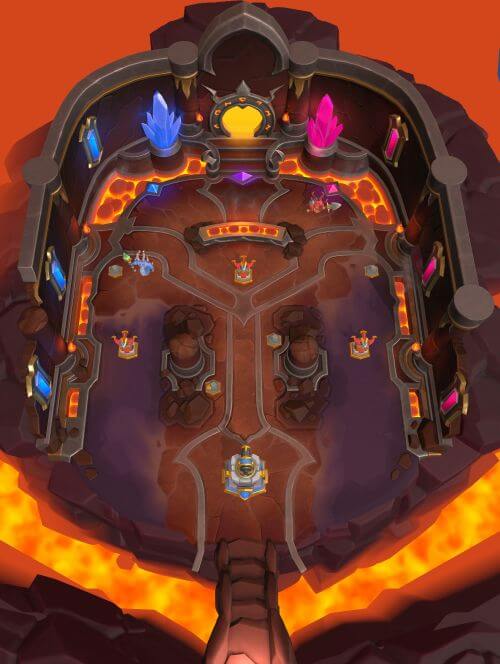
Map Mechanics
Whenever you capture a Tower, Garr spawns two Firesworn at his side. The Firesworn start making their way down towards your base, one on each lane.Trading Towers back and forth can spawn a lot of Firesworn.
Phase 2 begins at 70% health
- Garr cleanses itself of Burn and Poison
- Multiquake deals lethal damage to all enemy minis within a radius of 15 from Garr
- Multiquake also deals 16 Siege damage to all enemies within a radius of 7 around each Tower every 0.2 seconds for 10 seconds, including to any enemy-held Towers themselves. Towers take 1600 damage overall from Multiquake, so they survive it if they are higher level than Garr.
- Garr casts Earthquake: targets the closest enemy ground mini or building within a range from 9 to 100, and deals 5 Siege damage every 0.25 seconds on a radius of 7 until the main target dies. Garr will subsequently cast another Earthquake after 12 seconds.
- Unlike many other bosses, Garr does not gain a damage shield at phase transitions
Phase 3 begins at 40% health
- Garr cleanses itself of Burn and Poison
- Garr gains Resistant
- There is a permanent Earthquake effect on your Barracks: 40 dps until Garr dies or your Barracks die.
- Final quake deals 30 Physical damage every 0.2 seconds (150 dps) on a radius of 7 around the quake in front of Garr - this is Garr’s only attack ability in the last phase
- Unlike many other bosses, Garr does not gain a damage shield at phase transitions
General Strategy
You have three main considerations in the encounter:
- Whenever you capture a Tower, Garr spawns two Firesworn: you don’t want to end up fighting over Towers or you may get overwhelmed.
- At the start of phase 2, all minis near Garr will be killed with a small delay (you can Cheat Death through it, but the timing is very precise)
- Phase 3 is a race because your Barracks will take continuous damage
The mainstream answer to these worries is to push only one lane, hit hard enough to reach phase 2 but not so hard that you would immediately reach phase 3, and then build another push on the same side that will take Garr through phases 2 and 3.
The secondary lane can be defended with Ritual of Rime Skeleton Parties or Angry Chickens.
Garr’s Headhunting Darkspear Troll can be a problem for such defenses, so you want a spell or an Unbound mini to handle it, such as S.A.F.E. Pilot.
There are multiple alternative strategies too. You can beat Garr with a single push if you time your Cheat Death just right and avoid the wipe. You can also push both sides: ideally, one side arrives at Garr first and pushes it to phase 2, and the other side arrives after the wipe and finishes the job. The higher your levels, the more leeway you have, even more so because Garr’s Multiquake does not destroy the Towers if they are at a higher level than Garr.
LFR Builds
Cairne with Molten Giant

rumblo:CBYQABoECBMQARoECCYQAhoECDoQARoECBsQAhoECC4QABoECDsQAQ==
You can optionally use Gargoyle instead of Molten Giant.
Important Talents
Fae Blessing on Faerie Dragon is important to give your tank Resist.
Filet Trebuchet on Meat Wagon allows it to better outrange the bosses.
Gnomish Cloaking Device is good for S.A.F.E. Pilot if it is lower level than the boss.
Strategy
Kill Flamewaker Elites with S.A.F.E. Pilot before they finish their channel and release a Lava Wave.
Take the side Towers first and attack Shazzrah with your Resistant Tank and Meat Wagons.
Then, attack Gehennas. Note that Gehennas casts a low-range wipe at 65% health, and be ready to reinforce your attack.
Finally, proceed to the top of the map to finish off Shazzrah. It is fine if you kill Shazzrah before Gehennas too.
Watch it in action
Rivendare with Gargoyle
rumblo:CBIQAhoECCsQABoECDoQARoECC4QABoECBsQARoECBMQARoECCYQAg==
You can optionally use Molten Giant instead of Gargoyle.
Important Talents
Fae Blessing on Faerie Dragon is important to give your tank Resist.
Filet Trebuchet on Meat Wagon allows it to better outrange the bosses.
Gnomish Cloaking Device is good for S.A.F.E. Pilot if it is lower level than the boss.
Strategy
Kill Flamewaker Elites with S.A.F.E. Pilot before they finish their channel and release a Lava Wave.
Take the side Towers first and attack Shazzrah with your Resistant Tank and Meat Wagons.
Then, attack Gehennas. Note that Gehennas casts a low-range wipe at 65% health, and be ready to reinforce your attack.
Finally, proceed to the top of the map to finish off Shazzrah. It is fine if you kill Shazzrah before Gehennas too.
Watch it in action
Anub'arak
rumblo:CBAQARoECB4QARoECDIQABoECEcQAhoECC4QABoECDoQARoECE0QAg==
Important Talents
Explosive Shells on Anub’arak is mandatory to have enough damage output from the Beetles.
Filet Trebuchet on Meat Wagon allows it to better outrange the bosses.
Gnomish Cloaking Device is good for S.A.F.E. Pilot if it is lower level than the boss.
Strategy
Kill Flamewaker Elites with S.A.F.E. Pilot before they finish their channel and release a Lava Wave.
Take the side Towers first and attack Shazzrah with your flying minis and Meat Wagons.
Then, attack Gehennas. Note that Gehennas casts a low-range wipe at 65% health, and be ready to reinforce your attack.
Finally, proceed to the top of the map to finish off Shazzrah. It is fine if you kill Shazzrah before Gehennas too.
Watch it in action
Boss Strategy
Updated: May 2025
Minis in Gehennas’s and Shazzrah’s Army
- Core Hounds - Guard Dog
- Dark Iron Miner - Dwarven Ambition
- Flamewaker - Engulf
- Living Bomb - Blast Radius
- Pyromancer - Blaze of Glory
- Warsong Grunts - Blood Pact
- Warsong Raider - Saboteur
The Boss and Other Minis
Gehennas (red boss)
- 8,000 health
- Unstoppable
- Shadow Bolt: 280 Elemental damage, 1.8 seconds attack speed, 13 range, targets ground minis only (but hits both)
- Rain of Fire: 28 Elemental damage every 0.25 seconds for 8 seconds (896 damage overall), 8.0 seconds cooldown, 8.5 range, 6 radius, targets flying minis only (but hits both), highest priority ability
- Spawn Flamewaker Elite: When Gehennas reaches the left or right end of his patrol path, he spawns a Flamewaker Elite there
Shazzrah (blue boss)
- 8,000 health
- Unstoppable
- Arcane Missiles: 75 Elemental damage per second for 5 seconds (425 damage overall), 13 range, targets flying minis only (but hits both)
- Arcane Explosion: 260 Elemental damage, 1.8 seconds attack speed, 10 range, 11 radius, targets ground minis only (but hits both), highest priority ability
- Counterspell: Prevents any spells from being cast while alive
- Blink: Teleports to the top of the map at 65% and remains there for the rest of the encounter
Flamewaker Elite
- 200 health
- Lava Wave: 10-second channel to summon a Lava Wave that destroys minis and buildings on its path
Map Mechanics
Do not bring any spells because Shazzrah will counter them all as long as it is alive.
When Gehennas reaches the left or right end of his patrol path, he spawns a Flamewaker Elite there. The Flamewaker Elite begins a 10-second cast to summon a Lava Wave. If the Flamewaker Elite is not killed before this cast ends, a Lava Wave will spawn that destroys minis and buildings on its path.
Gehennas uses its area-of-effect ability only when it targets a flying mini. Shazzrah uses its area-of-effect ability only when it targets a ground mini. The area-of-effect abilities have a higher priority, but are not used if the current target is still alive.
Gehennas becomes Enraged at 65% health:
- Destroys all enemy minis on a radius of 8
- +0.05 gold per second
- +75% movement speed
- +25% damage
Shazzrah blinks at 65% health:
- +0.05 gold per second
- Teleports to the top of the map and remains there for the rest of the encounter
General Strategy
Kill Flamewaker Elites before they finish their channel and release a Lava Wave. This is usually done with a S.A.F.E. Pilot: even-level S.A.F.E. Pilot kills the Elite from the Crash damage alone, and a significantly lower-level Pilot can kill it from Stealth with the Gnomish Cloaking Device talent. Note that if you need to kill it from Stealth, you must not engage either of the bosses nearby to not take damage from their area attacks.
Take the side Towers first and attack Shazzrah. Shazzrah will use a single-target attack when targeting a flying mini and an Arcane Explosion area attack when targeting a ground mini. Meat Wagon can shoot from outside the Arcane Explosion range, which makes it a great damage dealer in this encounter. At 65% health, Shazzrah will Blink to the top of the map.
Then, attack Gehennas. Gehennas is the opposite, it will use a single-target attack against ground minis and an area attack when targeting a flying mini. Tanking it and dealing damage with long-range minis still works. The more you keep Gehennas in place, the fewer Flamewaker Elites it can summon. Note that Gehennas casts a low-range wipe at 65% health, and be ready to reinforce your attack.
Finally, proceed to the top of the map to finish off Shazzrah. It is fine if you kill Shazzrah before Gehennas too.