Up to 84% Off VPN
In The Blood of Dawnwalker, Hive and Seek is one of the objectives that becomes available during Lacra's questline. During this mission, Coen will travel through underground caves alongside Lacra in search of Isbrand, the maker of Brencis. Funnily enough, it's at this point where Lacra will also reveal herself and Coen to be connected in blood, as Brencis is one responsible for turning both of them into Vrahkir.
Of course, you shouldn't expect to be navigating just any other cave during this quest - no, that would be far too simple, wouldn't it? These caves at Boar's Back where Isbrand is being held are infested with kobolds. You'll need to not only find your way through these caves but also deal with the threat of these aggressive beings and choose whether to trust this kobold hive or not at a certain point. Luckily, this complete quest guide will walk you through the entire process and help you find Isbrand without any issues.
Quick Links
- Starting the Hive & Seek Quest
- Interacting With the Kobold Hive & Their Offer
- Chonk the Insatiable Bossfight
- Freeing Isbrand and Completing Hive & Seek
Starting the Hive and Seek Quest

First, you'll need to make your way to the cave entrance located at Boar's Back, behind the Uriash village. This exact location has been marked on the map screenshot below for reference.

After speaking with Lacra and discovering that you are brothers-in-blood through sharing Brencis as your maker, you can then choose to progress onward into the cave.
Now that you're inside the cave, your primary objective is to find and question Isbrand - Lacra's old acquaintance and Brencis' maker. However, the cave has multiple things to watch out for as you explore these dark areas.

- There is silver in the water. If you make contact with it, it will begin chipping away at your health rather rapidly. Avoid the water at all costs or heavily minimize the seconds you spend in contact with it if you absolutely must use it to progress forward. There are usually ledges nearby that you can use with your vampiric powers instead of wading your way through.
- Waves of kobolds will appear along the way and attack you, so be prepared for a fight. Luckily, you'll have Lacra by your side so you should be able to make short work of them.
- Green glowing stones indicate the path forward. Keep an eye out for them to find your way through the caves and refer to them if you get lost.
- Along the way, you may find nests. Be sure to check these for some handy loot and crafting recipes that can come in handy for the later fights.
Interacting With the Kobold Hive & Their Offer

Follow the green crystals until you come across a group of kobolds and defeat them with Lacra. Continue following the path marked by the crystals, and you will face an encounter with another kobold within a clearing. After defeating this kobold, Lacra will then point out that it appears to have been corrupted somehow.
After this dialogue, continue following the path further into the cave, and use your vampiric Planeshift ability to wall run your way across the gap where the cave floor has collapsed.

Here you will find another corrupted kobold that you need to defeat in battle. After doing so, the kobold hive will then interact with you directly, speaking to you with an offer. According to the hive, they can lead you directly to Isbrand's location, so long as you deal with "Chonk".
You now have the choice of accepting or rejecting the hive's offer. This is up to you, but the smoothest path forward is to accept the offer. After doing so, a kobold will lead you all the way to Isbrand, though there will be a couple of small encounters to claw your way through along the way.

Once you reach Isbrand, you and Lacra discover that he has been imprisoned in chains and the kobolds have been eating his flesh over and over infinitely as his body regenerates. The hive now turns against you in a trap, arriving in waves to fight. This includes Chonk, a much more, well...chunky kobold, marking the initiation of the boss fight against him and the hive.

Chonk the Insatiable Bossfight

Aside from regular melee combos, Chonk also has a lunging attack and an acidic attack where he will...well... essentially puke acidic substance across a nearby area. Lovely, isn't it? This is the most threatening of his attacks, but there is a way to tell when it is coming - he will spread his arms out. When you see him doing this, be sure to dodge out of the way and reposition behind him to chain easy damage.
As for his other attacks, you can get around them by timing perfect blocks and a well-timed side dash or shadowstep. Make sure to pivot and get some hits into the other kobolds to help pick them off between Chonk's attacks. Avoid being hit by Chonk and chip away at his health with Lacra until he's down, then wipe out any remaining members of the kobold hive.
Freeing Isbrand & Completing Hive and Seek

After defeating Chonk the Insatiable and the surrounding kobolds, the remainder of the hive will attempt to feed on Isbrand. In this dialogue you need to tell them to calm down and then tell them that if they feed on Isbrand they will lose their bond with one another. This will be enough to make them stand down and leave you alone.
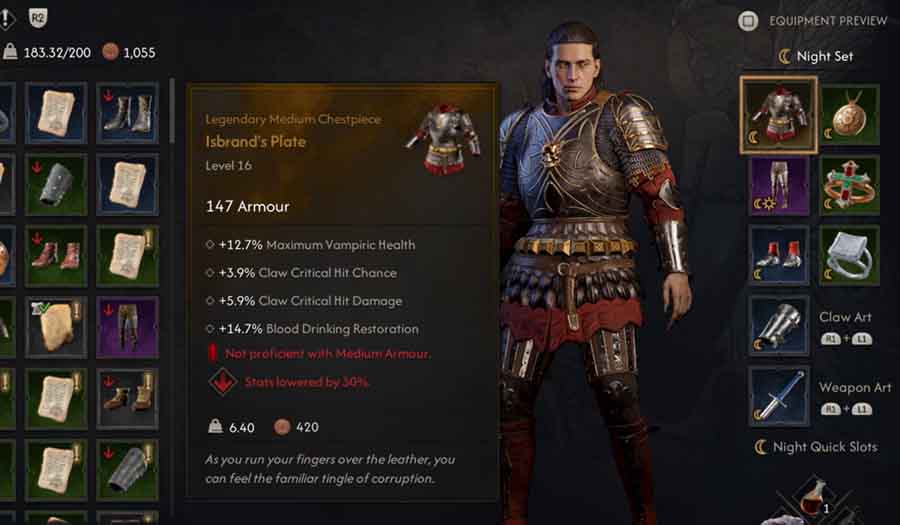
Don't forget to take a moment to properly loot the area! In the large rectangular chest, you can pick up a free Legendary armor set - Isbrand's old armor, quite literally titled "Isbrand's Plate". It's a pretty good find a that offers increased critical chances, improved max vampiric health, and increased restoration from drinking blood, and it can easily be missed if you don't take a second to snag it, so don't miss out!
Now head over to Isbrand to trigger the final cutscene between you and Lacra. You will both finally free Isbrand from his imprisonment, though he will be in no healthy state to converse or assist you in any way. The Hive & Seek quest will now conclude.
The cutscene then skips over to a nearby abandoned fort tower, where Lacra is tending to Isbrand's recovery. She tells you she needs a night with him alone to work on his recovery, meaning you will have to return the next day in order to get the next quest with Lacra - "Our Rotten Roots".

However, she will also give you a lead that you can choose to follow up on in the meantime, or not. She speaks of another Vrakhir located in Svartrau named Vicho who may be able to assist in your ultimate goal of taking down Brencis. According to Lacra, he lives in the Altenmarkt near the butcher's shop.