Raid Setup
Introduction
Welcome to our Mythic Mug'Zee boss guide, for the Liberation of Undermine raid. Learn about the Mythic specific Mug'Zee mechanics and the strategy we recommend to deal with this boss on Mythic difficulty!
Fight Style: Single Target fight
Recommended Setup: 2x Tank / 4x Healer / 14x DPS
Enrage: Hard - 100 Energy in P1 or P2
Useful utilities: Immunities
Hero/Lust usage: At 40%
Mechanics
In order to trigger the side swap and avoid the enrage at 100 energy, every player now has to be on the same side of the room.
Each cast of this ability will spawn an additional Gaol add. You start with 2 Gaols like on Heroic, and end up on 4 Gaols at the same time.
Additionally, if a Gaol is enraged, it becomes immune to damage and cannot be killed, which will result in a wipe.
The boots (circles) cannot be removed unless the player walks into fire. You still have to deal with the arrow the same way as heroic, running behind a wall or freezing a mine, but the player will take constant damage until the circle is removed.
MK2 Electro Shocker
This add now has a shield that makes it immune to damage unless hit by a Finger gun.
At 40%, Mug’Zee will spawn an electrical barrier that splits the room. Touching the beam will kill the player. This ability does not play a role because the raid is moving in a specific pattern that makes this ability non problematic.
Strategy
Important: This strategy involves running 4 healers and skipping one room swap at 4:00. By doing so, you skip the hardest part of P1 and will also have a much easier time healing the last phase due to one less stack that you gain each time you swap sides of the room.
There are a couple of things you need to set before you start pulling the boss.
Mine Popping
Since this is now a tank mechanic, running a prot paladin is strongly advised due to bubble being such a great tool for this.
You will have 2 sets in Phase 1 and 1 set in Phase 2.
Phase 1
1st Set: Paladin + Offtank + Paladin (x2 with bubble)
2nd Set: Paladin + Offtank + Paladin (x3 with bubble)
Phase 2
The Paladin tank soaks all 4 with bubble (the remaining 2 should be frozen with arrows).
In the case you are not running a Paladin tank, you can always assign Monk players to take a bomb here and there due to their passive (Dance of the Wind) that makes them take reduced physical damage until hit by a physical ability. This can go up to 90% DR.
Prisons
Due to the prison increasing in numbers on each set, you will need to pre-plan all prisons in order to make this ability as smooth as possible.
General rule here is that you want to prio all players that can get out of the prisons on their own. Monks, Locks, DH, Mages and void elf players!
Monks (both dps and healers) are great for this and should be prioritized every set.
Example Prisons:
- 1st set: (Monk - Lock) (DH - Mage)
- 2nd set: (Monk - Lock - Healer) (DH - Healer - Mage) (Random - Healer - Random)
- 3rd set: (Healer - Tank - Monk - Rogue) (Healer - Lock - Mage - Random) (Healer - Void Elf - DH) (3 random players with strong defensives or off-heals but not immunities)
Immune rocket soakers need to be in the first 2 prisons, so that they can soak while still being inside. Generally speaking, players doing immunities should never be assigned to a soak, unless they can get out of the prison on their own, like Mages.
Rocket Assignment
This is a rather simple assignment as it only happens 3 times in the entire fight:
- 1st set should be the 2 tanks + 5 immune players
- 2nd set everyone should be assigned except 5 immune players and 2 tanks.
- 3rd set is the same as 1st
Frontals
Healers need to assign externals for each frontal in this fight. There are 3 different ones.
Spray and Pray + Finger Gun both have similar damage patterns. The player is just taking constant damage and needs raw healing and some external.
Double Whammy shot on the other side is a big nuke, meaning the player needs to be topped and have an external before the hit. And there is a follow up explosion after as well.
Now that all the assignments are sorted, let's take a look at the fight flow.
Phase 1
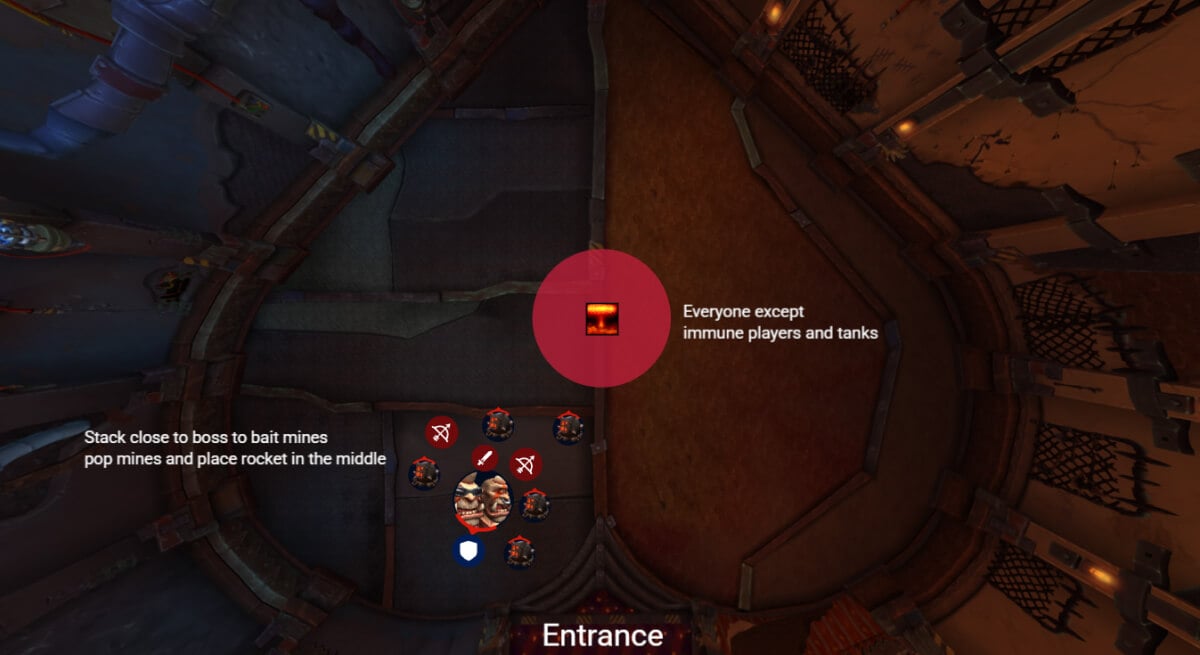
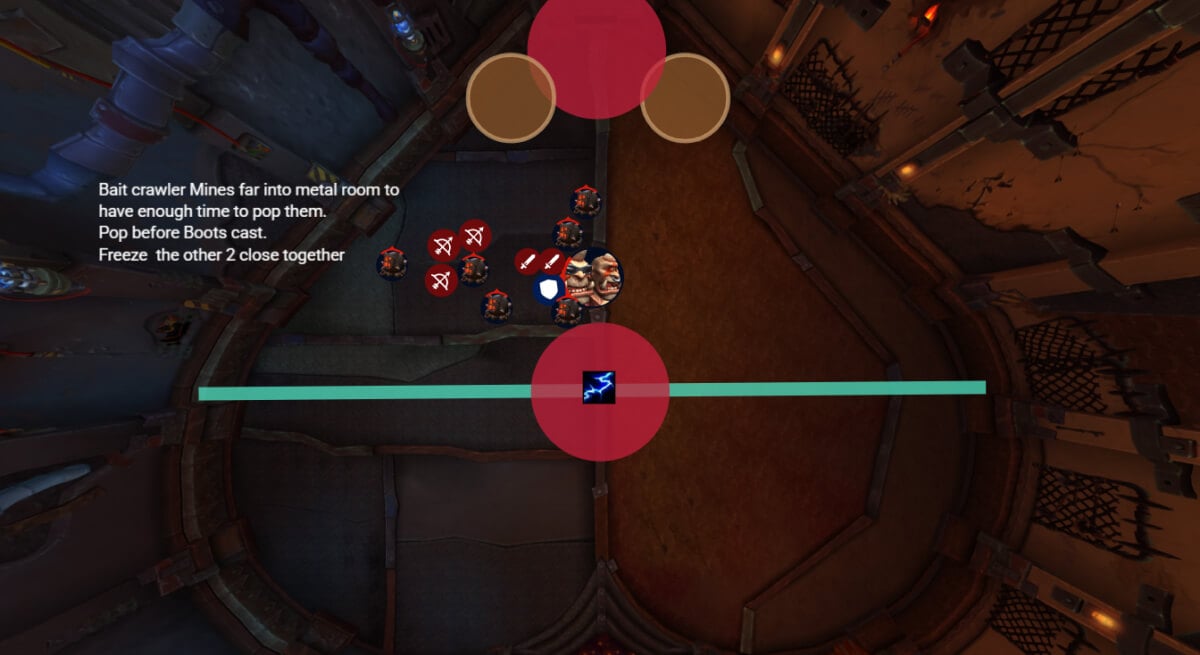
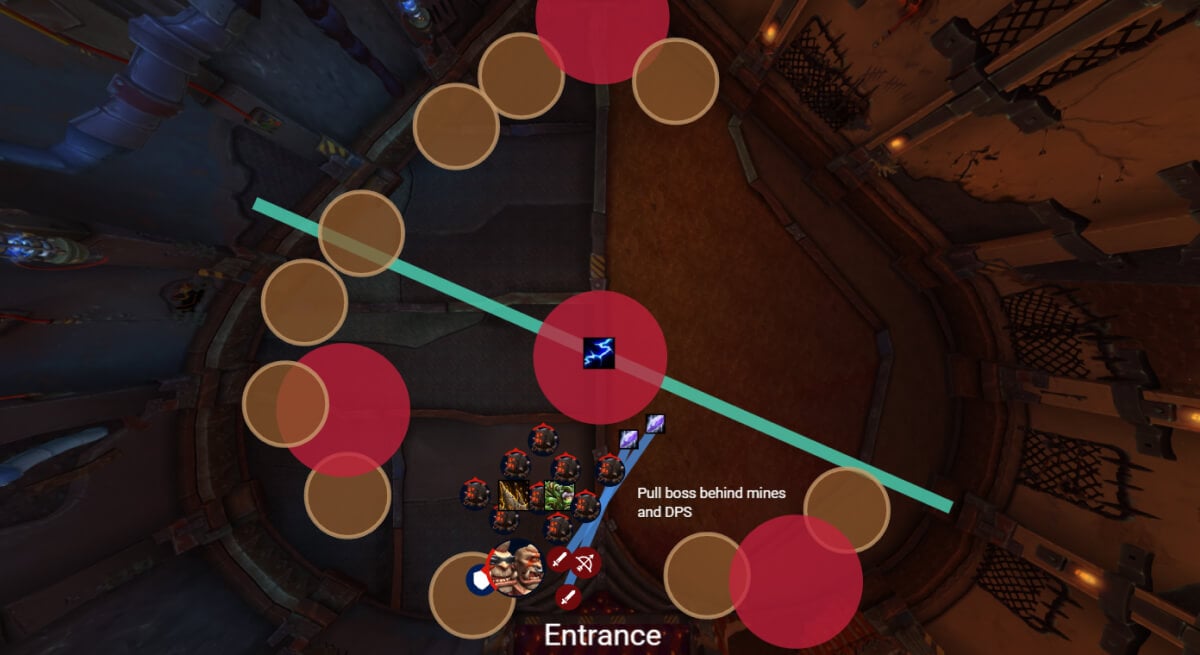
Start the fight on the opposite side of the entrance, with everyone starting in the metal area. Pull the boss closer to the wall and stack up to bait the mine spawns. When the mines start spawning, loosely spread around the boss to help soak.
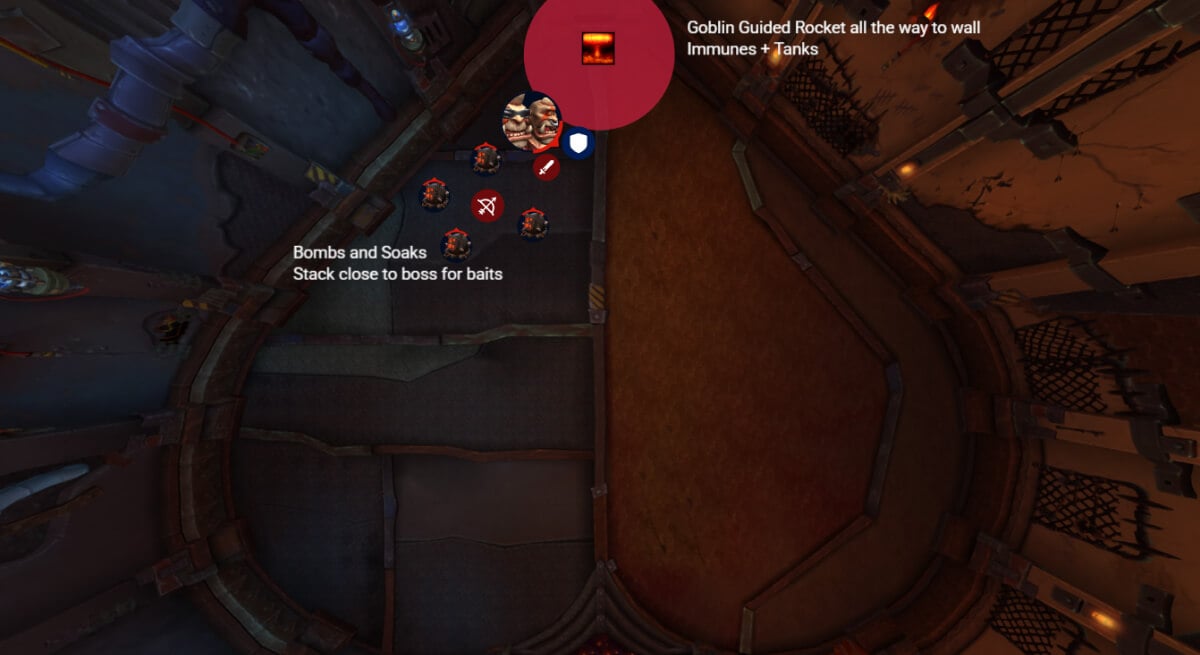
Whoever gets targeted by the first Rocket cast, place it at the wall. Only Immune players and tanks are soaking the first one
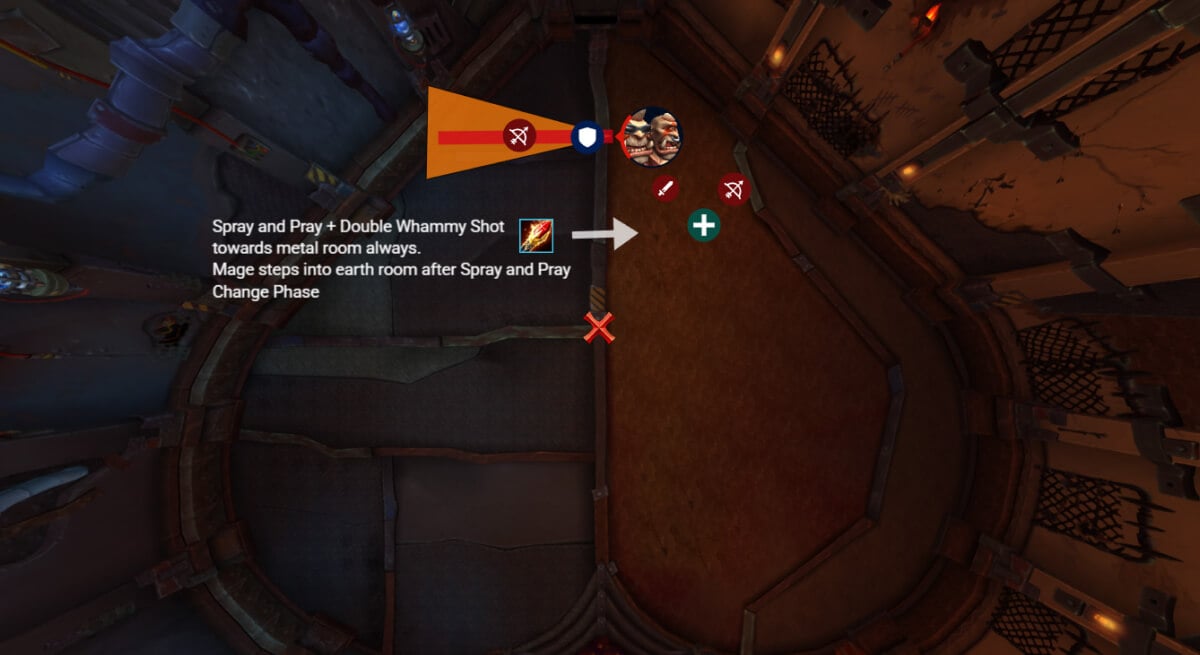
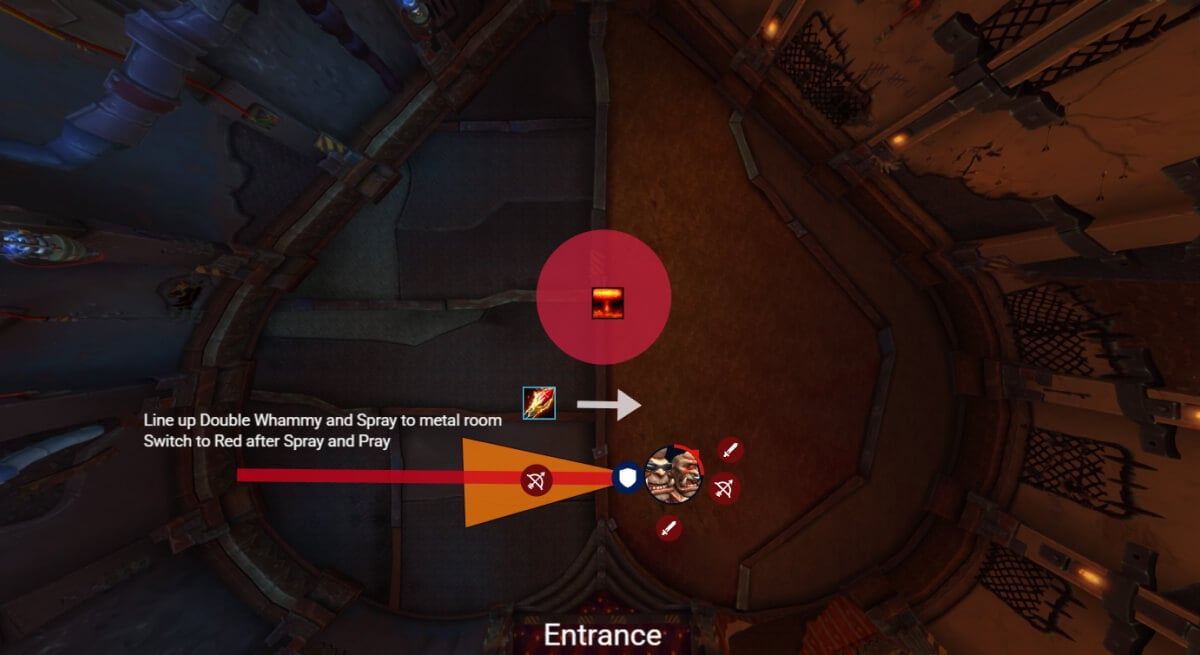
Shortly after you will get the first frontal sets. Double Whammy shot is used first, followed by Spray and Pray.
As soon as Spray and Pray ends, the Mage can trigger the phase spawn by blinking into the Dirt side of the room where everyone else should be standing.
Remember, every single player has to be on the same side in order for the Phase swap to trigger.
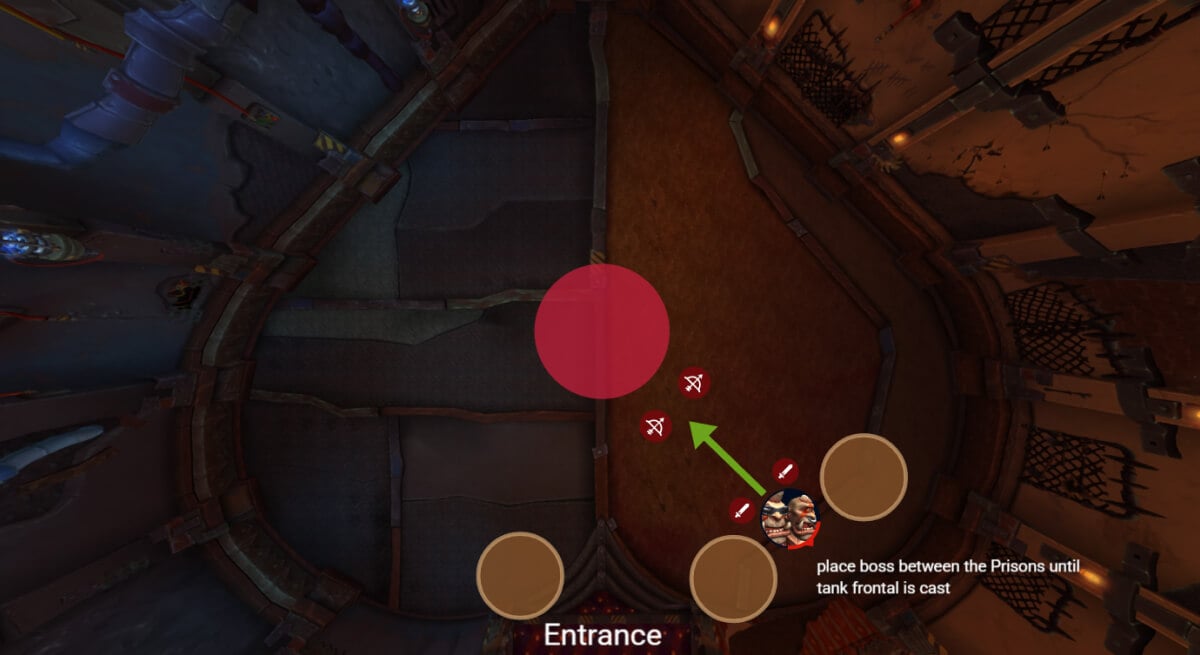
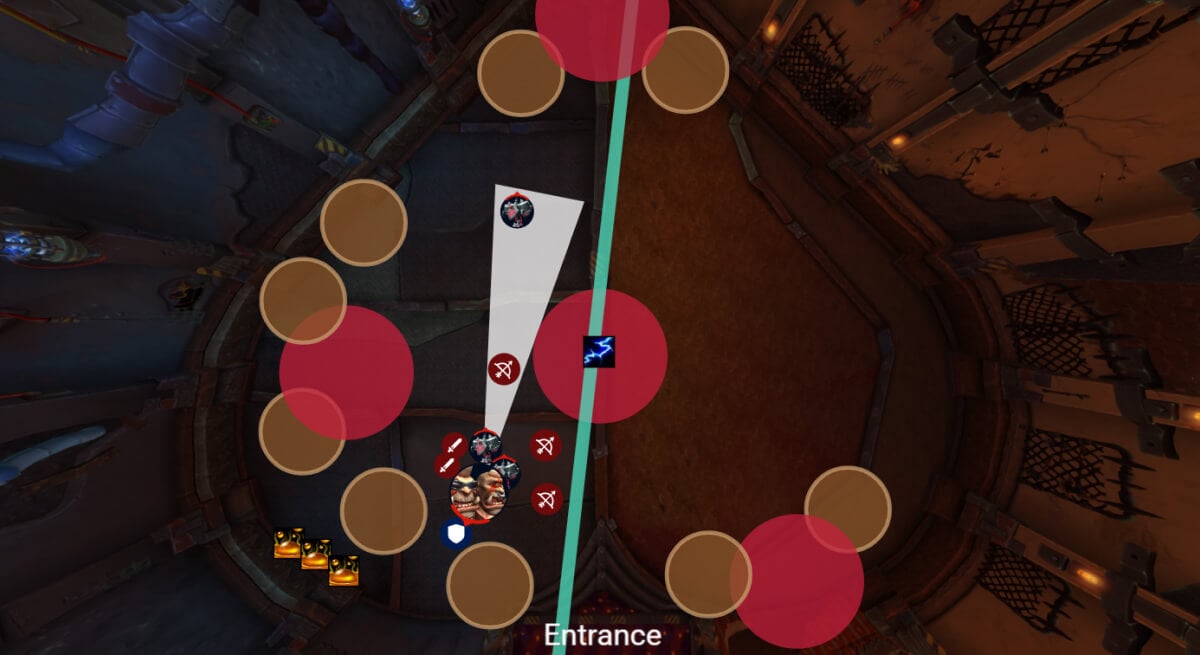
You are now playing the stone side and will get the first set of prisons.
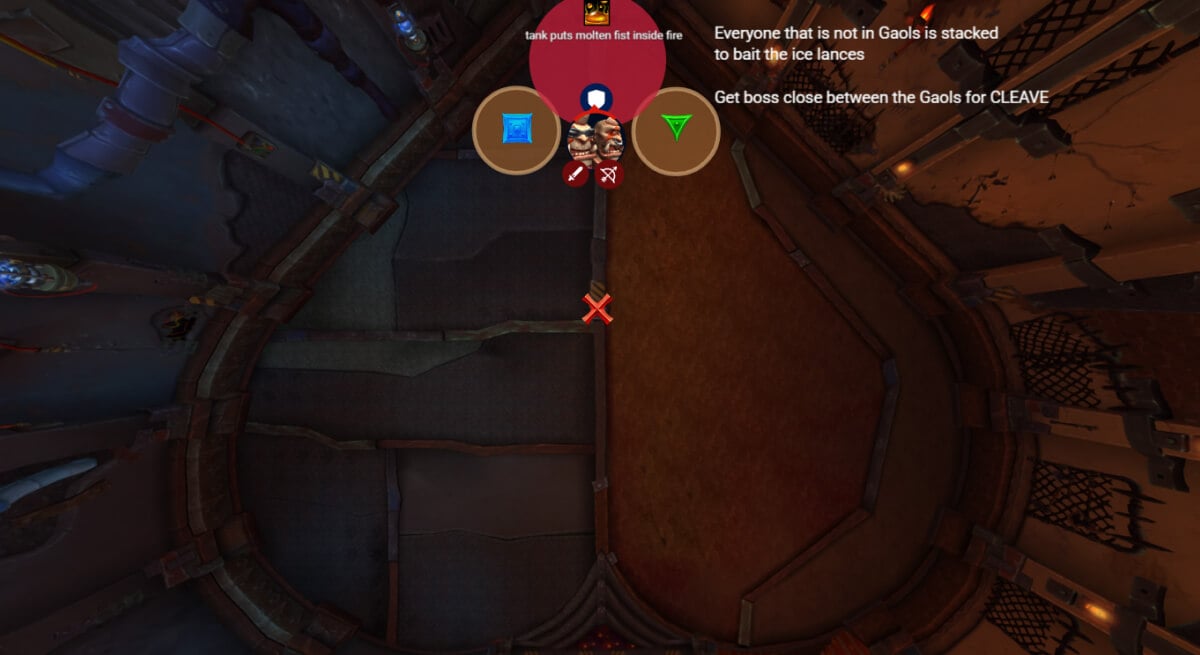
Place the prison on the Blue or Green marker and make sure assigned players go inside. Everyone else should stack close to the boss which is tanked between the prisons, to bait the arrows.
Just as the Frostshatter Boots cast finishes, players should walk in and out of the fire to instantly remove the boots, and then move to the correct side. Usually a WA should tell you to go LEFT or RIGHT. This is important in order to have enough walls to block the arrows.
After this, you want to move the boss into the metal area, behind the close Shocker add.
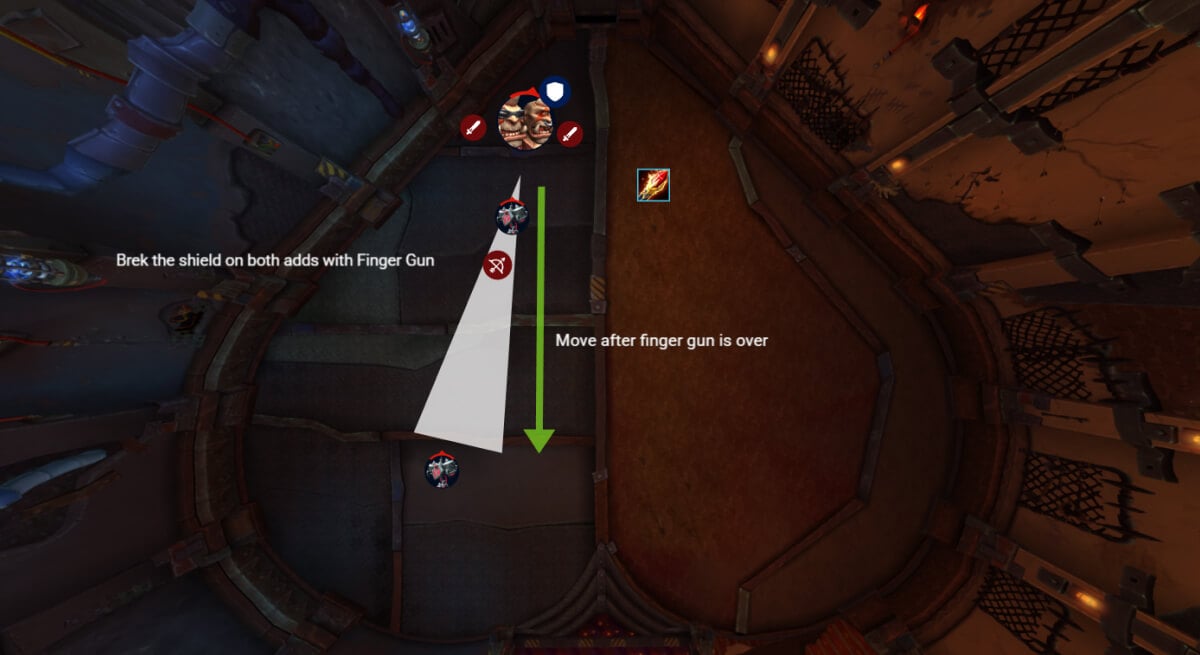
Whoever gets a finger gun needs to make sure both adds are hit with it to remove the shield that makes them immune.
Note: Your Mage (or whoever is triggering side swap) might get targeted with this, in that case you need a backup player to stand on that side so you can avoid triggering the swap too early.
You should trigger the side swap as you move the boss.
You will now get the next set of mines, pop them the same way as you did the first one.
On this set, you will get the 2nd rocket. Place this one in the middle of the room and soak it with everyone except immunes and tanks.
Once done with mines and the soak, move the boss to the dirty side and prepare for Double Whammy + Spray and Pray. Afterwards, you will be triggering the side swap.
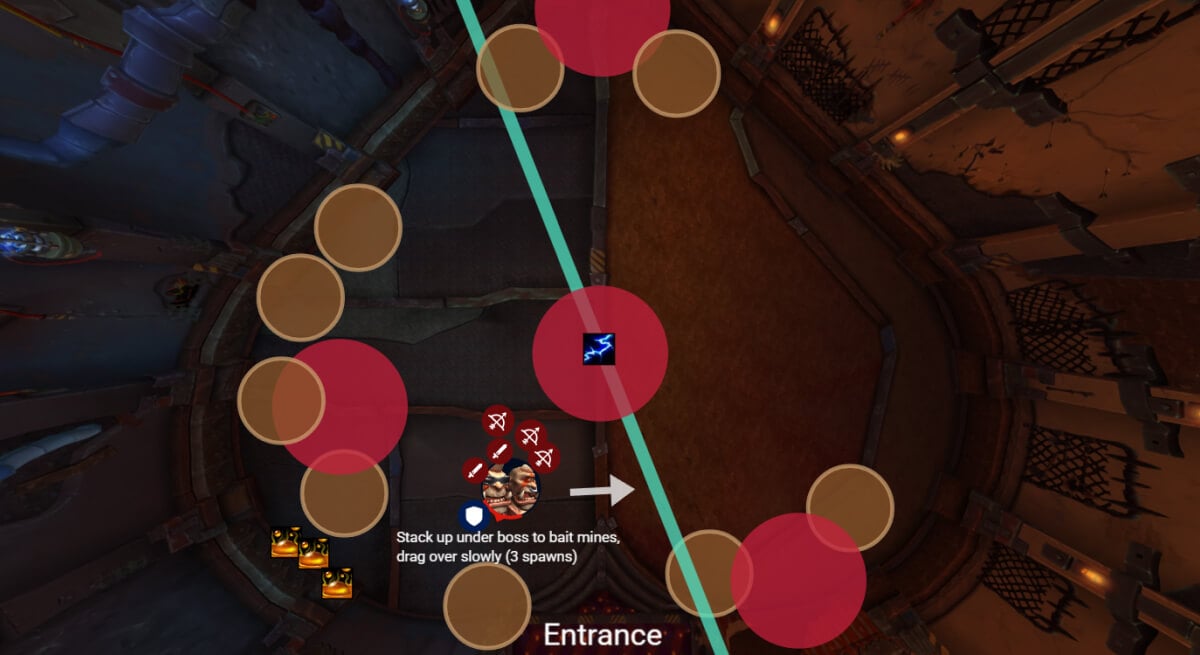
You are now playing the dirt side again and will get the next prison cast which will be 3 prisons.
The boss should be placed between the two prisons and once the tank gold ability is used, move the boss closer to the fire puddle in the middle of the room, because you will get a Frostshatter Boots cast.
Players should make sure to stack close to the boss to bait the arrows better. The player controlling the sides needs to stay on the opposite side.
Once the cast is about to finish, touch the fire and move out. If you have the arrow on you, move behind one of the walls at the bottom.
Others need to make sure to avoid arrows that will be shot towards those players.
If targeted by Finger Gun, you can break the close add, but do not try to hit both, otherwise you risk hitting several players with the frontal, for no real gain.
Important: Your goal here is to push the boss to 40% before 100 energy. Use Hero around 70 energy if you are too far off 40%. If you can't make it, you can trigger side swap to practice Intermission/P2, but keep in mind due to another swap, you will gain a permanent stack on the Boss that increases overall damage done until the end of the fight.
Intermission
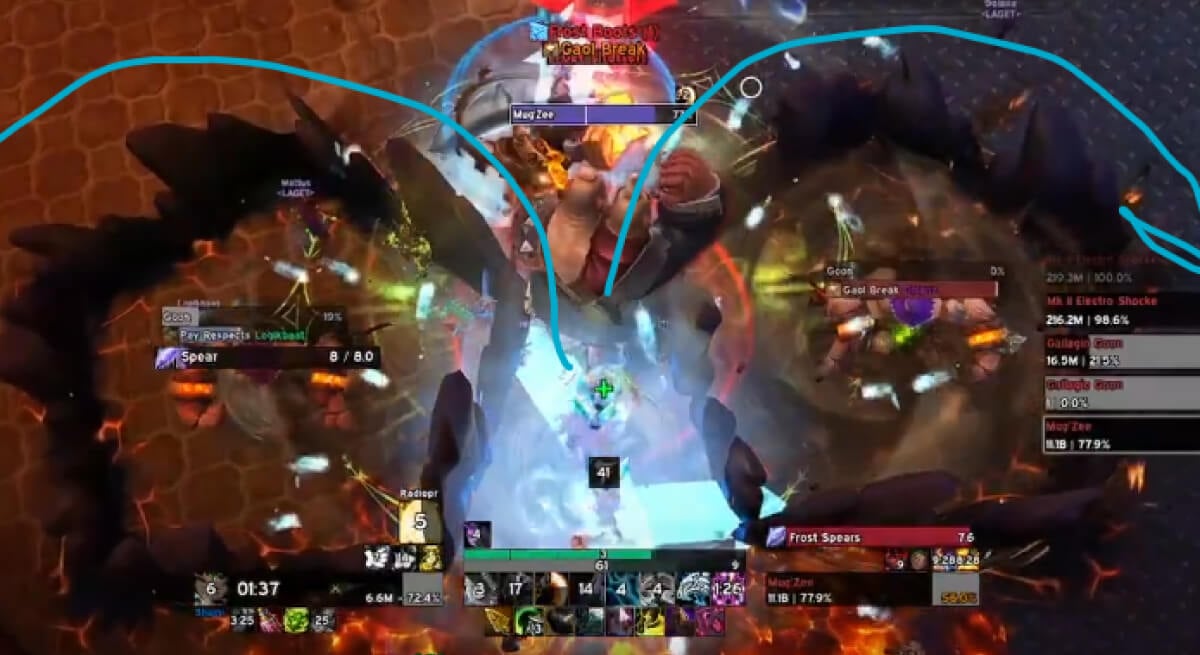
This phase is pretty simple as long as players dodge the swirls and do not get hit by the frontals from both guns.
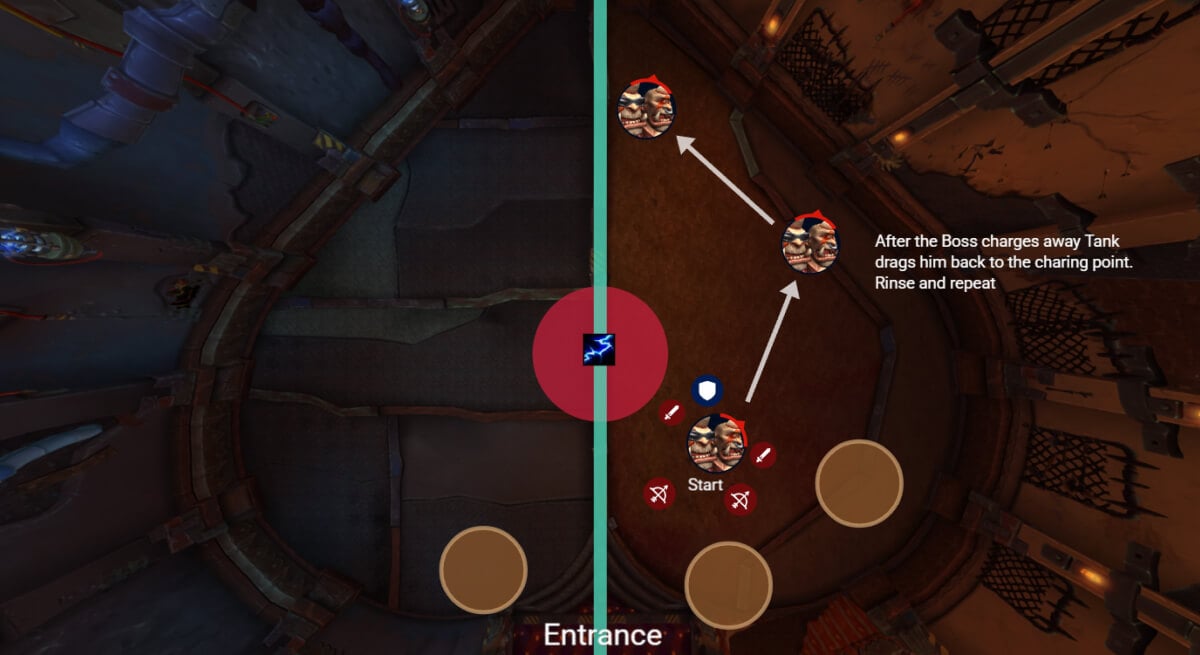
Due to the room being cut off, the boss is forced (coded this way) to charge into available empty space.
Mug’Zee will naturally charge in the same direction always at the start of the intermission.
After this charge, the Tank needs to taunt the boss back towards the starting position.
MugZee will only make a few steps in that direction and do another charge, but this time towards the opposite corner of the room from where you started.
This is where things get a bit tricky due to some bugs.
The Tank is supposed to taunt the boss towards the position where the boss started on the 2nd charge, but sometimes instead of turning back like the first 2 charges, the boss might charge towards that direction.
To fix this, just before the end of the 2nd spin, a monk should taunt the boss and the tank should taunt back instantly after. Somehow this fixes things and the boss will turn around after a few steps and charge in the proper direction which is the metal side. Do not worry, you will not get cut off by the electrical beam.
Once the charges are done, Phase 2 will start.
Phase 2
Stack close to the boss to bait the mines. The tank needs to pop the mines aggressively due to overlap with boots. Healers need to be ready for this. Make sure to overuse personals and health stones if needed, as this is probably the hardest point of the fight.
Pop 4, soak and instantly run towards the middle to be close to the fire. Move in to remove the boots, and all players who have arrows on them, hide behind the 2 remaining mines.
Everyone else should be running towards their expected prison position.

The Rocket goes between Purple and Green. Make sure immunes and tanks are soaking here, and other people in prisons should avoid getting hit by this if they have no immunity.
Once the prisons are done everyone should stack close to the boss.
You will get a Finger Gun cast on a random player, you aim the frontal just like you do earlier in the fight, hitting all the shockers, however only the melee one should be focused, the far ones are not relevant.
The moment you finish the finger gun, you have 2 more mines to pop that were previously frozen. DH using Netherwalk is great for this, but you can also force Monks or any other immunity to do it.
Everyone needs to focus on soaking those mines because you might get some really far circles, and you do not want to wipe to missed soaks this far into the fight.
Move away with Double Whammy and Spray and Pray, the safest spot is usually behind the boss towards the wall, since nobody should be standing there.
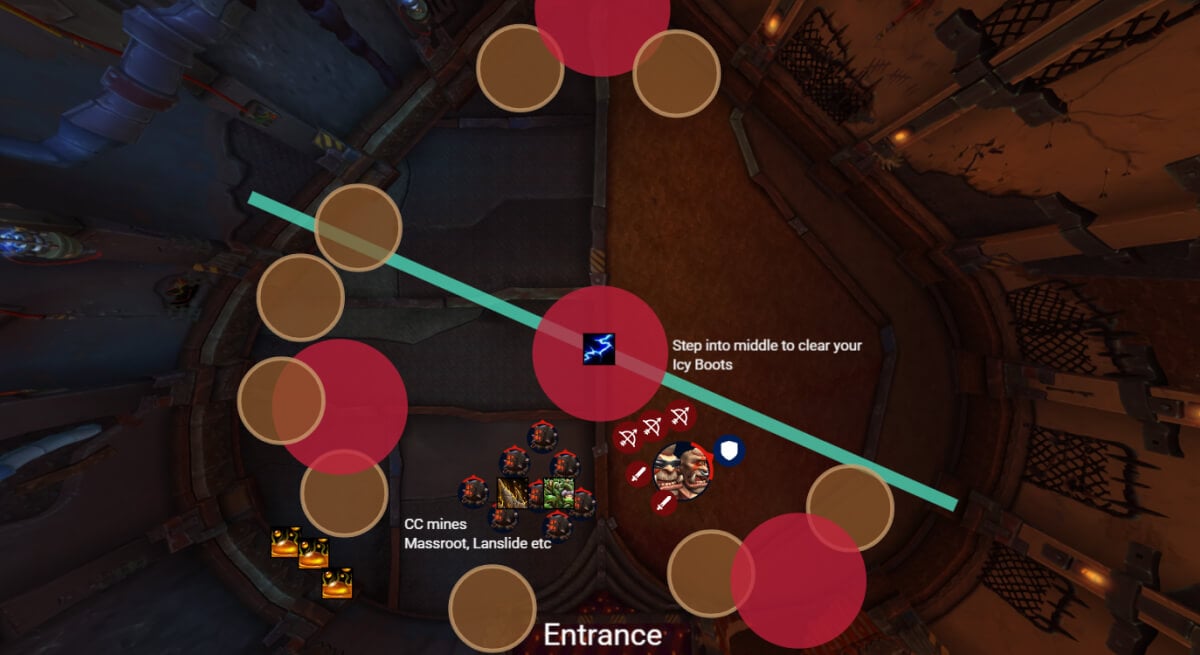
Stack up under the boss, with your back towards the middle of the metal room, this will create a better angle when the mines start spawning.
Move slowly towards the dirty side, as you spawn the mines, you want them as stacked as possible. Use all available slows and such.
You should end up standing next to the fire puddle. Look at the boss cast and step in at the last second and then move out.
Lastly, everyone should move behind the mines to avoid the arrows. Be really careful not to touch a mine here by accident.
Kill the boss.
WeakAuras
Northern Sky: Liberation of Undermine WeakAura Pack
This WeakAura also requires the Northern Sky Database and Functions WeakAura.
https://wago.io/NSUndermine