
Raid Setup
Introduction
Welcome to our Mythic Chrome King Gallywix boss guide, for the Liberation of Undermine raid. Learn about the Mythic specific Chrome King Gallywix mechanics and the strategy we recommend to deal with this boss on Mythic difficulty!
Fight Style: Single Target fight with adds in Phase 1 and in the intermission
Recommended Setup: 2x Tanks / 4x Healers / 14x DPS
Useful utilities: Evoker Rescue + Dracthyr Hover / Potion of Gust
Enrage: Bomb carrier Death, Failing to interrupt Giga-Coil, 10 minutes
Hero/Lust usage: On Pull
Mechanics
Two types of Canister are thrown at players at the same time. Fused and Tick-Tock canisters.
Fused canisters will always go for healers and Tick-Tock canisters will spawn in a specific pattern. Each canister needs to hit at least 3 players to split the damage, or everyone will get hit by the full effect.
After casting Giga Blast at a random player's location, Giga Blast residue will be left in the room; this needs to be used to charge the bombs that Technicians drop. Touching the Residue without holding a bomb will stun the player for 8 seconds.
Giga-Juiced Technician
Once killed, the Technician will drop a discharged bomb that needs to be charged using Residue. Once fully charged, it needs to be used to interrupt the Giga Coil cast, just like on Heroic.
The player who interacts with the bomb, will have a permanent debuff called Auto-Locking cuff bomb. If the player dies, the entire raid will take massive amounts of damage and receive a DoT that lasts very long. This quickly leads to a wipe.
Darkfuse Wrenchmonger
The Wrenchmongers will do massive amounts of damage to their target (tank in most cases) once Lumbering Rage is cast. This can be dispelled with De-Enrage spells like Soothe etc.
Strategy
The good news is, if you’ve made it this far, don’t worry, this boss is easier than Bandit / MugZee and can typically be beaten within 50 to 100 pulls.
Like usual in our guides, we need to make a setup first for several things
Bombs:You will need 5 players total to deal with the bombs. On Mythic, you will need to interrupt 5 Giga Coils casts with those.
Generally speaking, anyone can do it but certain sets require extra abilities.
Mages and DH are by far the best to deal with this.
- Bomb 1 - 2 - 3 > Mage or anyone else
- Bomb 4 > Someone who can Glide into the Coil, and Disengange/TP back.
- Bomb 5 > Tank
You can use Potion of Gust to glide into the coil, but getting back either requires a self ability or a rescue by an Evoker. If your tank is not Drachtyr, they can use the pot and get rescued.
The bomb needs to be charged before it can interrupt the Giga Coil cast, you can do this by collecting 3 orbs that spawn after a Giga Blast Frontal. Once charged, it stays charged until deposited or the bomb expires.
Kill Technician > pick up bomb > charge it > deposit
Canisters Soaking (P1)
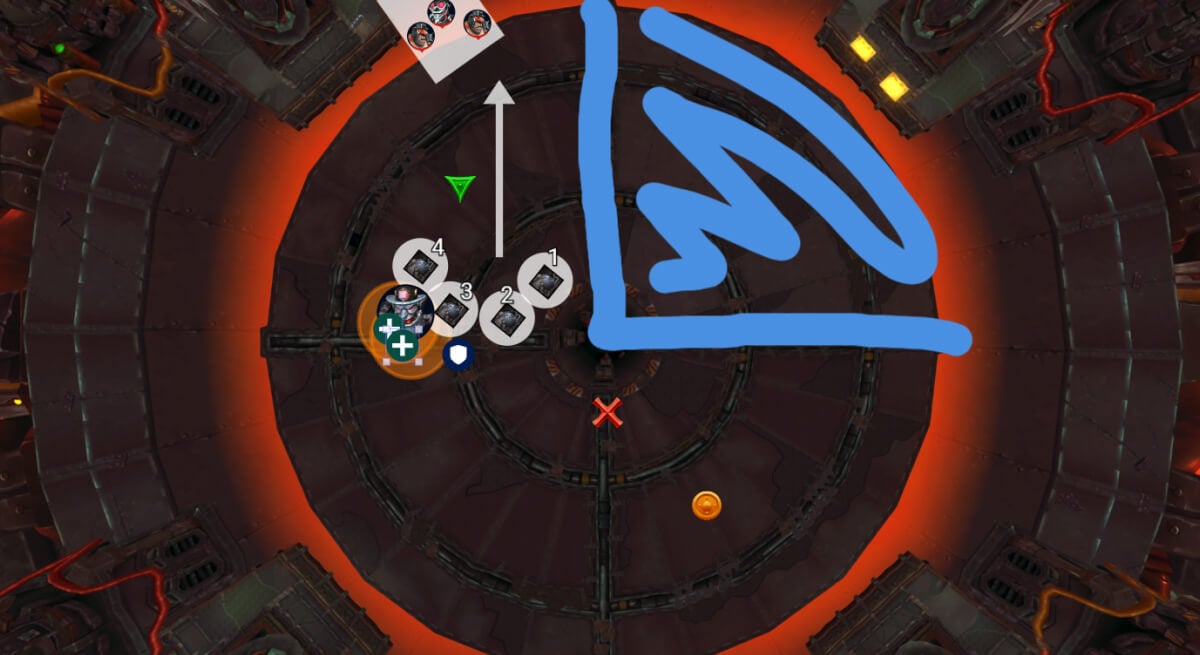
Each canister needs at least 3 players.
The far canister (1) should have 1 extra player because mostly players from these canisters go out dealing with bombs during canister casts. So make sure that at least 3 of your bomb players are in this soak.
- (2) Should be 3 ranged players
- (3) Whatever you want
- (4) Melees
Healers always get the fused canister and should stack on top of each other, with the tanks.

Assuming 3 players from (1) canister are doing the bombs, you should never need to make some adjustments, since you will naturally always have at least 3 players due to having 4 initially.
Depending where your 4th bomb player is, they will move out to deal with the bomb during the last canister set. On this one, you can send a tank to cover for the missing player or someone from group (1).
Frontal Soaking (P2)
You need 5 players per soak, but it's recommended to play 6 just in case someone misses the soak or dies before.
Every Soak should have 1 tank + 2 healers, the other 3 players are up to you, but ranged players are generally better at this.
Wrenchmonger Enrage
This does not really need any assignments, just make sure you have 2-3 players who are dealing with this. Monk, Hunter, Druid can do it. Happens when they cast Lumbering Rage
Sentries (intermission)
1st intermission you will have 3 of those, 2nd intermission 4 sentries.
Each sentry will be casting an ability that can be only interrupted once. The 2nd time the cast cannot be interrupted and if it finishes it will simply nuke a player constantly until death.
You want to delay the interrupt till the end and then make sure to kill the sentries before the 2nd cast finishes.
Warlocks can use Curse of Tongues to slow down the cast.
Now that we have set all this, start with the fight flow.
Phase 1
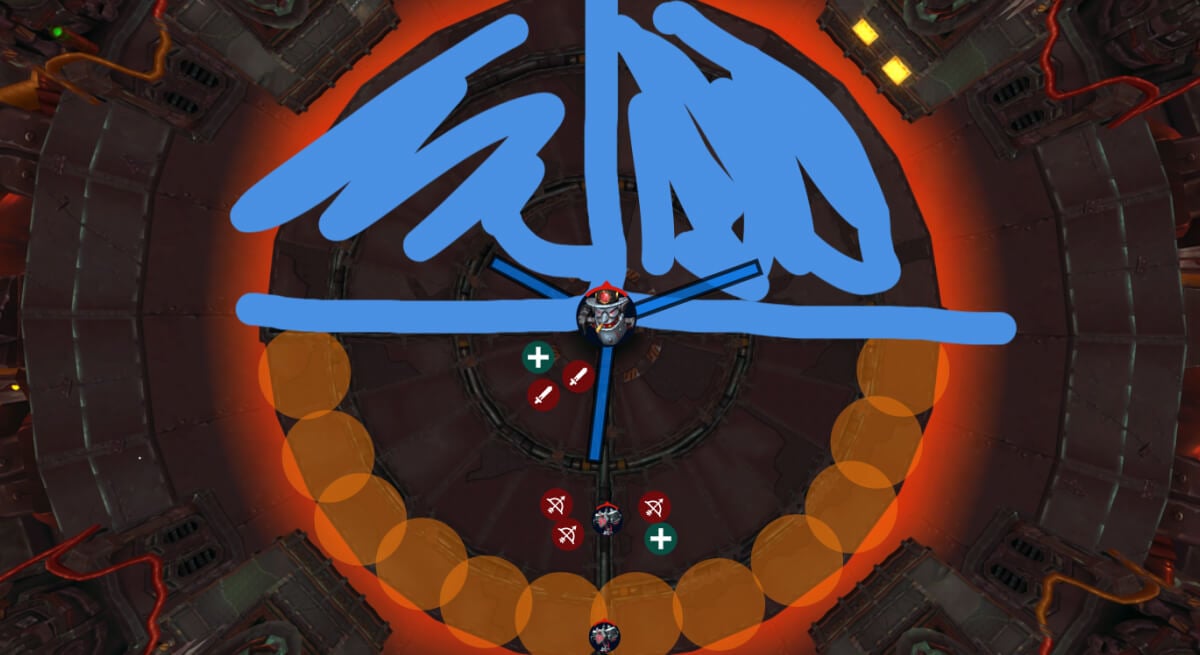
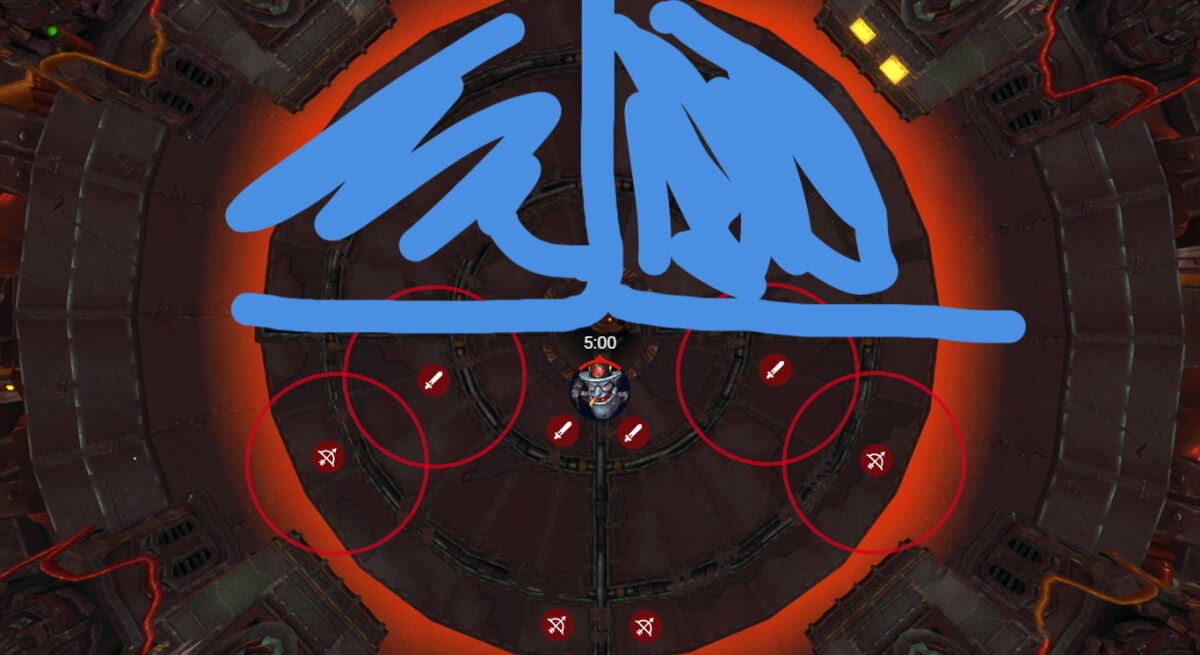
Right at the opener, you will get the ability that you usually do at 50% on Heroic.
This time however, everyone has to move around.
The reason for this is that a player gets connected with the boss with electricity that deals higher damage the further the player is from the boss.
Additionally, getting hit by other beams will deal damage as well.
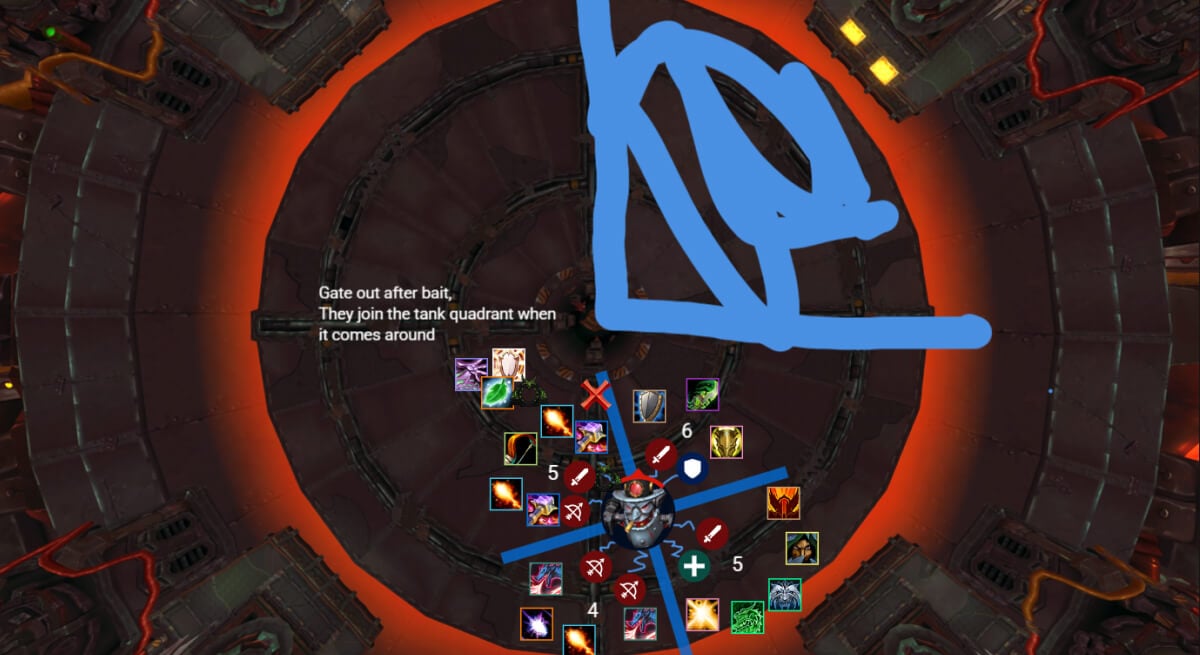
You can also do 5 on each site, at the end of the day it does not matter much as long as players dodge beams and move properly.
Once the shield is destroyed, you can delay the interrupt if the healing looks manageable, for extra damage. Once Interrupted, the fight starts.
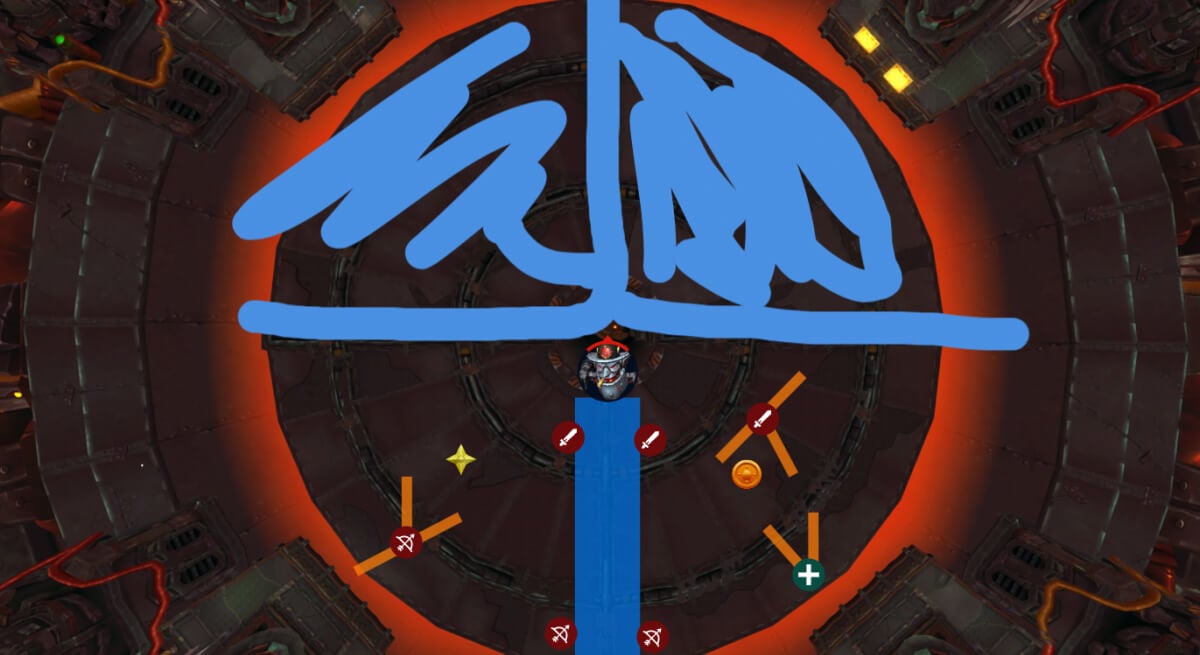
Right behind you, you will get your first set of adds. Bring the boss there and focus on the Technician. This is the only Technician that needs extra attention because nobody has cooldowns and it just goes slow. If you fail to kill it fast, you will get several ticks of Giga Coils that ramp up in damage on every tick. Combined with Canisters that come during this, the damage can quickly kill off some players.
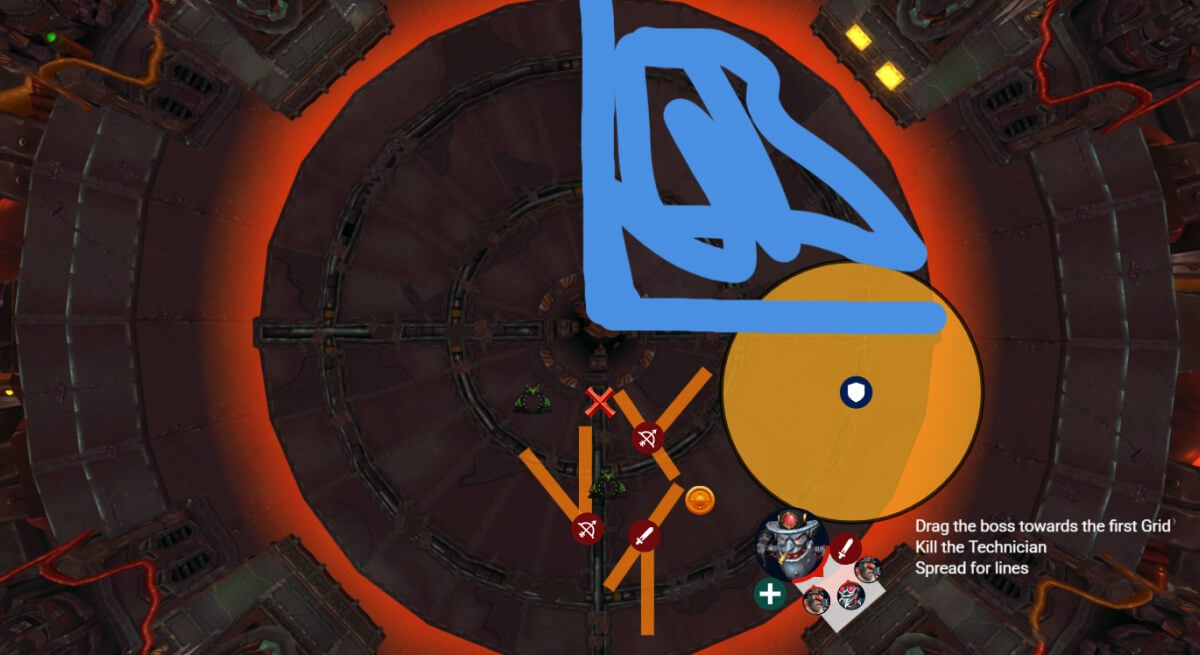
Tank will also clear the Duds here, preferably a Paladin with bubble.
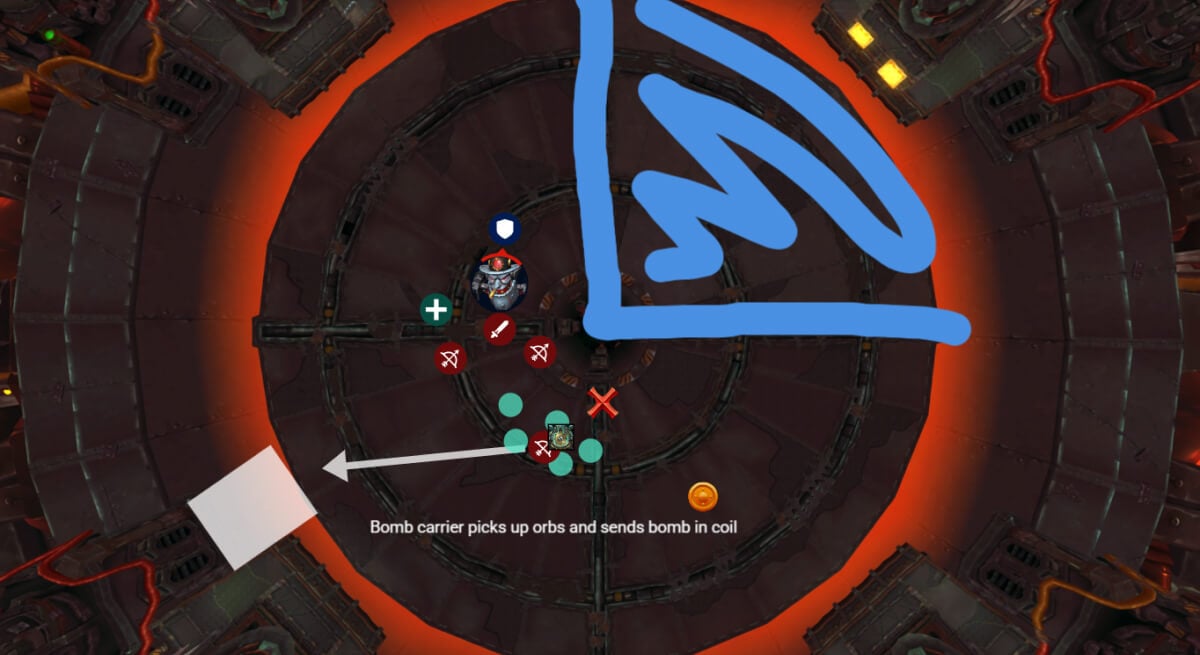
Once the Technician is dead, whoever is assigned to do the first bomb, instantly picks it up, charges with orbs that spawn after the frontal and goes into the coil to interrupt.
Everyone else will be doing the 1st set of canisters, as we described above.
After you are done with canisters, boss will cast suppression and you should run towards the next set of adds.
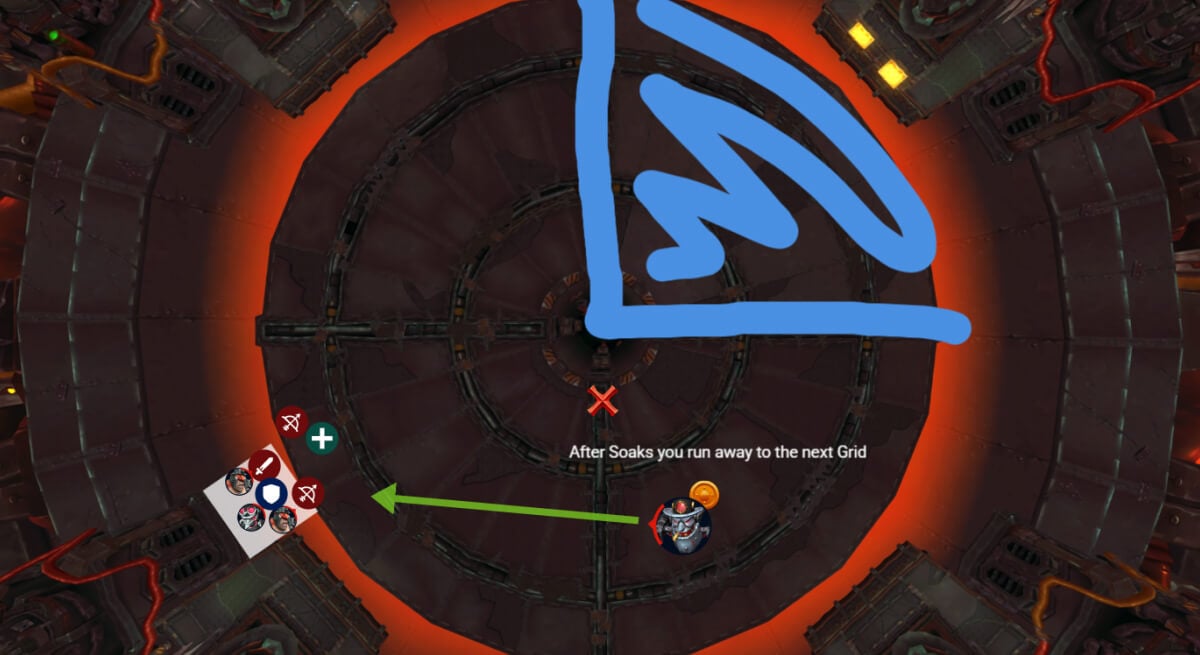
Kill adds, make sure to De-Enrage the Wrenchmonger and pick up the bomb after.
You will get another set of canisters, deal with that and bait the Frontal into the empty room.
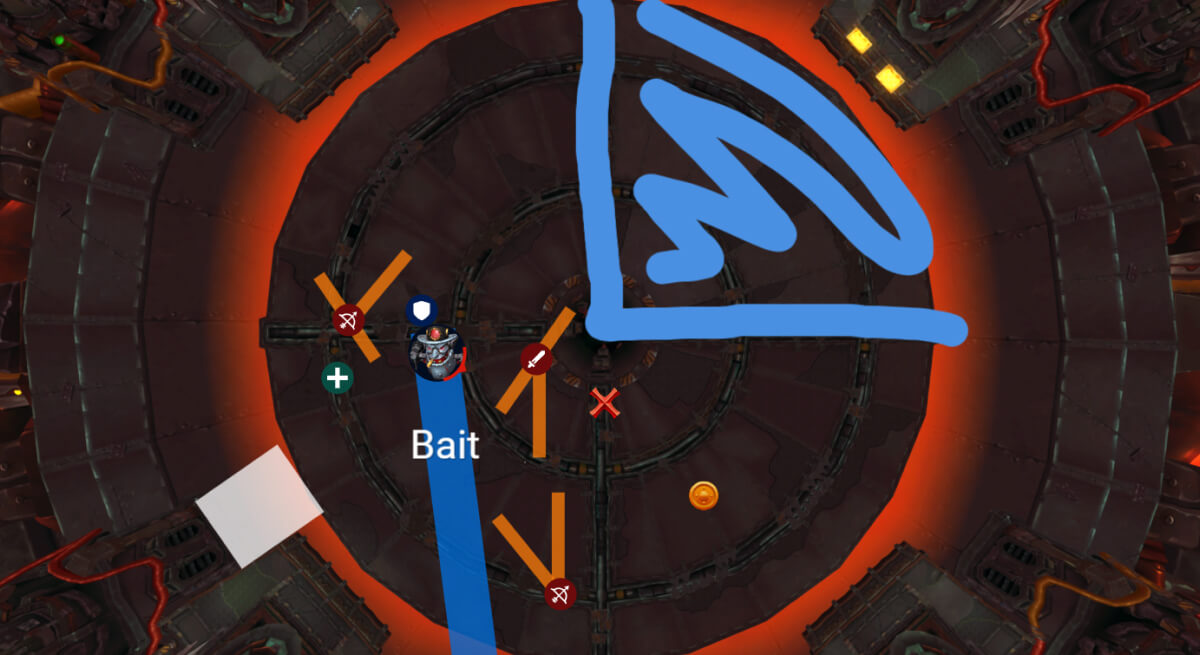
NOTE: If you get the lines, you do not have to bait.
Player will be able to charge the bomb after and deposit it to the Coil you just went to kill the adds.
Here you get another set of Canisters, followed by the Suppression cast that forces you to move towards the last platform.
Now you are playing the hardest point of P1 and arguably the entire fight.
Pick up the adds from the platform, and put the boss slightly towards the middle of the section. Just around where (3) canister spawns.
Everyone baits the frontal towards the outside of the room. At the same time some players will get the lines and they do not have to bait, just move out, but make sure you are standing close to your soak canister without putting the line on top of it.
Just as the frontal is cast, everyone instantly runs towards their positions, using all available speed boosts.
Healers Will stack on top of (3) here with other players who are assigned there. Use strong defensives. Barrier/Spirit Link very good for this.
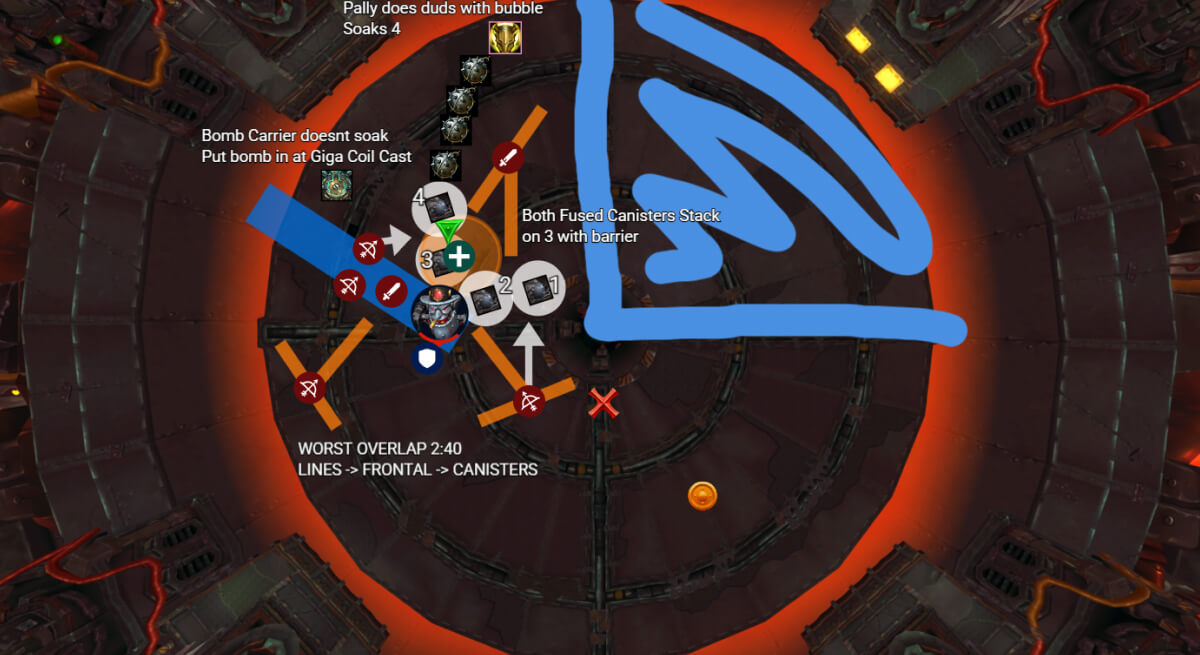
One tank should be dealing with the duds, as all of this is happening.
Note: Soaking (1) can be a bit tricky on this set because you have exactly 3 players for it, and if one of them is late, you explode. It is recommended you send a fast player from (3) soak to go for (1) instead for extra safety. For example: If your DH is playing (3) have them fel rush into (1) on this set.
If you successfully did this, you will get a set of adds spawn on top of you, but this set has 2 Technicians. Kill the adds + the technician, but tank should pull out one of the technicians to the side and make sure it does not die before 3:30 (otherwise the bomb will expire in P2 before you get to use it)
Do another set of Canisters, and move away from Suppression after.
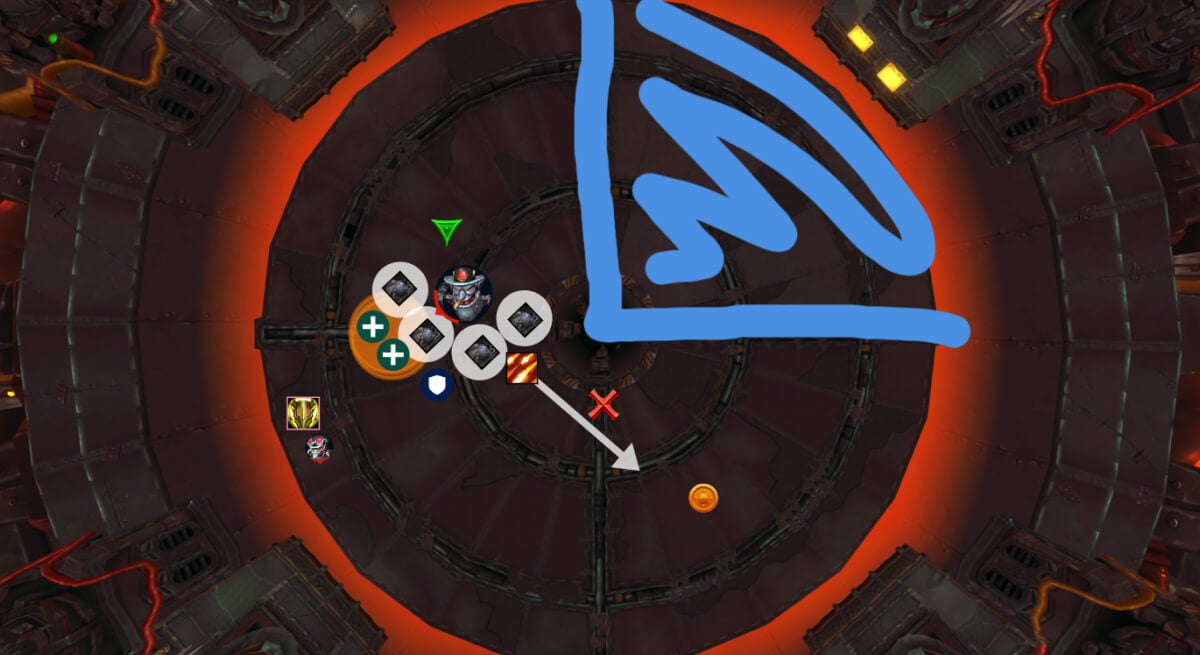
Once in position, bait the last frontal towards the empty room, and move out with lines.
Tank can bring in the last technician here and you should kill it.
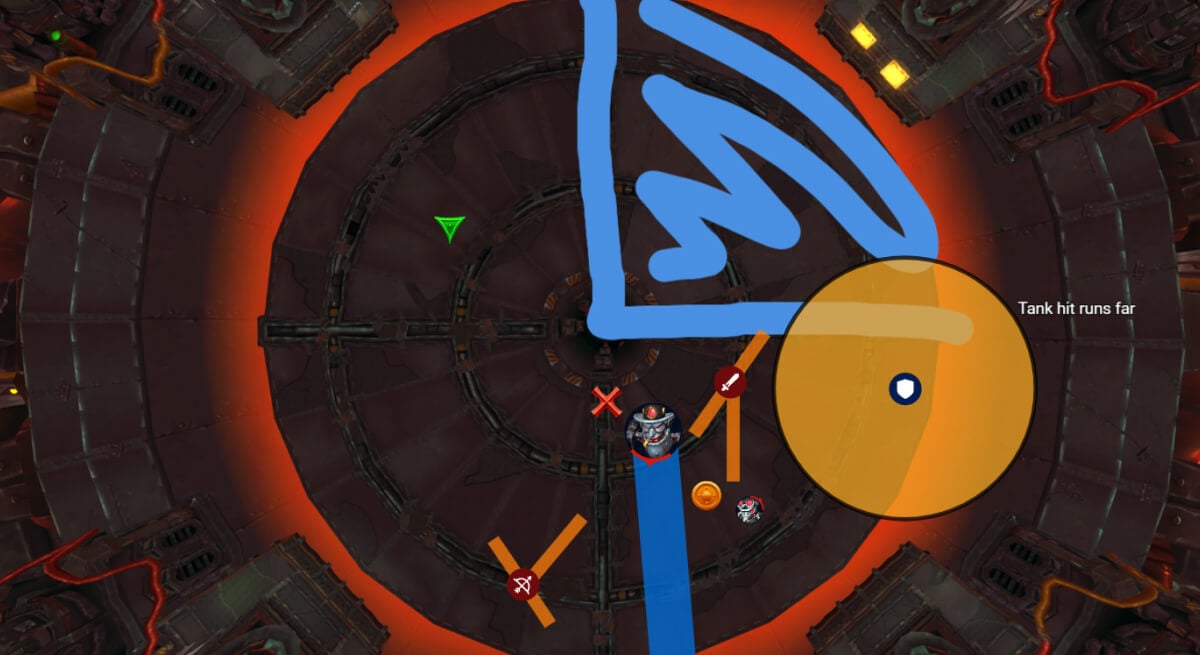
Whoever is doing 4th bomb, uses this frontal to charge it, and goes to the Green side to Dunk the bomb. By doing so, this side will be covered in electricity because the 3rd bomb was also deposited there. On this one the player needs to be able to glide towards the coil and disengage or teleport back.
The 2nd bomb that is dropped by the delayed Technician, is picked up by the tank and needs to be carried far into P2. Tank can choose to charge this bomb at any point until it’s time to deposit later in P2.
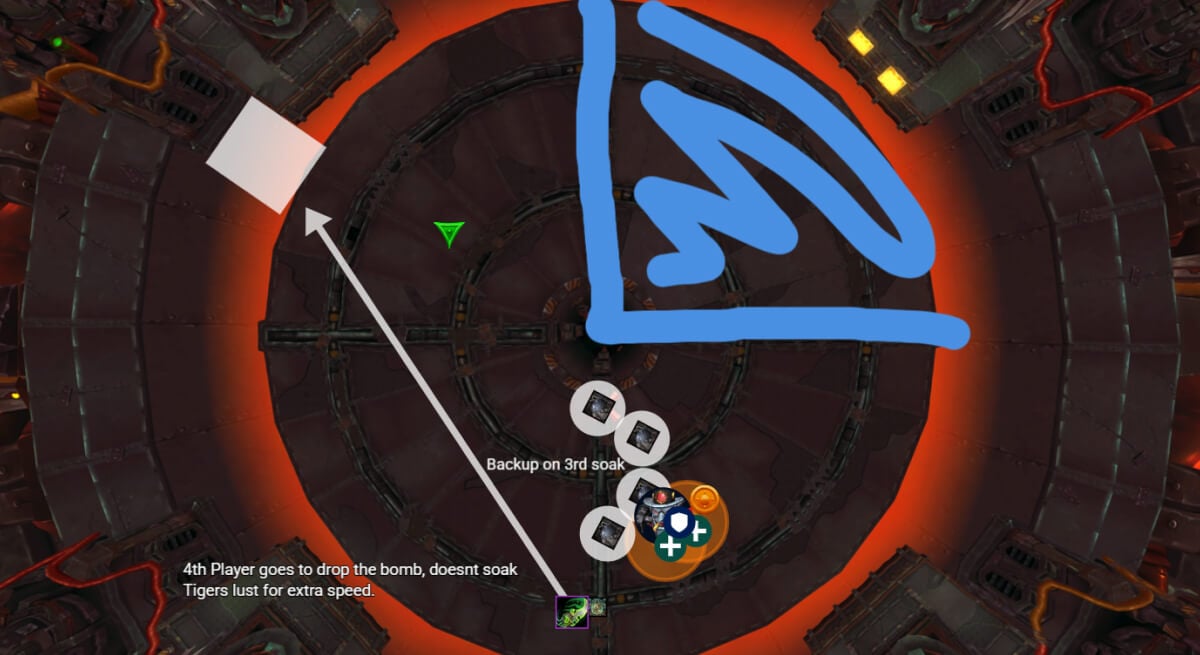
Do the last canisters here, but make sure someone is backing up for the missing player who is doing the far bomb at this point.
Once completed, boss will reach 100 energy and intermission will start.
Intermission
Ranged players should position themselves to the back and melee should cuddle up in a corner to dodge the beams. Note: The beam has a grace period, so it will not instantly hit the player if it spawns on top of them.
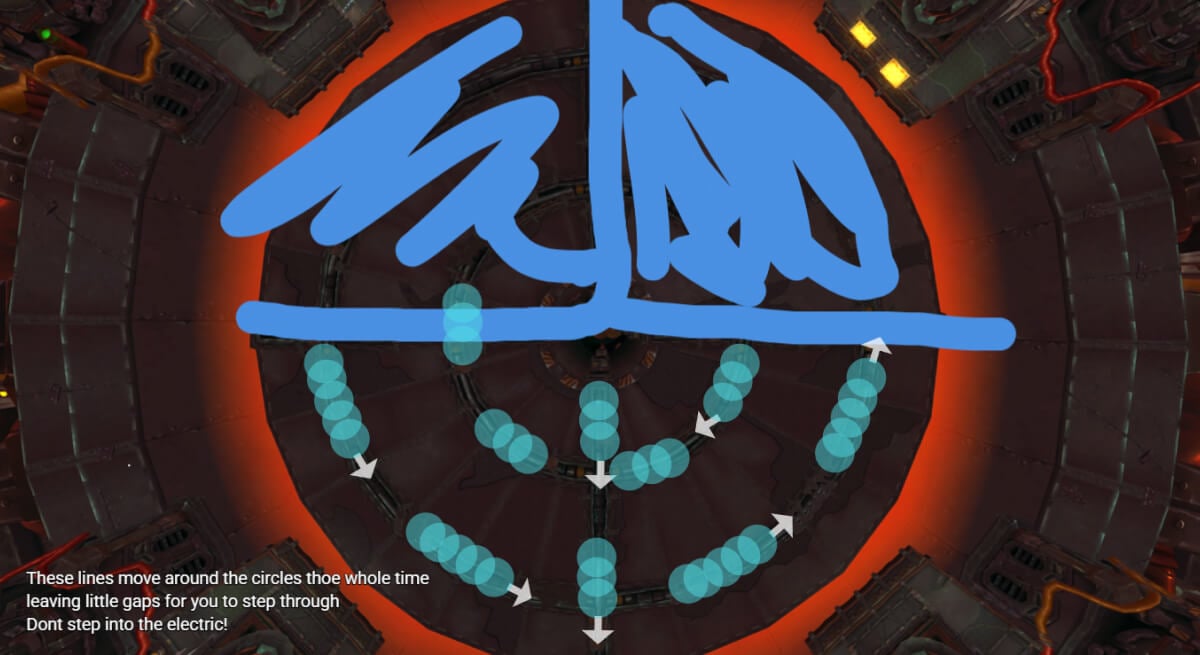
Parts of the room are covered in electricity that moves around, it is very important the players do not step into those as they deal massive damage. Use the gaps or quickly run through the circles because this is just the spawn animation.
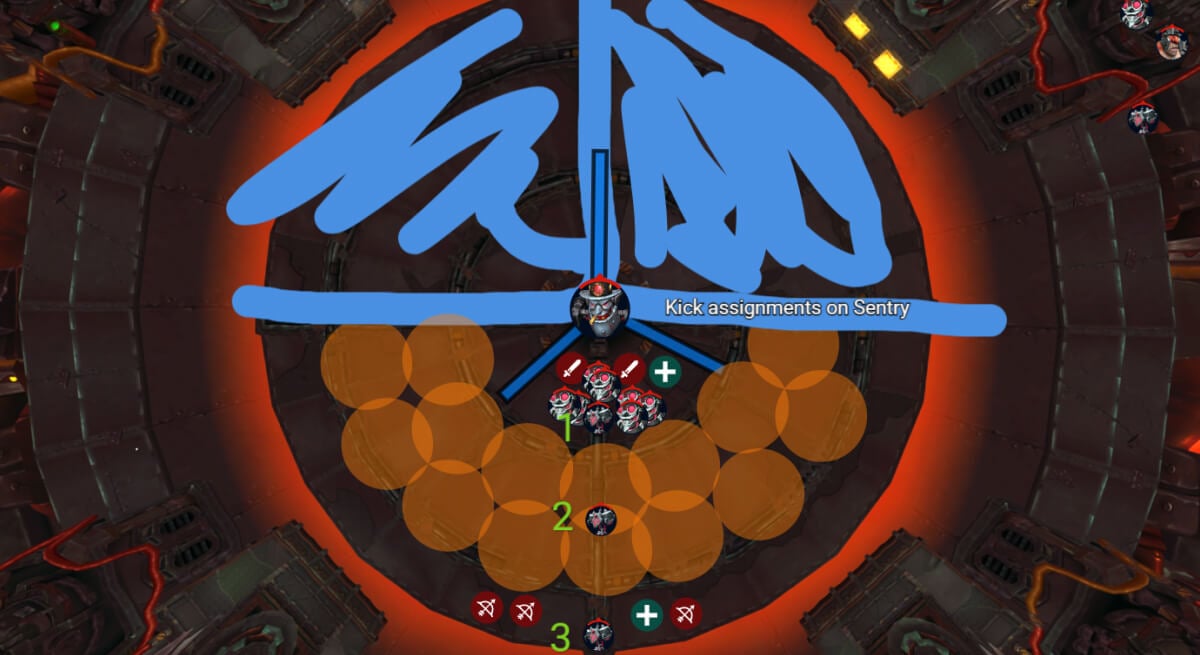
Ranged should primarily focus on the Sentries, while Melees are killing the Blaster adds.
Make sure to use Stun rotation here to interrupt Juice It cast!
Ranged players are moving back and forth here as soon as the orange circles explode.
Finish the sentries before they get a cast off and P2 will start.
Phase 2
This entire phase is very simple, one could say you are playing a m+ boss but one mistake on the wrong player (bomb carrier) and it's a wipe.
Essentially, you are repeating the same thing all the way until the end. You get one intermission that is just like the previous with the addition of 1 extra sentry that does not make much difference. Almost nothing overlaps, so there are no real hard moments.
Main thing is to understand how to deal with certain abilities.
Frontal Soaking
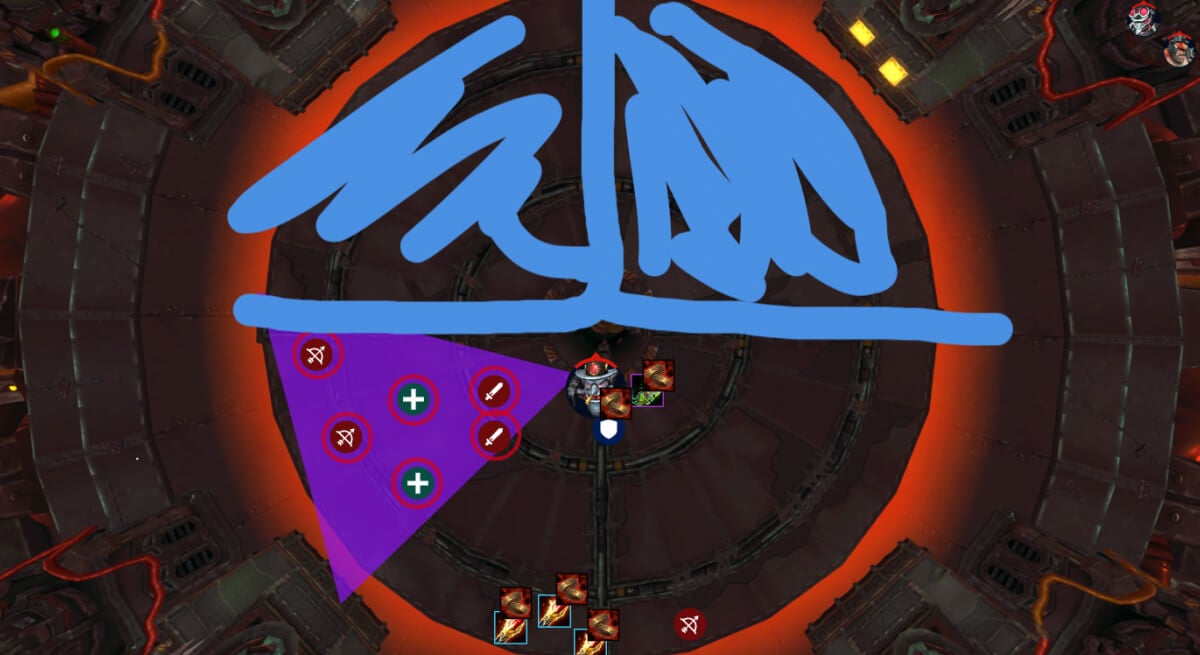
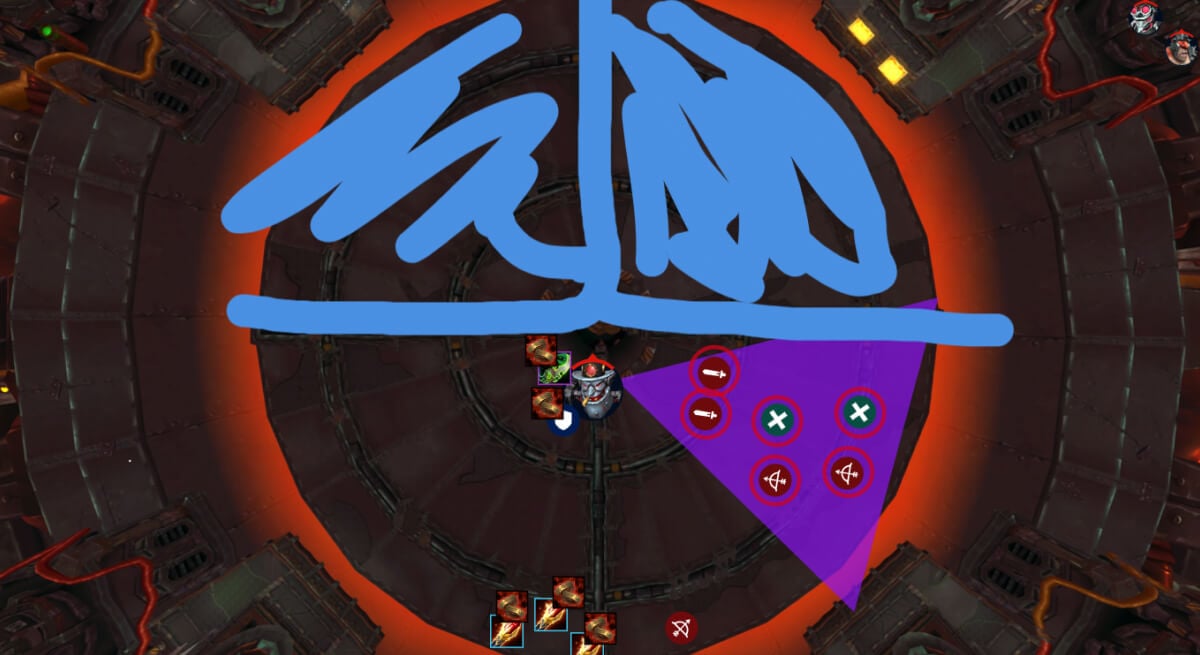
Star with the left soak first, then right and keep alternating like this.
Tank should always face the frontal to the side, so that the middle players should not have to dodge it.
Middle players and melee with bombs should always play solo middle, to avoid getting killed by other peoples mechanics like Big Rocket circles and Suppression puddles.
Each soak also has a different task when it comes to defensive usage:
- 1st soak (LEFT) - just heals, no personals or such
- 2nd soak (RIGHT) - just heals, no personals or such
- 3rd soak (LEFT) - Immunes, Big personals and Heals (overlaps with Sappers Satchels)
- 4th soak (RIGHT) - Big personals + Heals
INTERMISSION
- 1st soak (LEFT) - Everything you have left (an extra player should soak for safety)
- 2nd soak (RIGHT) - Everything you have left (an extra player should soak for safety)
One key thing to understand here for healers, is that the absorb is shared between players, meaning that you can heal one or several, depending on what gives you the biggest HPS output (healing Hpalas in this case is beneficial because they have healing received buff).
Suppression
By far the deadliest ability in this phase. Standing too close will do a lot of damage, but getting hit by the puddles leaves a nasty dot that finishes you off most of the time.
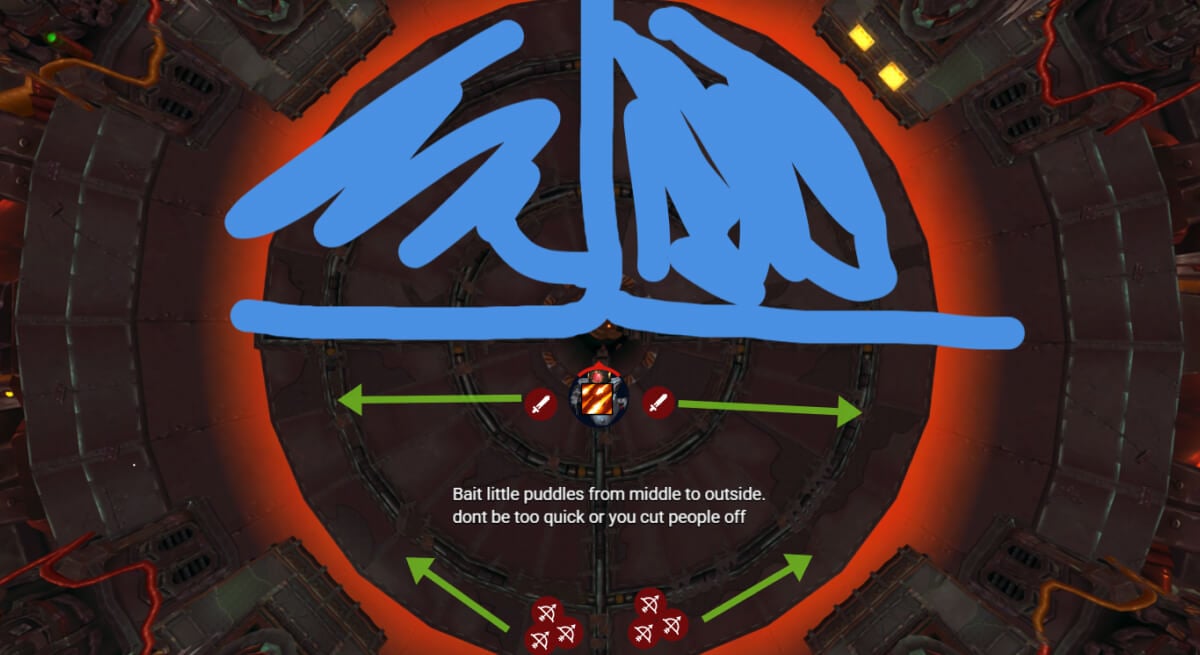
You want to stack together as much as possible and run when circles start to appear.
Do not run too far ahead and just stutter step together. This way you won’t spawn extra circles in front of the group.
Bomb Carriers have to be extra careful with this and should generally always play together to get used to the movement and not risk getting caught off by other players.
Big Bad Buncha Bombs (big circles)
This ability is rather simple but can cause some issues. The players affected to this should go to the side as much as possible, but if one of the bomb players get it, its suggested that other players move away from them, just to reduce the amount of movement and have less risk in moving over electricity or getting caught by satchels.
You can have a big advantage in satchel dodging if you understand what exactly happens.
The player with a big circle, gets hit by a rocket that “splinters” into several small satchels across the room. Those then turn into circles that deal 3m damage each, and they can stack up on each other. So getting hit by 1 is not a big issue, but getting hit by a circle that is basically 3 circles on top of each other is very deadly.
However the trick here is to understand where the safe spot usually is, and the answer is where the player with the big circle went, because the sachets splinter away from them, meaning they will have 0 sachets in their area, or 1 - 2 that got thrown there by another circle, which is not problematic.
So to put it simply, after the big circles pop on players, running towards them is generally the safe play, and running away from them usually means you will run into a bunch of satchels on the ground.
Giga Blast Baiting
In between abilities, boss will cast Giga Blast frontal, on a random ranged player.
It is suggested that all ranged players bait as close as possible to the middle of the room.
So pretty much the same thing as you do in P1.
If you got the lines = move to the side
Others = move towards the middle to bait
The reason for this is that you do not want random orbs standing in the room, because they stun for a long time if you get hit by those and can be very deadly during suppression.
Last Bomb Deposit
Lastly, the one thing you need to do before 2nd intermission is interrupt the Giga Coil cast. Tank has been holding the bomb here for a long time, and needs to make sure to glide towards the platform before the bomb expires (it has a debuff timer) depending on your fight timer, you should expect to for the Coil at around 7min, just before or during the last Giga Blast at 100 energy.
Tank should Glide, or use a potion of Gust, and once the bomb has been deposited, Evoker can rescue the tank back.
If done correctly, boss will start the intermission and another part of the room will be covered in electricity.

The electricity does not do much damage, so just run when it appears and go into intermission positions. Melees should hug the edge and do not be afraid when the beam that rotates spawns on of you, it has a grace period.
Remember that you have 4 sentries here, so pay attention to extra kicks, and generally focus on killing the sentries as fast as possible, because you do not want to wipe due to a sentry targeting a bomb carrier and causing an explosion.
Once you are past this, there is nothing new, you get the last 2 frontals, suppressions, and bombs.. Just play the fight as you did so far and remember what I told you about safe spots and big circles and the boss will die.
WeakAuras
Northern Sky: Liberation of Undermine WeakAura Pack
This WeakAura also requires the Northern Sky Database and Functions WeakAura.
https://wago.io/NSUndermine