
Introduction
Hey everyone, and welcome to the Tazavesh: Streets of Wonder dungeon guide for season 3 of The War Within! In this guide I’ll be going over the abilities of all the trash mobs and bosses throughout the dungeon, as well as how I recommend you handle them. I’ll be focusing on the mythic and M+ versions of the dungeon, but most of this article will apply to both normal and heroic difficulties as well. I’ll also be including my recommended, PUG friendly route via the Mythic Dungeon Tools addon for anyone interested.
Some background on myself, my name is Tactyks and I am an avid M+ player, achieving the 0.1% M+ title in every season it has existed, as well as competing in The Great Push in season 4 of Shadowlands. I also create M+, Raid, and tank guide content on my YouTube and Twitch channels, so be sure to stop by and say hi!
Socials:
- YouTube: https://www.youtube.com/@Tactyks
- Twitch: https://www.twitch.tv/tactyks
- Twitter: https://twitter.com/tactyks
If you are using the Mythic Dungeon Tools addon, you can import my recommended route using the following link: https://wago.io/mpjSfDngG
Tazavesh: Streets of Wonder Mythic+ Dungeon Route
If you are using the Mythic Dungeon Tools (MDT) Addon, you can import our PUG Friendly Route for the Mythic+ difficulty of Tazavesh: Streets of Wonder below.
Tazavesh: Streets of Wonder M+ Dungeon Route: https://wago.io/mpjSfDngG
Video Guide
Zo’phex the Sentinel Trash
Gatewarden Zo’mazz
- This mob is immune to CC
- Be ready with defensives or healing CDs when Radiant Pulse is cast
- Proxy Strike targets the tank, use a defensive if needed
Customs Security
- Tanks be aware of when this mob gains the Hard Light Baton buff, and use defensives as needed or purge the buff off
- Avoid the random target circle created by Disruption Grenade
Interrogation Specialist
- Glyph of Restraint debuffs a random player, healers use a Magic dispel to remove it
Support Officer
- These mobs start with the Refraction Shield buff, use purges to remove it ASAP otherwise your spellcasters will be in danger
- Hard Light Barrier shields a random mob, use interrupts or a purge to remove it
- Hyperlight Bolt targets random players, use any spare interrupts on this
Armored Overseer
- This mob is immune to CC
- Make sure to stay away from the rotating beam of energy created by Beam Splicer
- Proxy Strike targets the tank, use a defensive if needed
On top of this trash, there’s also a mini boss in the area that you’ll have to defeat in order to spawn the first boss.
Portalmancer Zo'honn
- This mob is immune to CC
- Make sure to interrupt every cast of Empowered Glyph of Restraint
- Avoid the random target line attacks that begin to happen when Rift Blasts is cast
- Be ready with defensives or healing CDs when Radiant Pulse is cast
Zo’phex the Sentinel Boss Fight
After defeating Portalmancer Zo’honn you’ll be able to take on Zo’phex, which is a pretty heavy movement encounter. To start, the boss will use Armed Security to throw out his bladed arms into 6yd circles towards 2 random players, so you’ll need to stay away from those and if needed you can bait as a group to conserve space. For more dodging there’s also the random target frontal in Charged Slash, so make sure you play relatively close to the boss to make this easier to avoid.
To force players to occasionally spread out, the boss will use Impound Contraband to pacify 2 players until they pick up a nearby weapon that appears to them. When doing so you do get the Vigor buff so it isn’t all bad, but still you’ll want to grab your weapon and end that pacify as quickly as possible.
Whenever the boss reaches full energy they will mark a player for Interrogation, stunning them in a containment cell after a few seconds and then fixating them while blades spin in front of the boss, slicing through anyone in the way. When this happens the targeted player will want to make some distance between them and the boss, and the rest of the party should swap to the containment cell to destroy it before the boss can reach the target. Note that if the target has a stun break effect like Icebound Fortitude, Deep Breath, or even the Human racial that can be used to immediately break the cell.
For tanks, the melee swings on this boss actually hit quite hard so be prepared to stagger your defensives accordingly, particularly when the boss uses Fully Armed as that will increase the damage of those swings by 25% until the next cast of Armed Security.
The Grand Menagerie Trash
Tracker Zo’korss
- This mob is immune to CC
- Make sure to stay close to this mob and move as a group or you’ll be pulled by Chain of Custody
- Bait the Beam Splicer ground effect towards the edge of the mobs circle and then move away to prevent the pull from triggering while still avoiding the rotating beam
- Lockdown targets the tank, use a defensive if needed and dispel or snare break the Magic root
Ancient Core Hound
- This mob is immune to CC
- Split your damage evenly across both Core Hounds that spawn, as they will resurrect if they don’t die within a few seconds of each other
- Move out of the random target Lava Breath frontal
- Be sure to interrupt every cast of Ancient Dread
Enraged Direhorn
- This mob is immune to CC
- Frenzied Charge targets a random player, make sure you aren’t in the path and use blinks or dashes to avoid the attack if possible
- Wild Thrash does a small AoE around the mob, stay out of melee when this starts
Frenzied Nightclaw
- Frantic Rip targets a random player, use defensives and bleed cleanses as needed
Market Peacekeeper
- Quelling Strike targets a random ranged player, stay close to the mobs to prevent this cast
- Phalanx Field redirects nearby spells to the mob and grants a large damage taken reduction, use physical CCs to stop the channel or move mobs away from the AoE shielding
Veteran Sparkcaster
- Scintillate targets a random player, use spare interrupts on this cast and dispel the Magic debuff it applies
- Hyperlight Salvo channels into a random player, use CCs or interrupts to quickly end this cast
Commerce Enforcer
- This mob is immune to CC
- Force Multiplier enrages the mob and buffs nearby allies, soothe the enforcer specifically to remove the enrage from the entire pack
- Power Kick targets the tank, use a defensive and don’t get knocked into other packs or the nearby stun walls
The Grand Menagerie Boss Fight
This encounter has you taking on three separate bosses over the course of the fight, where to start you’ll face off against Alcruux. Once you push him below 50% health you’ll spawn the second boss, Achillite, after 15 second delay, and similarly once you push Achillite below 50% you’ll spawn the final boss Venza Goldfuse after a slightly longer 30 second delay.
Starting with Alcruux, right at the start of the fight he’ll debuff a player with Gluttony, so this person will want to stay away from allies to not cleave them, plus keep in mind it will bounce to the next nearest player on expiration, meaning you’ll be dealing with it the entire fight, even after Alcruux has been defeated.
Outside of this DoT there's a couple dodgeable mechanics. First is Grip of Hunger which pulls all players to the boss before a 20yd AoE cast, so make sure you are ready to run out and use movespeed increases as needed. The other ability is Grand Consumption, which creates 2 waves of circles that cover the entire arena. If hit by a circle it will actually leech health to the boss, so make sure you watch the order the circles spawn in, stand on the second wave until the first wave explodes, then quickly move off the second wave to the now safe areas.
Moving on to Achillite, he adds some more DoTs into the mix with Purification Protocol, a 6s Magic debuff on 2 players that does a 10yd AoE on expiration. You’ll want to dispel one of these as quickly as possible and have the other player use a defensive, meaning you should prioritize dispelling your squishier players if you can.
Achillite also adds more to dodge with Venting Protocol, which causes the boss to shoot out several waves of Volatile Anima orbs that bounce around the room. If you get hit by them you’ll take some damage and gain a stacking 5% damage done decrease for 1min, so do your best to dodge. That being said, the player currently debuffed with Gluttony can actually safely remove them from the fight by running over them, which instead grants them a stacking 5% damage increase in Devoured Anima. This means not only does it make it safer for the rest of your group if you run around soaking orbs, it’s also beneficial for your damage!
Note that these Anima Orbs continue to spawn periodically from Achillites body even after you defeat him, so you’ll need to deal with them for the rest of the fight. If possible I recommend killing him in a corner as this actually catches some of the Anima Orbs, meaning less for your group to dodge. Outside of that, tanks will want to watch out for the Flagellation Protocol channel and make sure they always have a defensive available.
Venza Goldfuse is the final boss of the encounter, and her main ability is Whirling Annihilation, which pulls all players towards her as she pulses for damage to anyone within 7yds, so make sure you are fighting against it. Her Chains of Damnation ability makes this a bit more complicated, as it creates shackles on a random player that root them until they are destroyed. If you have a freedom effect like Tiger’s Lust or Blessing of Freedom you can use that to instantly remove these shackles, otherwise your group will need to swap to them and destroy them to free the affected player.
P.O.S.T Master Trash
Defective Sorter
- These mobs will attempt to use Open Cage to free a pack of chickens that stun players, use a CC to stop this cast or out-range the chickens
P.O.S.T Worker
- Letter Opener targets the tank, watch your stacks and use defensives or bleed cleanses as needed
Overloaded Mailemental
- Spam Filter buffs a random mob, interrupt the case or purge the Magic buff off
- Junk Mail targets a random player, beware if you are being targeted by multiple and use a personal if needed
P.O.S.T Master Boss Fight
To start out the fight as well as intermittently throughout it, the boss will cast Hazardous Liquids, creating several circles all around the room. You can choose to either soak these circles, gaining a stacking Magic DoT in Alchemical Residue, or you can let them hit the ground to create larger puddles of area denial. These circles spawn in a staggered fashion, so its possible for a single player to soak more than one of them. In general I recommend soaking at least 1 puddle per person, with your tank attempting to soak multiple if possible, allowing you to conserve a fair amount of space while not being overwhelmed by the DoT damage.
Shortly after these circles go out the boss will do some additional group damage with Fan Mail, so make sure you are prepared with healing and players who have multiple DoT stacks or are low health use a defensive. This cast is always followed by Money Order, a group soak ability that you can either have your group stack in, or if the target has an immunity you can have them run away and soak it on their own, which once again helps with the groups damage intake.
When the boss reaches 100 energy he activates one of the four nearby mail portals and creates 5 packages of Unstable Goods. These packages detonate for heavy DoT damage after 30s, so to prevent this from happening you’ll need to run over to them, click to pick them up, and throw them in the active mail portal using the extra action button. Holding a package does slow you quite a bit, so you can also opt to throw to another player instead of running it yourself, just be careful when you throw as if you don’t hit an open mail portal or a player without a package then it will immediately detonate.
Myza’s Oasis Trash
Spread throughout the alleyways near Myza’s Oasis are some new Broker mobs, however you likely won’t be pulling many of them unless you opt to go right after the first boss.
The Bazaar Trade Event and Trash
When entering the area outside of Myza’s Oasis, you’ll trigger some RP that starts an event which you must complete in order to get the password to enter and fight Zo’gron. To start you’ll need to grab a trade good offered by a vendor near the entrance of the bar, which slows whoever is carrying it.
You’ll need to bring this item to the designated vendor somewhere else in the Bazaar, who will trade you another item in exchange for your initial one that you bring to a different vendor in the bazaar who finally gives you the password. Note that the vendor you need to deliver your goods to are shown on the mini map with a yellow circle. We've included a map for where each of the Tazavesh market vendors are for the different items you have to trade between them.
Tazavesh Bazaar (Market) Trade Event Map:
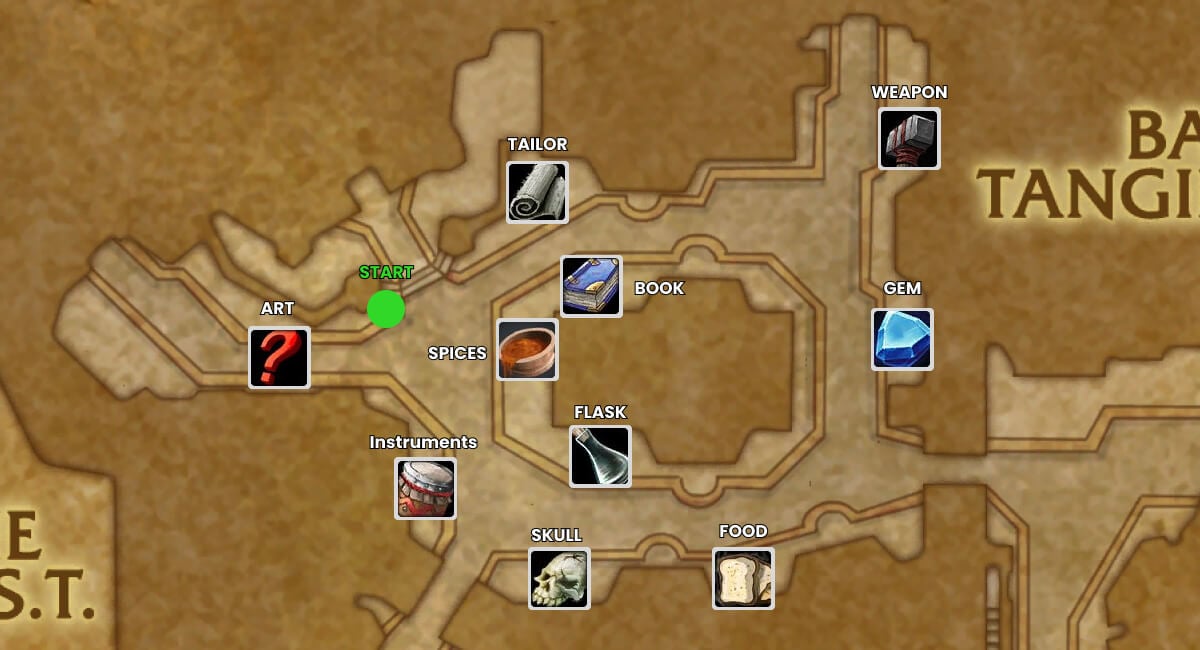
To make this more difficult, every time you interact with a vendor a group of mobs will spawn that you’ll need to deal with, plus there’s also a Lieutenant mob patrolling around the bazaar.
Bazaar Overseer
- This mob is immune to CC
- Energized Slam deals damage to 3 players, loosely spread out to avoid cleaving allies and use a defensive if your health is low
- Pierce targets the tank, beware of the damage amp debuff it applies and use defensives if needed
Cartel Lackey
- Tanks be aware of the stacking Gang Up buff for each additional Lackey in the pack
Bazaar Strongarm
- This mob is immune to CC
- This mob will fixate whoever currently has the trade goods, so use movement abilities to stay away if you are not the tank
- When actually tanking these mobs beware of the extra melee damage from Static Mace
Myza’s Oasis Boss Fight
To start this encounter you’ll need to have each player pickup one of the five instruments on the stage. It doesn’t really matter who goes where, however generally the healer will go on the drums, the DPS will take the instruments in the middle, and the tank will take the horn at the front.
These instruments grant an extra action button that allows you to interact with the music notes that appear on the floor, which if you hit while lit up grant a stack of Jazzy. If you reach 12 stacks of Jazzy you gain the Up Tempo buff, so it’s very important to hit as many notes as possible.
The fight itself alternates between a music phase and a combat phase, where the first 2 combat phases are adds and the last combat phase is the boss himself. Starting with the adds, the Oasis Security are the most important as they have the Menacing Shout cast which you’ll want to make sure is always interrupted. Otherwise they just have a tank hit in Security Slam, so make sure you have defensives ready if needed.
For all your spare kicks you can use them on the Disruptive Patron’s Hyperlight Bolt, and to lock the mob down you can also use a CC to stop their Teleport cast.
Finally the Brawling Patron is pretty straightforward, just using Throw Drink at a nearby player, so try and let the tank hit these mobs first to bait the attack on them. Also note that all of these mobs have an energy bar, gaining the Rowdy enrage buff if it fills, so if you don’t kill them fast enough you may need to use soothes. On top of this, throughout the entire encounter you’ll need to make sure you avoid the Rotten Food circles thrown by Unruly Patrons.
As for the boss himself, Zo’gron also has the same Menacing Shout interrupt and Security Slam tank buster as the adds before him, but he also has a few new abilities of his own. First is Suppression Spark, which puts an AoE circle around all 5 players while pulling them in, so make sure to fight against the pull in so you don’t cleave your allies, and watch out for the Jazzy notes that spawn when this ability goes off so you can refresh your buff!
Final Warning is a health based ability, cast around 70% and 35% health. This puts a large absorb on the boss and starts a 20s channel that can only be interrupted if the shield is destroyed. This means you’ll want to pool damage to help break this shield quickly, and healing CDs to help keep your group alive during the heavy ticking damage. Defensives can also be great here, especially if the shield holds for a long time.
Outside of that the boss will sometimes cast Crowd Control at a random player, creating a frontal that also causes all attacks and spells from that direction to be deflected, so make sure you quickly move out of the area.
So’azmi Trash
Outside of the Market Peacekeepers, Veteran Sparkcasters, and Commerce Enforcers which we previously covered, this area also has a mini boss that you can choose to fight or skip before porting up to engage So’azmi.
Commander Zo'far
- This mob is immune to CC
- Avoid the Shock Mines that spawn near random players, if you want you can use immunities to clear them after a few casts
- Power Kick targets the tank, use a defensive and don’t get knocked into other packs or Shock Mines
- Lethal Force tethers to players together, make sure to run away from your partner or use terrain to prevent you from being pulled together
So’azmi Boss Fight
Shortly after pulling the boss he’ll use Deploy Relocators, creating three pairs of portals that he intermittently moves around the arena, where touching one of the portals causes you to teleport to the matching pair. This is very important as it's the main way for you to avoid the Shuri ability, which creates a ring of energy that sweeps across the entire boss room and puts a heavy DoT on anyone it touches. Blinks do work as well if your class has them, as do immunities, otherwise you’ll need to use these relocators. If you do accidentally get hit, you can usually survive if you pop a large defensive.
To cut down on the space you have to play with, the boss will Divide the room in half with a wall of energy at 70% health, then in half again at 40% health. These walls are line of sight, so if the boss ever moves to a different area of the room, you’ll need to use the relocators, sometimes chaining multiple of them, to get yourself to where the boss is.
The main ability where this is a concern is the Double Technique cast that happens when the boss reaches 100 energy. This causes the boss to teleport away and begin to cast, which will apply a lethal DoT to the group if successful. That means you need to quickly use the relocators to reach the boss, then use 2 interrupts (yes, 2!) to stop the cast.
Other than that, the boss will occasionally use Phase Slash for some group damage, hitting 3 players and applying a bleed to them, so make sure you are ready with healing cooldowns, defensives, or bleed cleanses for when this happens.