Raid Setup
Recommended Classes
As many Melee as you can fit, with a minimum of 4 Ranged.
Mechanics
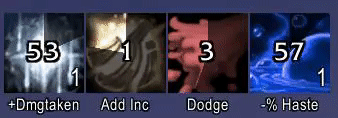
At 100 Energy on Mal’Ganis - both bosses will cast their Swarm abilities - dealing massive raid damage but also receiving 100% increased damage during this time.
Healer CDs should be used here, as well as DPS cooldowns.
Swarm last for 20s.
Each time Swarm is cast, Mal’Ganis will increase his Plague damage done by 10% and will cause an extra projectile to be fire out when Cloud of Carrion is cleansed, and when he fires out projectiles from underneath him due to Aura of Carrion for 50s after Swarm.
For 50s after Swarm is cast, Mal’Ganis will fire out Cloud of Carrion projectiles from underneath him, melee should step backward to dodge these just before it happens each time.
The debuff will also stack quicker on players whilst they are carrying it during this time.
This will continue until the next Infiltration of Dread mechanic occurs.
The boss will put 2x Cloud of Carrion debuffs on the raid each time this is cast, picking ranged targets.
As long as you have 4 ranged DPS/Healers this will never pick a melee target.
These should be passed as the stacks grow, usually at around 7/8 stacks - it’s possible to tank much higher stacks using defensive cooldowns.
This can be particularly dangerous if you have any active debuffs during the Swarm mechanic - players carrying the debuff will need extra healing.
Once a player has transferred their debuff to someone else they will have Biting Wounds on them for 10s, meaning they cannot receive another debuff during this time or they will likely die.
Cloud of Carrion can be cleansed using Fearful Trepidation.
Mal’ganis will spawn adds called Inchoate Shadows that will spam cast Ravenous Hunger, healing them and dealing AoE damage to the raid with each cast.
You need to let these adds heal to full as they cannot be killed until they reach max HP and turn into Corporeal Shadows. At this point they should be Death Gripped under the bosses, kicked, and killed.
Towards the end of the fight you can hard CC these adds with Hunter traps etc. as long as the bosses will die before 2 minutes has passed due to Coalescing Darkness.
Mal’Ganis will do a frontal ability Leeching Claws - this needs to always be kept facing away from the raid and the tanks need to make sure they are never hit twice or they will heal Mal’Ganis which should effectively cause a wipe.
The Among Us mechanic from Heroic - nothing has changed here, have raiders communicate which players they see with Demon wings and once 2 names have been said 3 times they can be confirmed as the players who need to be killed.
After this ability has happened Kin’tessa will increase her shadow damage by 10% and increase the size of her Slumber Clouds.
She will also enter Aura of Shadows mode for 50s after Among Us, meaning that any players who stand further than 8yds from another player will be horrified.
Kin’tessa will cast Fearful Trepidation regularly throughout the fight. These “fear bombs” can be used to cleanse Cloud of Carrion from players, sending out waves of projectiles that need to be dodged. It’s important that this is never dropped on any players other than those with Cloud of Carrion, as it will fear them through Bursting Dread.
The fear can be dispelled if it does occur.
A very important mechanic for the fight - Kin’tessa will regularly cast Slumber Cloud, spawning a cloud on a random Melee and a random Ranged player. These Clouds need to be baited close to the walls in order to give yourself room to play the fight.
You can see rough positioning for this in the strategy section.
Strategy
This fight is not strategically complex and rotates through the mechanics in a very linear fashion.
The key things here are to bait the Slumber Clouds properly, and to dodge the projectiles from Aura of Carrion properly. If you succeed in doing this, you will kill the boss fairly quickly.
After the fight starts the first big mechanic you will get is Swarm, putting you into Aura of Decay until the Infiltration of Dread occurs, after which you will be playing in Aura of Shadows.
This rotates throughout the fight, with the raid damage and amount of projectiles steadily increasing over time.
With a solid healing CD plan and good baiting/dodging the boss will die and you can collect your 285 loot.
General Positioning:


WeakAuras
Sepulcher of the First Ones WeakAura Pack
https://wago.io/slraid3