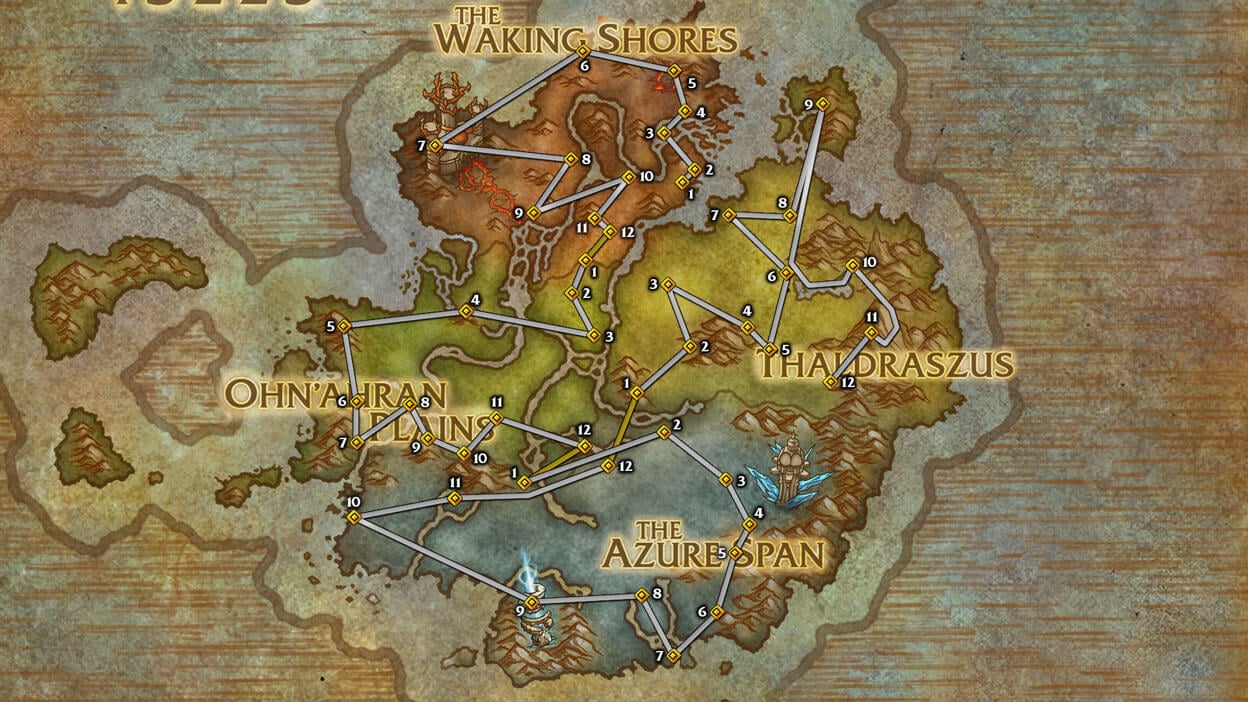
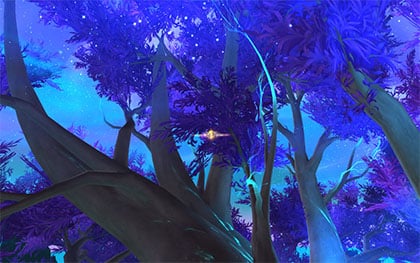
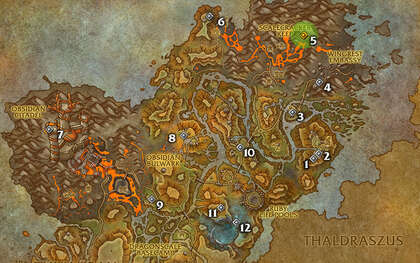
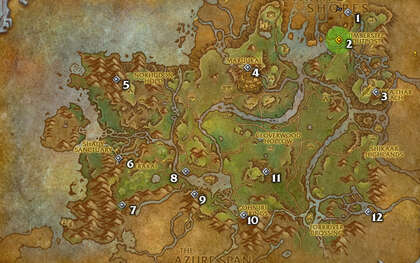
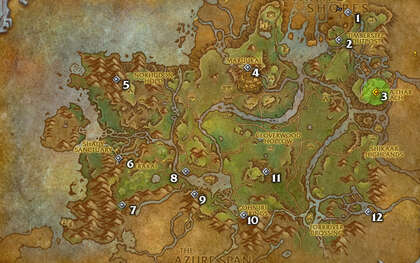
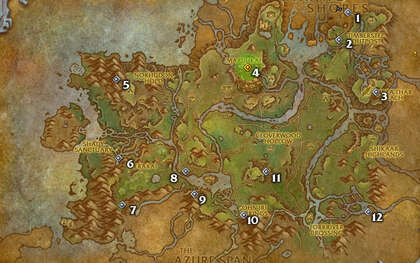
In this guide, now updated for Patch 10.2 (Emerald Dream), we show you where all 48 Dragonriding Glyphs are located on the Dragon Isles, the 8 newest Glyphs in the Emerald Dream, the 8 Glyphs on The Forbidden Reach and the 8 Glyphs in the Zaralek Cavern. We located and mapped out a route for each Dragonflight zone. We unlocked Dragonriding and instantly collected all 48, but you could also do the zones as you level through them.
The Glyphs are used for the Dragonriding talent tree, you spend them to improve your dragon. We recommend trying to find the Glyphs without a guide, because discovering them was a lot of fun, but if you get frustrated or don’t have the time, then we are here to help.
There are a total of 72 Glyphs all around the Dragon Isles, split between The Waking Shores, Ohn’ahran Plains, The Azure Span, Thaldraszus, The Forbidden Reach, Zaralek Cavern and the Emerald Dream. Every time you collect a glyph, you will get an achievement, making the glyphs account-wide, so if you collect them on one character, you don’t have to collect them again on your other characters.
Dragonriding Glyph Collection Tips:
- Most of these Dragonriding Glyphs can be collected by waiting for all of your Vigor charges to be available to let you use multiple Skyward Ascent ability uses quickly after each other to generate speed and the height needed.
- If you are collecting multiple Glyphs, you can sometimes use the height gained on the current one to get to the next one quicker or without using as many Vigor charges, making collecting them quicker.
- You can access the Dragonriding Skill Upgrades via the Dragonriding emblem next-to your minimap. So, make sure to upgrade whenever you have enough glyphs collected. Especially the max Vigor increase after collecting your first Glyph.
- Install the TomTom Addon and create a Macro for each of the zones that contains the glyph coordinates for that respective zone. Then use the macro when inside that zone.
- When you are close to a Glyph you haven’t collected yet, you will get a message in chat and the Dragon Glyph Resonance buff that a Glyph has been detected close to your location.
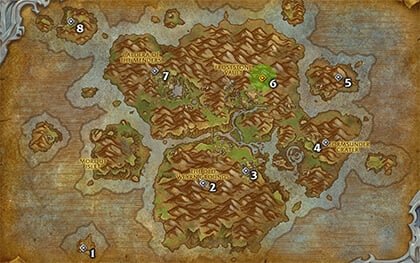
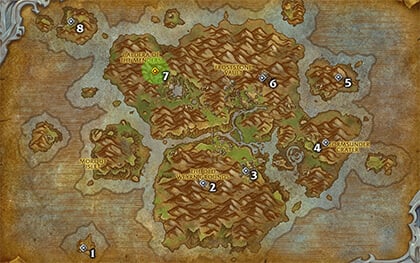
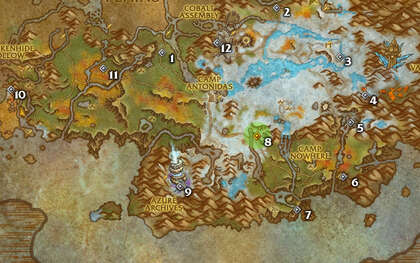
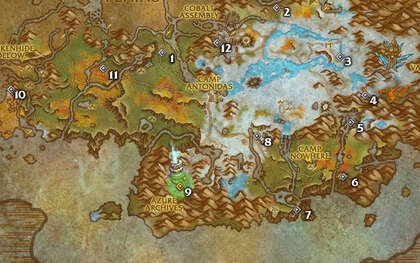
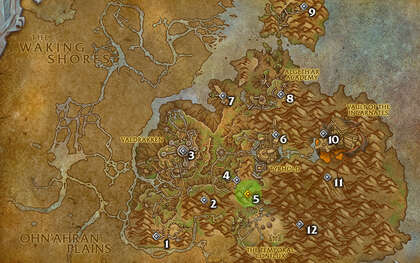
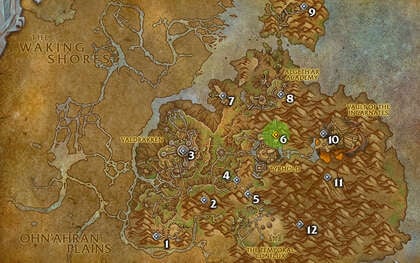
Emerald Dream
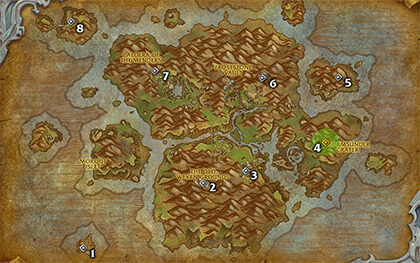
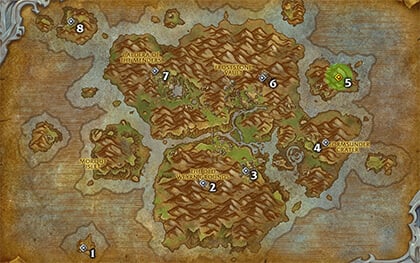
With the release of Patch 10.2 and the new zone, the Emerald Dream, we are getting 8 brand new Dragonriding Glyphs and 3 new skills.
The route below for the Patch 10.2 Glyphs is pretty straightforward, focused on minimizing the Vigor regeneration needed while grabbing all the Glyphs in one go, but also aims to give as much context as possible so you can find the ones you might have missed during your own Glyph hunt!
After collecting the new Glyphs, you will have access to the new Second Wind ability (a 3 minute cooldown skill that instantly gives you 1 Vigor), as well as the Swift Skimming and Wind’s Respite passive effects! With these new skills, you can have even more fun when Dragonriding around the Emerald Dream.
Emerald Dream: Dragonriding TomTom Glyph Coordinates:
Using the TomTom Addon, Create a Macro with the following waypoints, then use it when in Emerald Dream./way 61.66 75.43
/way 49.97 64.27
/way 31.83 80.59
/way 21.19 26.73
/way 29.83 21.20
/way 33.82 45.57
/way 45.51 45.82
/way 60.35 30.12
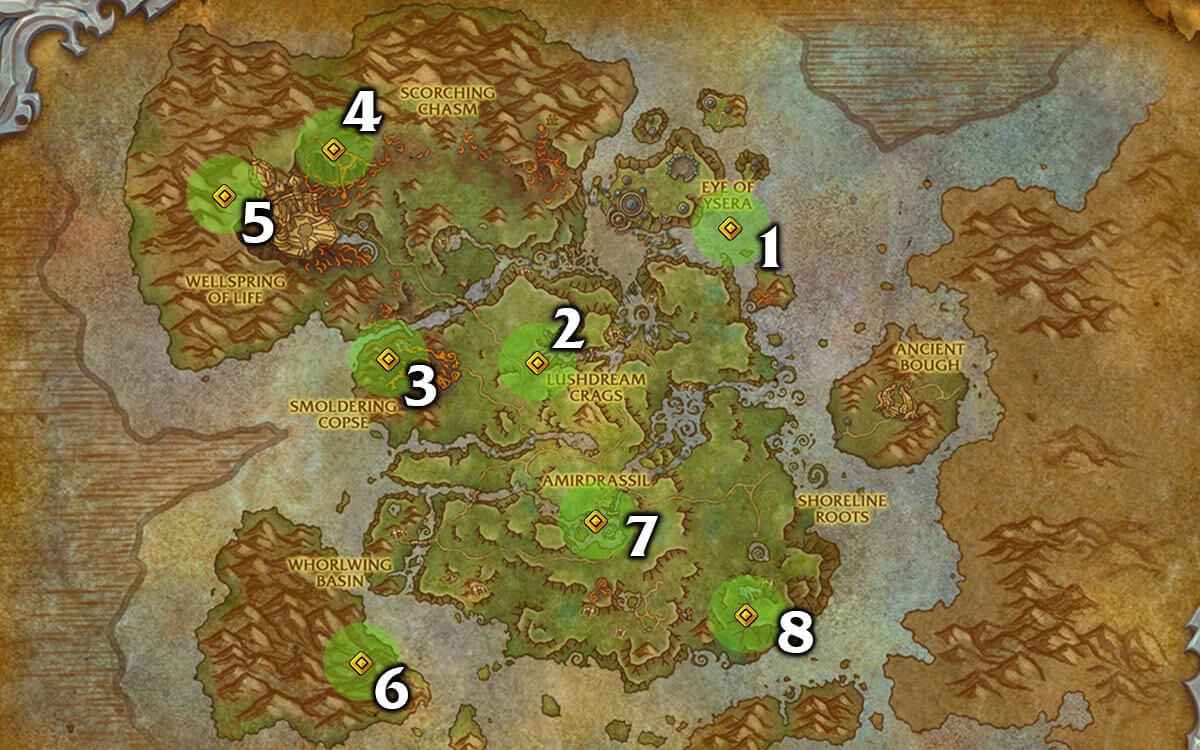
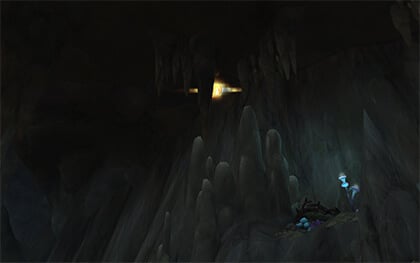
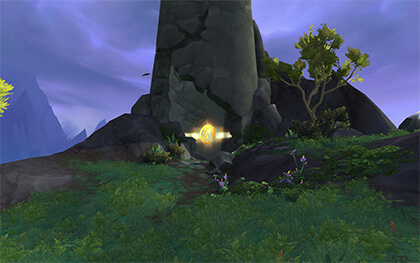
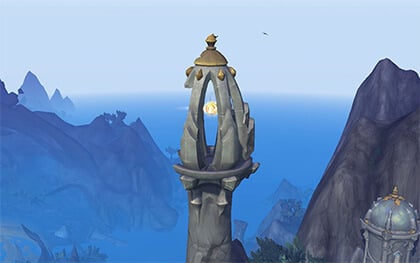
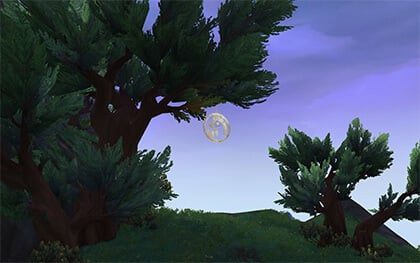
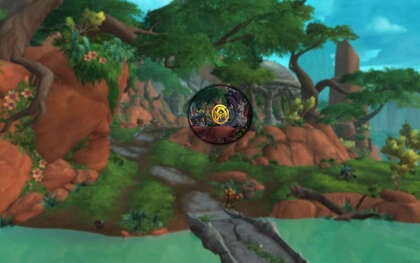
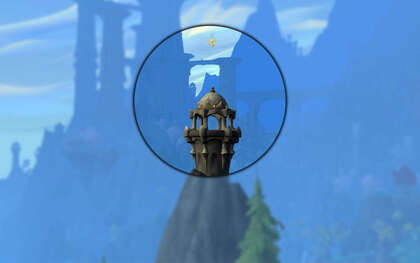
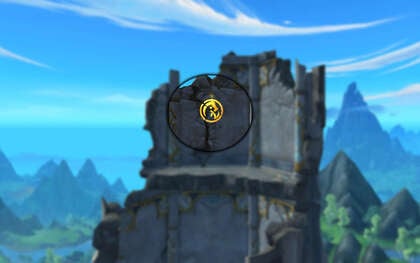
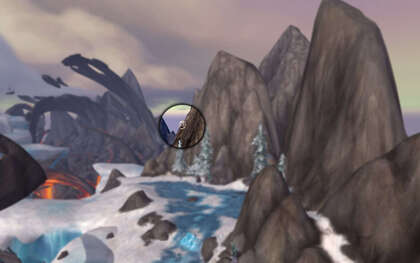
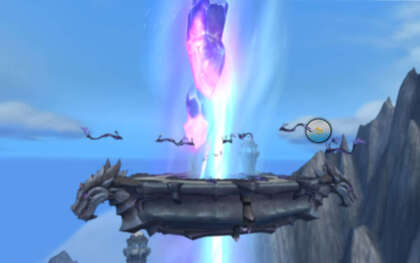
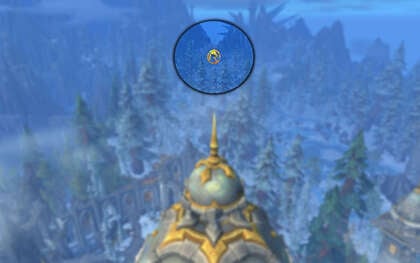
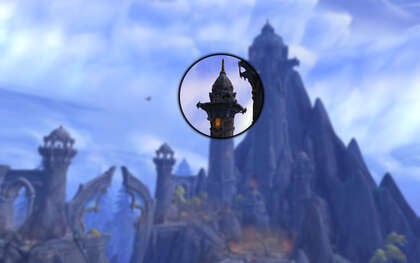
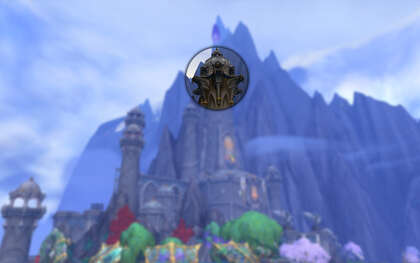
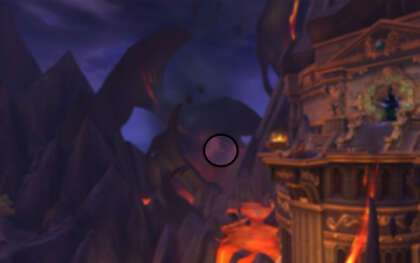
1. Dragon Glyphs: Eye of Ysera
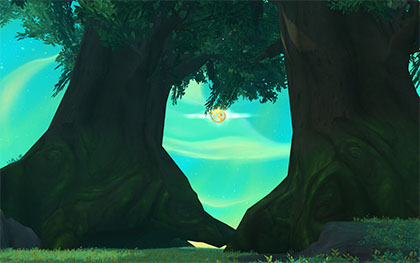
/way 60.35 30.12
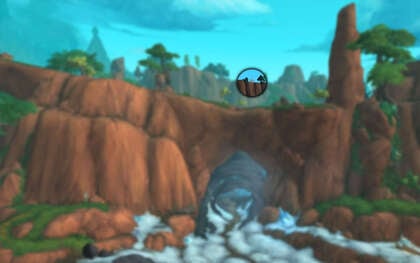
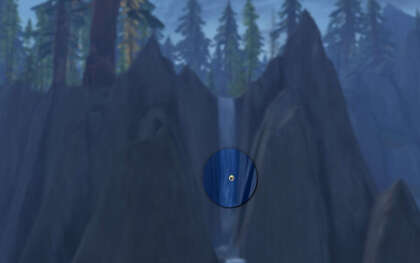
This Glyph is on a floating island, very high off the ground, close to the fortress in the Eastern part of the Emerald Dream. The Glyph itself is in between the two large trees that are on the island, close to the floor.
Starting with maximum Vigor, use Skyward Ascent as much as you can to get to the correct height, aiming towards this first Glyph’s location.
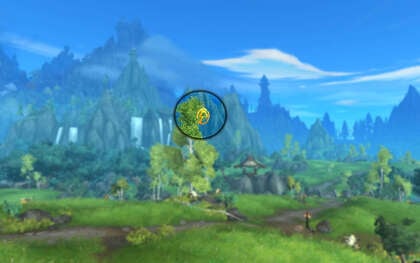
2. Dragon Glyphs: Dreamsurge Basin

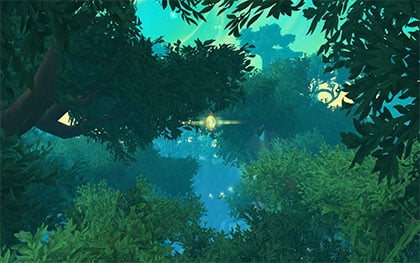
/way 45.51 45.82
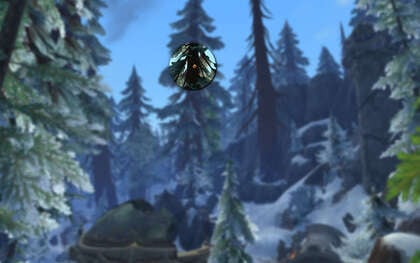
This Glyph is hidden amongst the top of the trees, quite high off the ground. You can look out for the flowers that are floating close to the Glyph.
Turn left from the previous Glyph, Eye of Ysera Glyph, then aim straight towards this one. Try to stay to the left hand side of the river and be ready to cut down into the trees.
3. Dragon Glyphs: Smoldering Copse

/way 33.82 45.57
The Glyph is located amongst the branches of the large burnt tree in the Smoldering Copse section of the Emerald Dream.
When flying to this Glyph from the Dreamsurge Basin Glyph, you can glide in a straight line whilst aiming at the burnt trees, saving some Vigor for the next Glyphs on the route.
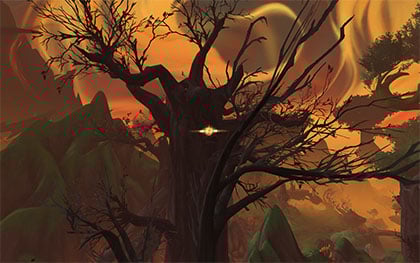
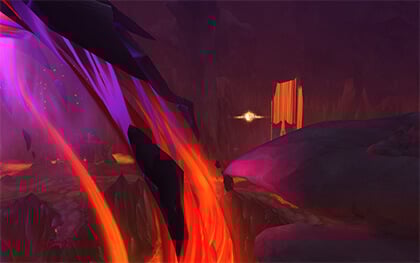
4. Dragon Glyphs: Cinder Summit
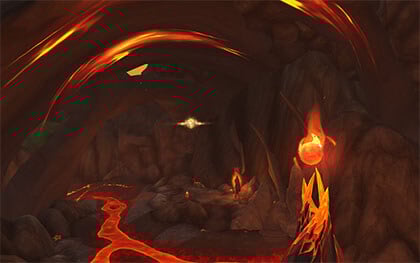
/way 29.83 21.20
This Glyph is located in the lava pits, at the Northern part of the Emerald Dream. The Glyph is right underneath a dome of fiery stone spikes, slightly above the lava on the ground. Very close to the Glyph is a twisted stone pillar with a fireball floating at the top.
After grabbing the Smoldering Copse Glyph before, turn right and aim towards the lava filled structure that should be right before you. You may need to use a couple Skyward Ascent to get to the correct height.
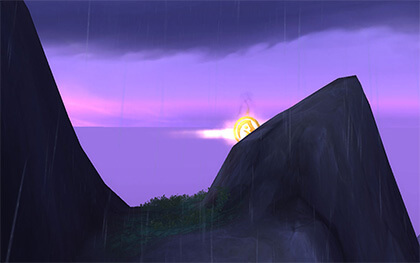
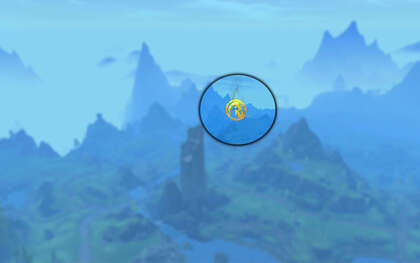
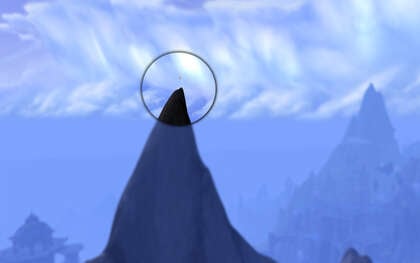
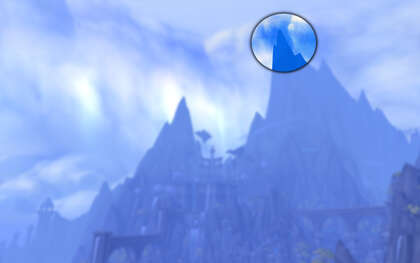
5. Dragon Glyphs: Smoldering Ascent

/way 21.19 26.73
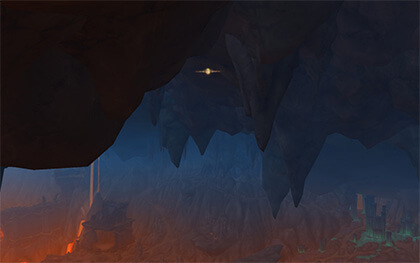
This is the highest Glyph of the zone, being at the top of the tallest mountain in the Northwest of the Emerald Dream. For reference, this Glyph is located near the raid entrance. We recommend waiting for your vigor to be full before beginning the ascent to the peak.
After collecting the Cinder Summit Glyph, get ready to use all your Vigor on Skyward Ascent to reach the peak of the mountain. If you don’t make it to the top, there are plenty of places to stop to recharge your Vigor on the way up.
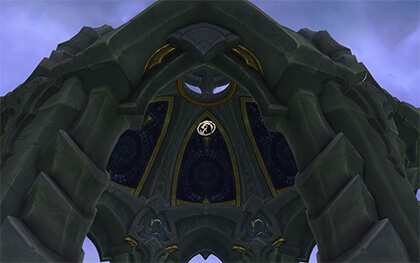
6. Dragon Glyphs: Whorlwing Basin
/way 31.83 80.59
This Glyph is located on the Whorlwing Basin island, in the Southwest of the Emerald Dream. The Glyph is raised above the ground, in an open space, surrounded by small and medium sized mountains with grass on top of them.
If you are coming from the Smoldering Ascent Glyph, you can use your momentum from the top to glide all the way down. If you want to feel the speed, you can use a few charges of Vigor with Surge Forward to get there a little quicker.
7. Dragon Glyphs: Amirdrassil
/way 49.97 64.27
This Glyph is located right near the top of Amirdrassil, high above the twisting branches of the massive World Tree. You have to fly quite high for this one, so save your Vigor!
Flying from the secluded Whorlwing Basin Glyph, you will need to use a lot of Vigor to reach the height needed to get to the top of the World Tree. Aim towards the top branches and you will find the Glyph in the open space in the middle of them all.
8. Dragon Glyphs: Wakeful Vista
/way 61.66 75.43
This Glyph is located in the Wakeful Vista region, in the Southeast of the Emerald Dream. The Glyph is high up in the branches and leaves of the big tree close by.
Flying down from the Amirdrassil Glyph, get ready to lose your height quickly by gliding down while aiming slightly to the right for the final Glyph. Keep an eye out for it, since it can be hidden by tree leaves depending on your approach angle.
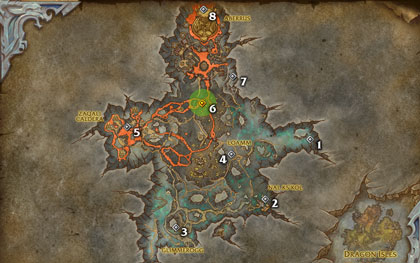
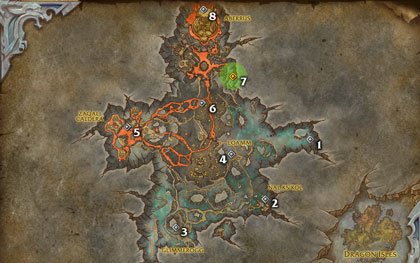
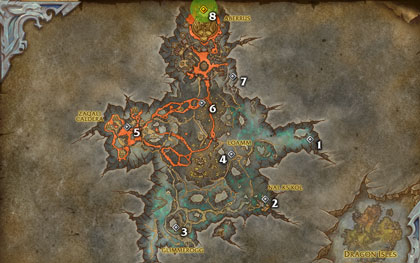
Zaralek Cavern
Patch 10.1 brings with it the Zaralek Cavern, located underneath the Dragon Isles, which can be accessed via one of the many cave entrances.
The route for the Patch 10.1 Glyphs below is fairly straightforward, and should have you find all of the Zaralek Cavern Glyph locations with ease. Most Glyphs are located close to the roof of the cavern and our route lets you slightly benefit from the height of one glyph to get to the next.
After collecting these new glyphs, you unlock 2 new talents on the Dragonriding Talent Tree, Ground Skimming and Land's Blessing.
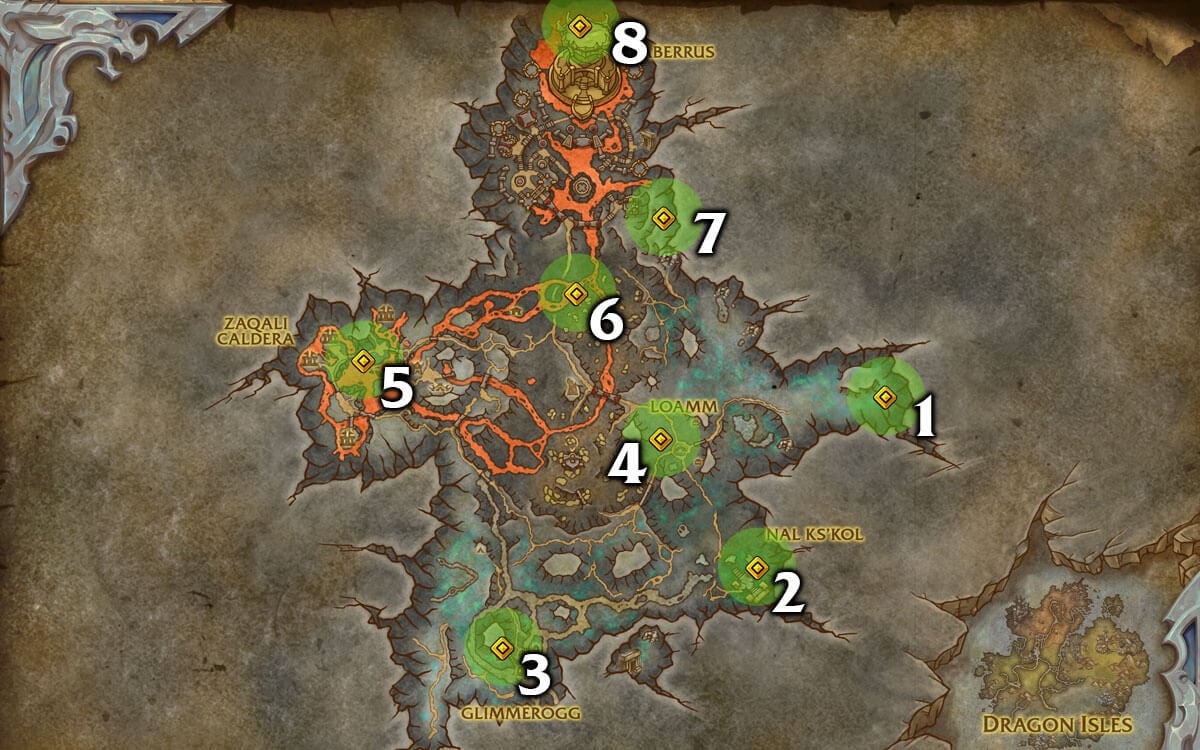
Zaralek Cavern: Dragonriding TomTom Glyph Coordinates:
Using the TomTom Addon, Create a Macro with the following waypoints, then use it when in Zaralek Cavern./way 48.06 4.46
/way 55.34 27.82
/way 47.43 36.99
/way 30.50 45.30
/way 54.75 54.63
/way 41.71 80.36
/way 62.75 70.26
/way 71.96 48.41
1. Dragon Glyphs: The Throughway
/way 71.96 48.41
As you enter the Zaralek Cavern via the entrance between Thaldraszus and Ohn’ahran Plains, turn slightly to your right, and the first Glyph is just below the roof of the cavern behind large green stalagmites.
2. Dragon Glyphs: Nal ks’kol
/way 62.75 70.26
This Glyph is close to the roof, on the left of the large pillars/stairs in front of Nal ks’kol (the structure shown on the bottom right of the in-game map), hidden behind some stalactites.
3. Dragon Glyphs: Glimmerogg

/way 41.71 80.36
This Glyph is above a large stone that has a stone balcony on the front of it. From the ground, it will take one or two Skyward Ascent uses to reach it.
4. Dragon Glyphs: Loamm
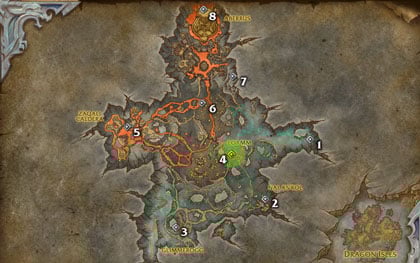
/way 54.75 54.63
This Glyph is close to the roof of the cavern, above round shaped buildings made of sandy stone with yellow smoke above them.
From the ground, it will take a single Skyward Ascent to reach it.
Coming here from the Glimmerogg Glyph, you can follow the path over the stone bridge, and into the slightly enclosed, lower roofed area that this Glyph is located in.
5. Dragon Glyphs: Zaqali Caldera

/way 30.50 45.30
This Glyph is a little more challenging. It is located in Zaqali Caldera (left section of the map), quite high up, above a large horizontal rock with a pink/purple hue that sticks out from the wall.
The Glyph and the rock are to the right (as you fly into the zone) of the large swirling lava vortex in the middle of the area.
Note: When flying in this zone, you gain stacks of a Dragonslayer's Sight debuff; when you reach 10 stacks of this debuff, you will be dismounted and fall to the ground (without a parachute or slowing effect).
Because of this, you should either collect the glyph quickly without landing, or you can collect the glyph, land just underneath it to reset your debuff, then fly to the next one. Both approaches will need you to use Surge Forward / Whirling Surge to avoid hitting 10 stacks, which you will if you fly slowly.
6. Dragon Glyphs: Acidbite Ravine
/way 47.43 36.99
This Glyph is just below the roof of the cavern, close to large rocky stalactites. Reaching it from the ground requires 2-3 quick uses of Skyward Ascent to get high enough to collect the Glyph. If you are flying directly from the Zawali Caldera Glyph, you are roughly half way up already, so won’t need as many vigor charges for Skyward Ascent.
7. Dragon Glyphs: Slitherdrake Roost
/way 55.34 27.82
This Glyph is close to the wall of the cavern, behind small, rocky stalactites and above a clump of stone stalagmites. It isn’t very far from the ground.
You can glide all the way down to this one from the Acidbite Ravine Glyph.
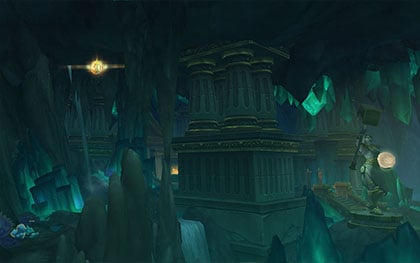
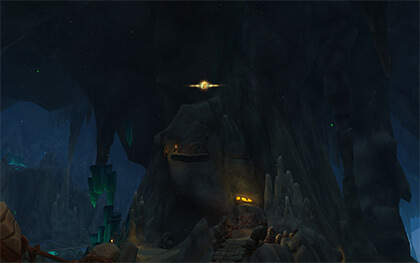
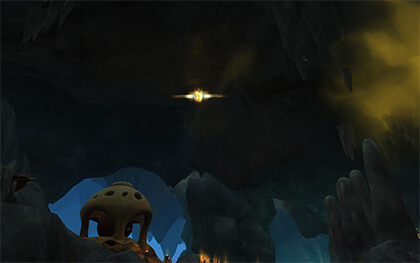
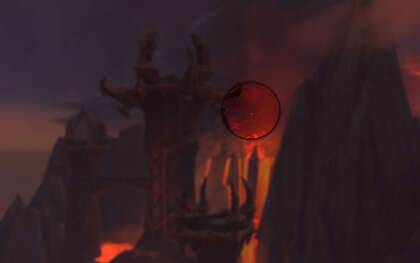
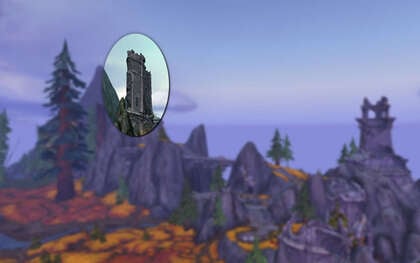
8. Dragon Glyphs: Aberrus Approach
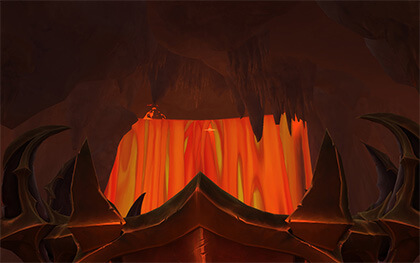
/way 48.06 4.46
This Glyph is at the top of the large lava waterfall behind the Aberrus Approach Tower (raid entrance). It will take 5-6 uses of Skyward Ascent to fly from the Slitherdrake Roost Glyph to this one. If you run out of Vigor early, you can also land on the tower and wait to recharge before flying upwards to the Glyph's location.
Note: Be careful to not fly too close to the lava waterfall, as you will be dismounted. Likewise, if you fall into the lava behind or inside the waterfall, you can only mount again when outside of the waterfall.
The Forbidden Reach
The Forbidden Reach zone, released in Patch 10.0.7, has had 8 new Dragonriding Glyphs added to it. The Glyphs and their coordinate locations are listed below. Our route for the Forbidden Reach Glyphs aims to minimise Vigor recharging time, but it should also help to collect any that you miss from your own exploration!
The Forbidden Reach: Dragonriding TomTom Glyph Coordinates:
Using the TomTom Addon, Create a Macro with the following waypoints, then use it when in The Forbidden Reach./way 18.36 13.12
/way 37.72 30.68
/way 62.54 32.43
/way 79.45 32.65
/way 77.30 55.10
/way 59.05 65.08
/way 48.52 68.96
/way 20.56 91.40
1. Dragon Glyphs: Talon's Watch
/way 20.56 91.40
This Glyph is inside the bottom of a ruined tower on the small island, Talon's Watch, in the far Southwest corner of The Forbidden Reach. You can reach it from the ground and jump to collect it.
2. Dragon Glyphs: The Frosted Spine
/way 48.52 68.96
This Glyph is close to the top of a snowy mountain, slightly raised from the floor in an open space.
If you're coming to this Glyph from Talon's Watch (Glyph 1), you can use the Gale Wind on that Island to get higher in the air. Then, fly in a straight line towards The Frosted Spine Glyph location and use Skyward Ascent on your way to reach the correct height up the mountain.
3. Dragon Glyphs: Talonlords' Perch

/way 59.05 65.08
This Glyph is at the top of a tall tower with large rounded pillars in the Talonlords' Perch ruined village.
If you fly from the previous Glyph in our list, you can glide down to this one without using Vigor.
4. Dragon Glyphs: Stormsunder Mountain
/way 77.30 55.10
This Glyph is towards the top of the Stormsunder Mountain on the East of The Forbidden Reach, slightly hidden behind a rock close to the top right side of the mountain.
When flying to this Glyph from Talonlord's Perch, you can fly mostly level towards this fourth Glyph and use Skyward Ascent to reach the ledge. Flying in this direction, the Glyph will be partially hidden behind a spikey part of the mountain.
5. Dragon Glyphs: Dragonskull Island
/way 79.45 32.65
This Glyph is close to the top and towards the back of the mountain on Dragonskull Island, the medium sized Island to the Northeast of the Forbidden Reach zone. It is beneath a group of trees on a grassy area of the mountain.
Flying from Glyph 4, Stormsunder Mountain, you can glide all the way down to this one by flying behind the mountain.
6. Dragon Glyphs: Froststone Peak
/way 62.54 32.43
This Glyph is inside the dome at the top of a very high tower at Froststone Peak, close to the Froststone Vault on the map.
Flying directly from the Glyph on Dragonskull Island is mostly in a straight line, however, you need to gain a lot of height to reach the Glyph. You will need to use roughly 4-6 Vigor charges on Skyward Ascent. If you run out before your reach it, you can land on the mountain below the tower to recharge.
7. Dragon Glyphs: Caldera of the Menders
/way 37.72 30.68
The Glyph is floating inside of a short tower with a broken roof in front of the Caldera of the Menders in the Northeast of the main island. If you miss going through the roof, you can also access the tower from the ground.
When flying from the Froststone Peak Glyph, you can glide all the way down to this Glyph. Aim for the blue laser beam on the floor, and the tower with the Glyph inside will be slightly to the right of that.
8. Dragon Glyphs: Winglord's Perch

/way 18.36 13.12
This Glyph is inside a short, ruined tower on the ground, located on the Winglord's Perch, the Island in the top-left of the Forbidden Reach.
Flying from Glyph 7 first requires a couple uses of Skyward Ascent to get some height, but then you can glide around the mountain on your right, towards the Island with the final Glyph. Flying from this direction, the Glyph will be hidden inside the roof of the short tower, but it's the only tower on the ground part of the Island, so it should be easy to find.
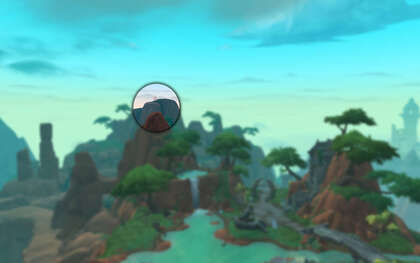
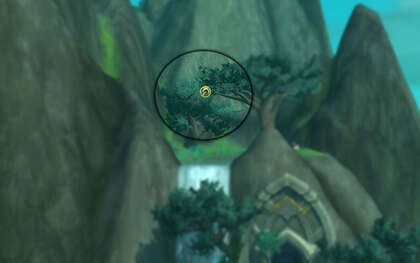
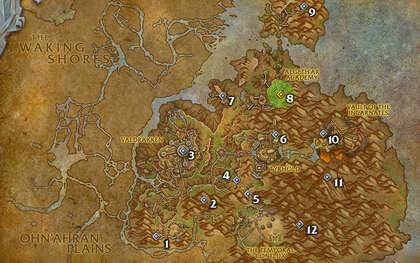
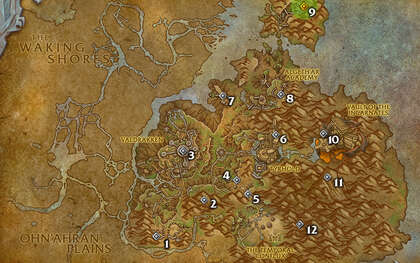
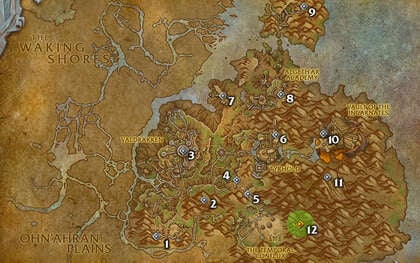
The Waking Shores
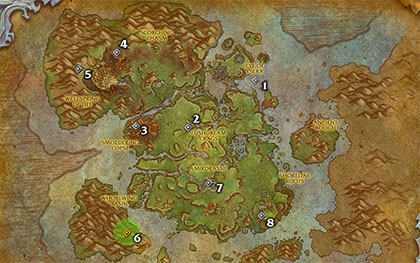
The image below shows all current locations for the Dragoriding glyphs in The Waking Shores. The order of the Glyphs is to help make collecting them quicker by using the height of one Glyph to glide to the next. However, it isn’t required to follow this path exactly, you can do them in whichever order you want.
The Waking Shores: Dragonriding TomTom Glyph Coordinates:
Using the TomTom Addon, Create a Macro with the following waypoints, then use it when in The Waking Shores./way 58.09 78.58
/way 54.46 74.21
/way 57.70 54.91
/way 40.95 71.93
/way 46.40 52.14
/way 21.76 51.40
/way 52.60 17.21
/way 74.87 37.33
/way 73.08 20.51
/way 69.27 46.23
/way 75.0 57.0
/way 74.34 57.54
1. Dragon Glyphs: Skytop Observatory Rostrum

/way 74.34 57.54
This glyph is located right next to the Rostrum of Transformation at the skytop Observatory.
Once you get this one, take the first Dragonriding Skills to increase your Vigor to 4 charges.
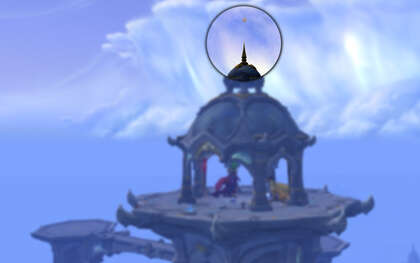
2. Dragon Glyphs: Skytop Observatory Tower
/way 75.0 57.0
This glyph is located on top of the tower at Skytop Observatory.
If you continue the questline a little further, you will get teleported to the top of the tower, directly below the glyph. You can use Skyward Ascent to fly out of the tower and turn around to reach the Glyph.
If you start from the floor, you can use all 4 uses of Skyward Ascent to get to the glyph quickly.
The more controlled approach is to use 2 uses of Skyward Ascent to get to the platform on the right side of the tower, then use 1 Skyward Ascent to get to the bridge, then 2 uses of Skyward Ascent from the bridge to the glyph. Wait in between for your vigor to recharge.
3. Dragon Glyphs: Dragonheart Outpost

/way 69.27 46.23
This glyph is located inside of the broken part of the tower. You can either use multiple charges of Skyward Ascent to reach it from the floor, or glide down from the Skytop Observatory. Also, you can use the ledge right below it to not fall down before moving to the next glyph.
4. Dragon Glyphs: Wingrest Embassy
/way 73.08 20.51
This Glyph is quite close to the floor, just above a short tower.
5. Dragon Glyphs: Scalecracker Peak
/way 74.87 37.33
This glyph is very high up on the mountain, so it will require you to fly to a few ledges to regenerate your vigor before making your way to the very top.
6. Dragon Glyphs: Life-binder Observatory

/way 52.60 17.21
This glyph is located on the roof, so you need to save Vigor to use multiple Skyward Ascent charges. The other option is to recharge your vigor at one of the ledges/platforms before going higher.
If you're coming directly from Glyph 5, you can glide all of the way down to this one.
7. Dragon Glyphs: Obsidian Throne
/way 21.76 51.40
This one is tricky and may require you to recharge your Vigor a few times before making your way up to the glyph, especially if you do it early on. The glyph is located behind the Obsidian citadel above the lava pool, so you can use the platforms on the Citadel and the mountain just below the glyph to recharge your Vigor.
If you're coming directly from Glyph 6, you can glide most of the way down to this one.
8. Dragon Glyphs: The Overflowing Spring

/way 46.40 52.14
This glyph is located on top of the mountain at the Overflowing Spring.
If you're coming directly from Glyph 7, you can glide all of the way down to this one.
9. Dragon Glyphs: Obsidian Bulwark

/way 40.95 71.93
This glyph is at the top of a tall pillar of stone. You can use multiple uses of Skyward Ascent or you can fly on top of the Obsidian Bulwark camp and then glide your way to the glyph.
If you're coming directly from Glyph 8, you can glide all of the way down to this one.
10. Dragon Glyphs: Crumbling Life Archway
/way 57.70 54.91
This Glyph is located just below the archway and not on top.
11. Dragon Glyphs: Ruby Life Pools Peaks
/way 54.46 74.21
This Glyph is at the top of a rocky mountain. There are lots of places to land and recharge Vigor if you can't reach the top from the very bottom.
12. Dragon Glyphs: Flashfrost Enclave
/way 58.09 78.58
This glyph is located at the flashfrost enclave on top of a hill.
If you're coming directly from Glyph 11, you can glide all of the way down to this one.
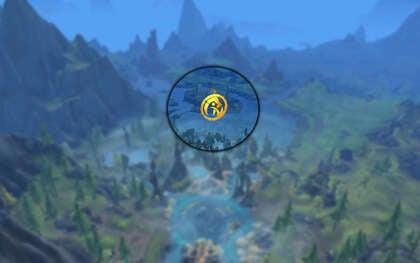
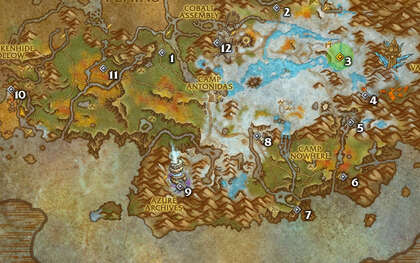
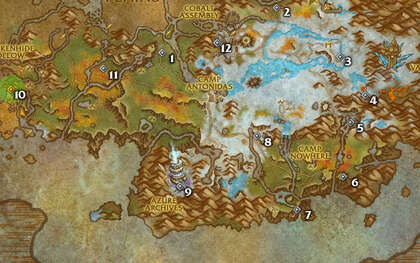
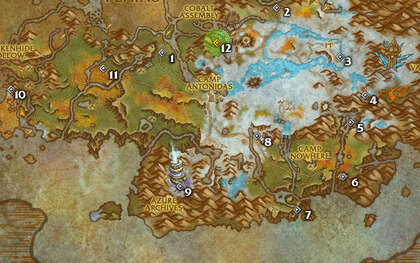
Ohn’ahran Plains
The image below shows all locations for the Dragoriding glyphs in Ohn’ahran Plains. Do them in the order you want, but we recommend doing them in this order to benefit from the Thrill of the Skies speed from a lot of the higher up glyphs to speed up getting a lot of the glyphs.
Ohn’ahran Plains: Dragonriding TomTom Glyph Coordinates:
Using the TomTom Addon, Create a Macro with the following waypoints, then use it when in Ohn’ahran Plains./way 84.07 77.27
/way 61.37 64.23
/way 57.13 80.10
/way 47.32 72.16
/way 44.73 64.57
/way 29.54 75.43
/way 30.15 61.56
/way 30.39 36.07
/way 57.79 30.81
/way 86.54 39.32
/way 78.42 21.17
/way Waking Shores 48.82 86.64
1. Dragon Glyphs: Rubyscale Outpost
/way Waking Shores 48.82 86.64
This glyph is located at the Rubyscale Outpost near the bridge.
This Glpyh is listed under the Ohn’ahran Plains achievement, but is right between The Waking Shores and Ohn’ahran Plains, when at the glyph, you will see it on The Waking Shores map. The waypoint to show it on the Ohn’ahran Plains map is /way Ohn'ahran Plains 80.0 13.0
2. Dragon Glyphs: Mirewood Fen
/way 78.42 21.17
This glyph is located at Mirewood Fen, follow the road up from Glpyh 1 in this zone. It is the area where you accept the first quest in Ohn’ahran Plains.
3. Dragon Glyphs: Rusza'thar Reach
/way 86.54 39.32
This glyph is above the rooftop of the tower on a hill, which is pretty high up, so you need to use multiple Skyward Ascent charges or use the surrounding mountains to land and recharge your vigor.
4. Dragon Glyphs: Ohn'ahra's Roost
/way 57.79 30.81
This glyph is located on top of the giant owl at the top of a large mountain in Maruukai. You will need multiple Skyward Ascent uses, or you may require breaks to recharge your Vigor at some point because it’s pretty high up.
5. Dragon Glyphs: Nokhudon Hold

/way 30.39 36.07
This Glyph is located on top of the mountain. You may require multiple Skyward Ascent uses or to recharge your vigor halfway through before making your way to the very top.
If you are flying directly from collecting Glyph 4, you can use a lot of the momentum to use less Skyward Ascent charges to reach this one.
6. Dragon Glyphs: Emerald Gardens
/way 30.15 61.56
This glyph is located just above the waterfall in the Emerald Gardens.
If you are flying directly from collecting Glyph 5, you can glide all of the way to this one.
7. Dragon Glyphs: The Eternal Kurgans
/way 29.54 75.43
This glyph is located in the middle of the air and not above a mountain, so you need to use multiple Skyward Ascent charges to reach it.
If you are flying directly from collecting Glyph 6, you should have momentum from the last, so less Skyward Ascent charges are needed.
8. Dragon Glyphs: Szar Skeleth
/way 44.73 64.57
This Glyph is at the top of the broken tower near Szarskeleth. From the floor it takes a few charges of Skyward Ascent.
If you fly here directly from Glyph 7 you can glide directly to this one.
9. Dragon Glyphs: Mirror of the Sky
/way 47.32 72.16
This glyph is located in the middle of the air. Use multiple uses of Skyward Ascent or use the big mountain next to it to your advantage and make your way higher up before collecting the glyph.
If you glide directly from Glyph 8, you can save a few vigor charges to reach this one.
10. Dragon Glyphs: Ohn'iri Springs

/way 57.13 80.10
This glyph is located in the middle of the air, on the side of the mountain’s top section. You will need multiple charges of Skyward Ascent from the ground.
If you go to this Glyph directly from Glyph 9, you can use your existing momentum and glide towards this Glyph, needing less Skyward Ascent charges to be at the right height.
11. Dragon Glyphs: Windsong Rise

/way 61.37 64.23
This Glyph is in the sky above a raised hill with a distinctive swirl pattern in the ground. You want to use multiple Skyward Ascent uses from the ground to reach this glyph, or, you can glide down from Glyph 10 without needing to use any charges of vigor.
12. Dragon Glyphs: Dragonsprings Summit
/way 84.07 77.27
This glyph is located in front of the dam. From the ground below it, you will only need to use 2 charges of Skyward Ascent.
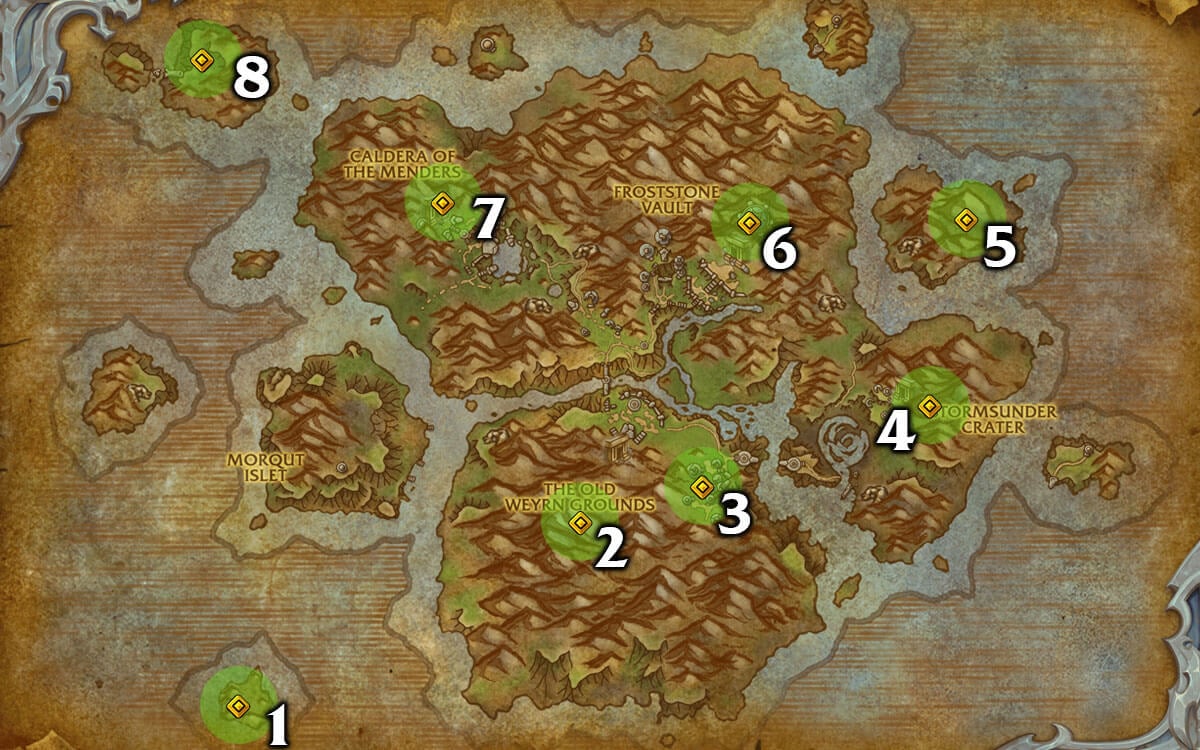
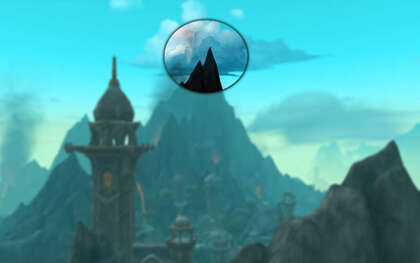
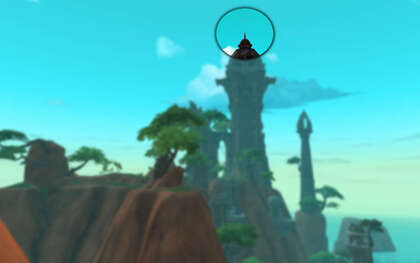
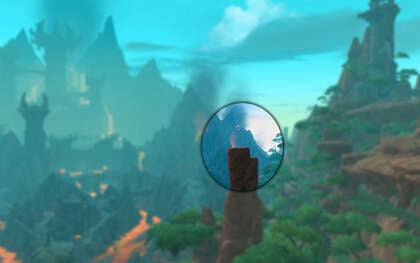
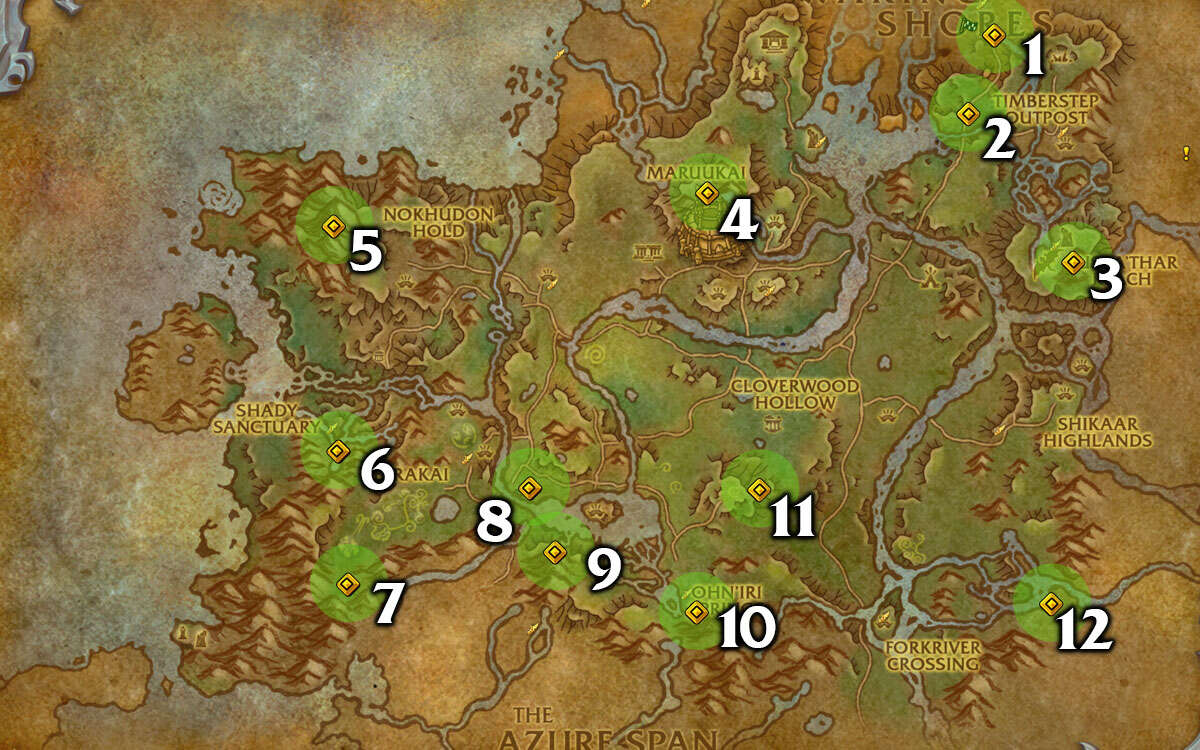
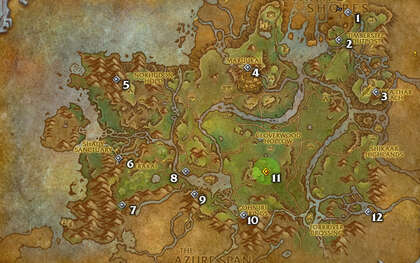
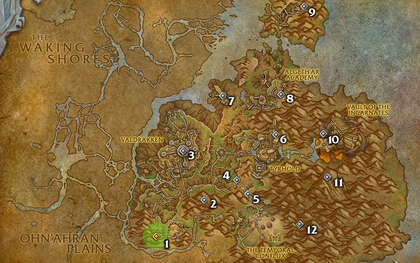
The Azure Span
The image below shows all locations for the Dragoriding glyphs in The Azure Span. The order of the Glyphs is to help make collecting them quicker by using the height of one Glyph to glide to the next. However, it isn’t required to follow this path exactly, you can do them in whichever order you want.
Remember to use the glyphs collected to upgrade your dragon riding skills if you haven't already.

The Azure Span: Dragonriding TomTom Glyph Coordinates:
Using the TomTom Addon, Create a Macro with the following waypoints, then use it when in The Azure Span./way 45.77 25.69
/way 26.73 31.68
/way 10.39 35.82
/way 39.20 63.01
/way 52.97 49.04
/way 60.62 69.99
/way 68.65 60.35
/way 70.58 46.26
/way 72.59 39.86
/way 67.64 29.11
/way 56.81 16.03
/way Ohn'ahran Plains 70.11 86.60
1. Dragon Glyphs: Forkriver Crossing

/way Ohn'ahran Plains 70.11 86.60
This glyph is located near the Forkriver Crossing camp on the road to The Azure Span. It is low to the ground, so should only need one use of Skyward Ascent from the ground.
This Glpyh is listed under The Azure Span achievement, but is right between the Ohn’ahran Plains and The Azure Span, when at the glyph, you will see it on the Ohn’ahran Plains map. The waypoint to show it on The Azure Span map is /way The Azure Span:Dragon Isles 36.55 28.15
2. Dragon Glyphs: The Fallen Course

/way 56.81 16.03
This glyph is located near the broken bridge between The Azure Span and Thaldraszus.
3. Dragon Glyphs: Kalthraz Fortress
/way 67.64 29.11
This glyph is pretty straightforward to collect. It is located on top of the tower inside the broken rooftop.
4. Dragon Glyphs: Vakthros Range

/way 72.59 39.86
This glyph is located in the air above a raised ice clearing; you will need to use Skyward Ascent to reach the area, but the Glyph is close to the ground and easy to reach.
If you have been following our ordering, you should be able to unlock more Dragonriding skills after collecting this glyph.
5. Dragon Glyphs: Lost Ruins

/way 70.58 46.26
The glyph is located inside the top of the tower at the Lost Ruins. It is high up from the floor, so will require 3 charges of Skyward Ascent.
If you come here from Glyph 4, you can glide the majority of the way.
6. Dragon Glyphs: Ruins of Karnthar
/way 68.65 60.35
This glyph is located at the top of the broken tower at the Ruins of Karnthar.
If you come from Glyph 5, you can glide the majority of the way to this one.
7. Dragon Glyphs: Imbu

/way 60.62 69.99
Pretty straightforward glyph to collect. It’s located right off the big waterfall.
If you go here from Glyph 6, you can glide all the way to this glyph, then use Skyward Ascent to get back up into the zone.
8. Dragon Glyphs: Zelthrak Outpost
/way 52.97 49.04
This glyph can be pretty tricky to spot because it's located high from the ground, right next to a huge tree. You will need up to 4 charges of Skyward Ascent from the ground to comfortably reach it, or you can use the tall tower or the surrounding mountains to get higher up before using Skyward Ascent or Surge Forward to reach the glyph.
9. Dragon Glyphs: Azure Archives
/way 39.20 63.01
This glyph is located very high in the sky, slightly away from the highest of the floating platforms. To reach it from the floor, it will require 4 charges of Skyward Ascent. However, if you don’t have enough vigor, you can use the giant structure in the middle of Azure Archives to reach the top before flying to the tower where the glyph is located.
Note: If you are doing the quests in this area, you can use a teleport to get to the top of the floating rings.
10. Dragon Glyphs: Brackenhide Hollow
/way 10.39 35.82
This glyph is located in the middle of the air and not above a mountain or a tower. You will need to use multiple charges of Skyward Ascent. You can also use the mountain next to it to recharge your vigor if needed before collecting the glyph.
You can also glide down from Glyph 9 to get here quickly.
11. Dragon Glyphs: Creektooth Den

/way 26.73 31.68
This glyph is pretty straightforward to collect. It’s located on top of a big tree trunk. It requires 2 charges of Skyward Ascent from the floor.
You can also fly from Glyph 10 to get this glyph.
12. Dragon Glyphs: Cobalt Assembly
/way 45.77 25.69
This glyph is located just above the roof of the big tower at Cobalt Assembly. You will need to use 4 charges of Skyward Ascent from the floor, or land on the platforms around the tower to recharge your vigor before reaching the very top.
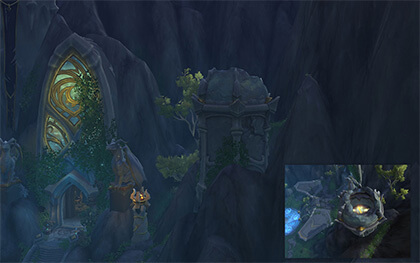
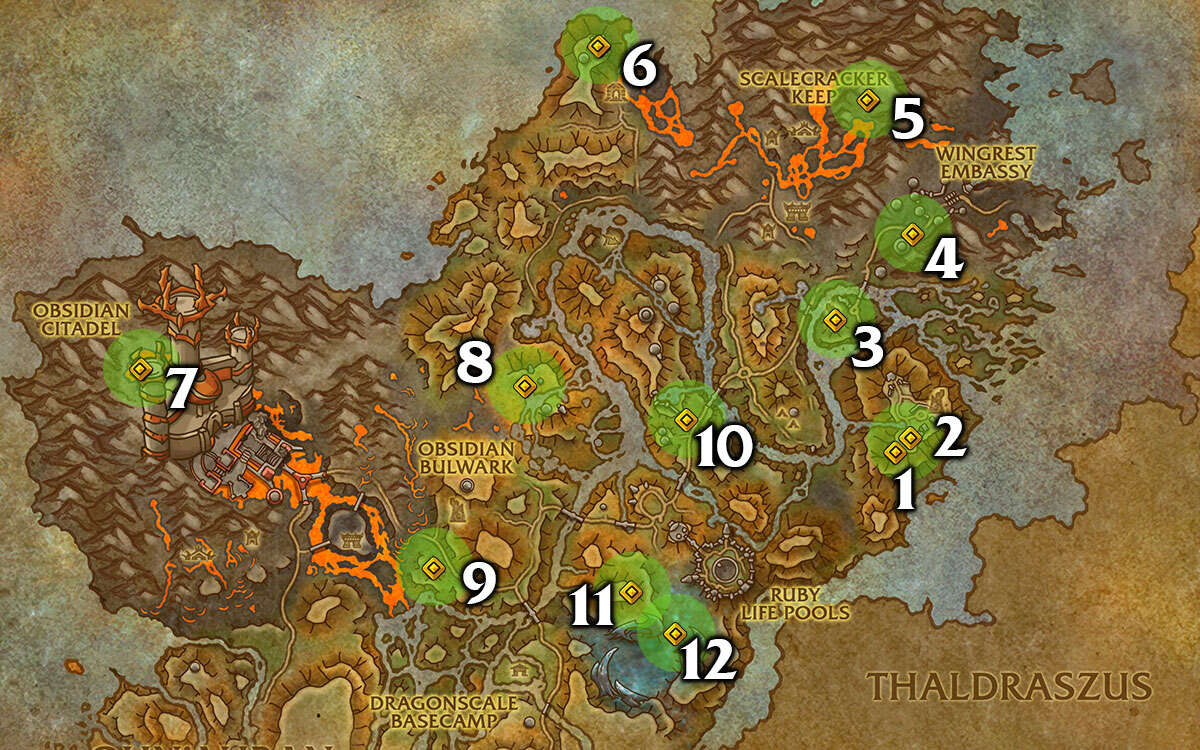
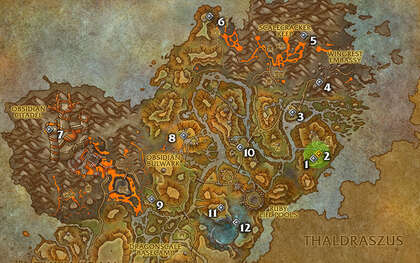
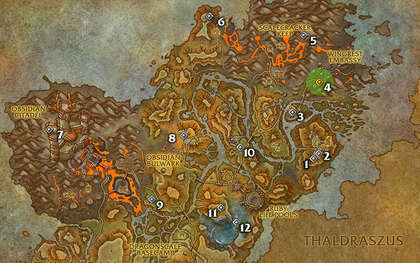
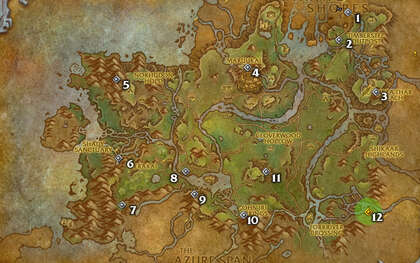
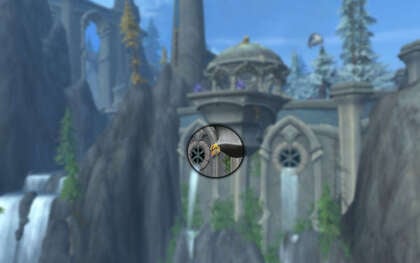
Thaldraszus
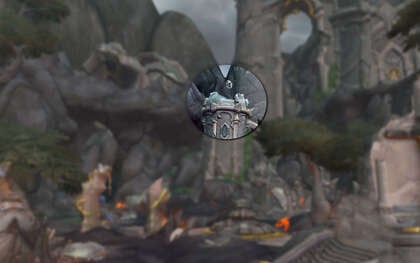
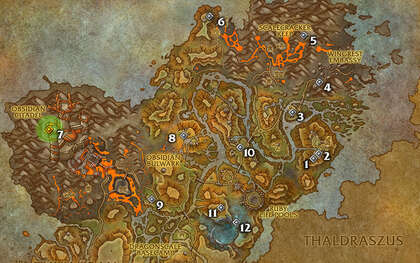
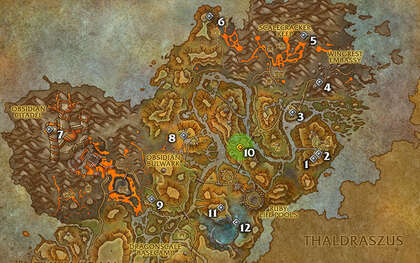
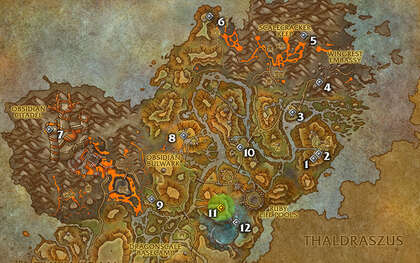
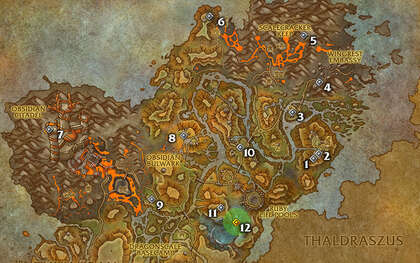
The image below shows all locations for the Dragoriding glyphs in Thaldraszus. There is no requirement to do the Glyphs in the order shown below, however, they are in an order to help use the height from one Glyph to make reaching the next one easier and quicker overall.
Remember to use the glyphs collected to upgrade your dragon riding skills if you haven't already. If you have followed our ordering, you should unlock the 3 final dragonriding skills during this zone.
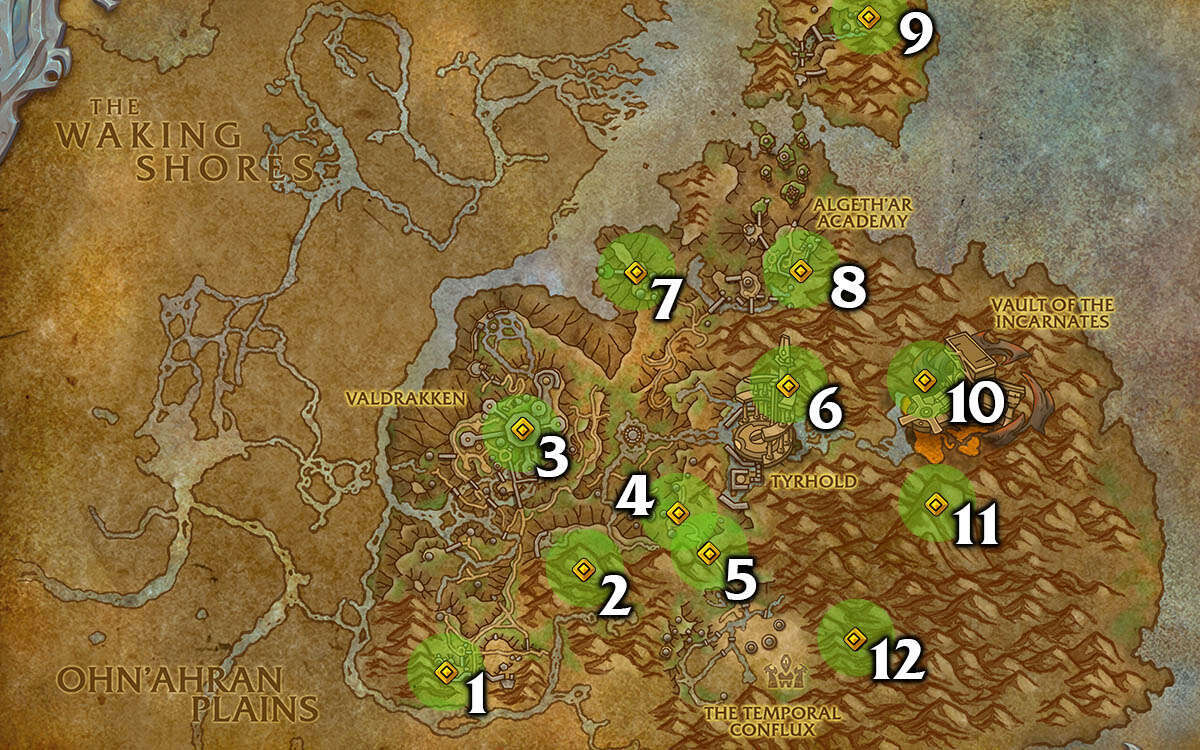
Thaldraszus: Dragonriding TomTom Glyph Coordinates:
Using the TomTom Addon, Create a Macro with the following waypoints, then use it when in Thaldraszus./way 66.01 82.34
/way 72.96 69.14
/way 72.40 51.71
/way 67.09 11.76
/way 62.41 40.46
/way 49.85 40.23
/way 61.57 56.61
/way 55.76 72.33
/way 52.65 67.43
/way Thaldraszus 41.26 58.27
/way 46.09 73.88
/way 35.56 85.56
1. Dragon Glyphs: South Hold Gate
/way 35.56 85.56
This glyph is located in the second highest tower next to the South Hold Gate. The Glyph itself is inside the top of the tower just below the rooftop. To reach it from the floor you will need to use multiple Skyward Ascent charges.
If you are following our order, you should wait in the tower to recharge your Vigor before going to the next one.
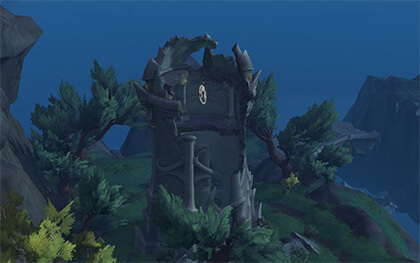
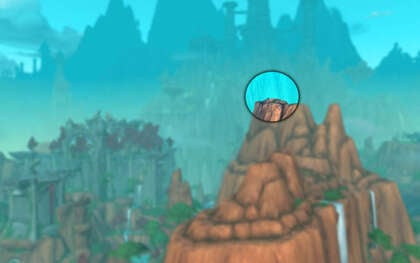
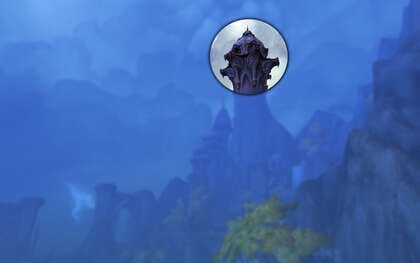
2. Dragon Glyphs: Stormshroud Peak

/way 46.09 73.88
This glyph is located on top of the big mountain. I would recommend waiting part way up with this one until you have enough vigor recharged to reach the top.
If you came to this Glyph from number 1, you should already be able to make it pretty high up the mountain to recharge Vigor.
Once you collect this Glyph and have collected all of the other zone’s glyphs you should be able to unlock one of your final dragonriding skills in the current tree.
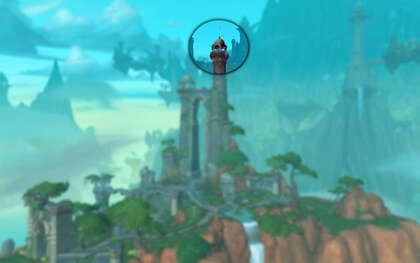
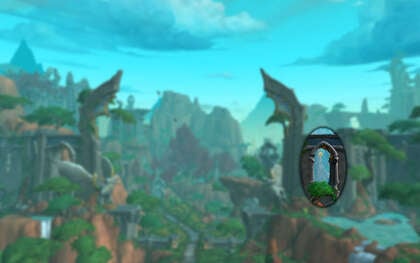
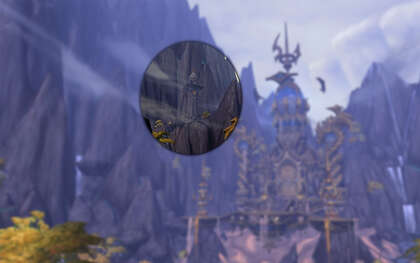
3. Dragon Glyphs: Valdrakken

/way Thaldraszus 41.26 58.27
This glyph is located at the very top of the Seat of the Aspects tower in Valdrakken. It is high up, from the floor of Valdrakken it takes 3 - 4 charges of Skyward Ascent to reach the Glyph.
If you are low on Vigor and level 64 or above you can take the teleporter from inside the ground floor of the tower to The Seat of the Aspects and then make your way to the roof to collect the glyph.
If you come to this Glyph directly from number 2, you can glide all the way down to this one.
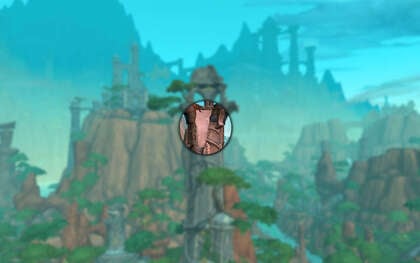
4. Dragon Glyphs: Gelikyr Overlook

/way 52.65 67.43
This glyph is located just above the bridge near Gelikyr Overlook.
If you come directly from Glyph 3, you can glide all the way down to this one.
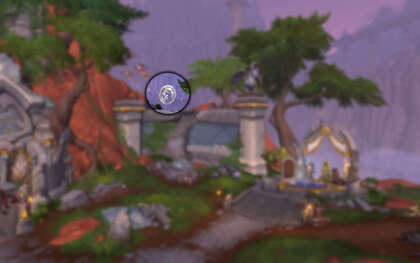
5. Dragon Glyphs: Passage of Time

/way 55.76 72.33
This glyph is located on your way to the temporal conflux just before the big stone archway. It isn’t very high up, so a single Skyward Ascent will let you reach it.
6. Dragon Glyphs: Tyrhold
/way 61.57 56.61
This glyph is located on one of the floating rocks next to the enormous structure in Tyrhold.
To reach the glyph from Glyph 5 it will take 5 - 6 charges of Skyward Ascent. From the floor of Tyrhold it takes less, but you need to use charges to get into the zone. If you have less Vigor available, you can make your way part way up the giant structure to recharge some vigor and then fly over to the floating rock to collect the glyph.
7. Dragon Glyphs: Algeth'era

/way 49.85 40.23
This glyph is located at the top of the tower, just above the roof. From the floor it will take 3 or 4 Skyward Ascent charges.
If you come to this one directly from Glyph 6 you can glide all the way to this one.
If you are following our ordering, after collecting this Glyph, you should now be able to purchase your second skill in the final row of the dragonriding skill tree.
8. Dragon Glyphs: Algeth'ar Academy
/way 62.41 40.46
This glyph is located inside the top of the tower with the giant crystal on its roof. It can be tricky to spot because the glyph is located just below the ceiling inside the tower.
If you come to this one from Glyph 7, you are already most of the way up, so will require less Vigor charges to reach it. From the floor you may need to wait for your vigor to recharge before getting to the top of the tower.
9. Dragon Glyphs: Veiled Ossuary
/way 67.09 11.76
The glyph is located inside the top of the tower just below the rooftop.
If you come directly from Glyph 8, you can use 1 or 2 Skyward Ascent charges then glide most of the way down to this one.
10. Dragon Glyphs: Vault of the Incarnates
/way 72.40 51.71
This glyph is located above the lava next to the left of the Vault of the Incarnates raid entrance.
If you want to go from Glyph 9 to this one, I recommend that you go back via Glyph 8 as the mountain on the left is very high. I flew back to the Algeth'ar Academy tower and recharged my vigor before flying up to Glyph 10 from the Tyrhold side.
Once you get high enough to get into the area, you can glide the rest of the way to the glyph. You can also land on a rock area or the raid entrance platform to recharge some vigor.
11. Dragon Glyphs: Thaldraszus Apex
/way 72.96 69.14
This glyph is probably one of the hardest glyphs to get. It is located on the biggest mountain on the dragon isles; it will require you to have unlocked most of your dragon riding skills and you will still need to land on side parts of the mountain to recharge your Vigor before making it all the way to the top.
The rest points that you can land on are spaced out around the mountain, so if you find yourself losing speed, you can try to fly around the mountain before losing too much height if you are fully out of Vigor.
With almost everything unlocked and coming directly from the raid entrance platform next to Glyph 10, I landed twice to recharge Vigor. Firstly on a spiked section of the mountain on the side of the mountain that you reach directly from Glyph 10. The second on the snowy part of the mountain, almost on the opposite side from where I started. From there, I was able to Skyward Ascent 4 times to reach the Glyph at the very peak of the mountain.
12. Dragon Glyphs: Temporal Conflux
/way 66.01 82.34
This glyph is located inside the top of the tower, just below the rooftop. The glyph is pretty high up, so from the floor it will take multiple charges of Skyward Ascent.
If you come to this Glyph after Glyph 11, you can swiftly dive down straight towards the tower.
If you followed our ordering for all of this, you should have collected all available Glyphs and can now finish fully upgrading your dragonriding skills. Congratulations and thank you for reading!