Raid Setup
Introduction
Welcome to our Mythic Tindral Sageswift guide. This boss is significantly harder than the bosses before it, so be prepared to really take this fight phase by phase and return to some higher wipe counts.
UPDATED! This guide has been written after the latest changes to Mythic Tindral on January 16th 2024.
Fight Style: Funnel/AoE/Cleave fight
Recommended Setup: 2 Tanks / 4 Healers / 14 DPS
Useful utilities: Tiger’s Lust, Hand of Freedom, Roars/Speed Totem, Personal Root removal abilities, Hunter Pets (to free someone)
Hero/Lust usage: 1st Intermission
Easy Mode
Phase 1:
- Assign Freedom’s and Defensive externals to certain players
- Dodge Fire beams and blue swirls
- Clear out the bombs and kill roots
- Spread out when Tindral flies away to pick up feathers faster
Intermission:
- Spread out when flying to the other platform
- Tanks stay towards the back to pick up the last orbs for maximum damage/heal stacks (10)
- Kill the shield before the damage becomes too high
Phase 2:
- Pre-move to dispel locations
- Stack up properly (tight) on each root cast
- Dragon squad needs to be fast and always hit the roots
- Spread to designated spots and soak seeds
- Use defensives and health pots aggressively whenever you deal with an ability
Phase 3:
- Combination of P1 + P2
- Dragon squad should use immunities on the 3rd and 4th set of bombs to avoid dying to beams
- Use defensives and health pots aggressively whenever you deal with an ability
Mechanics
Every player that avoids getting rooted or removes it, will now spawn a Scorched Treant. Those adds inflict low raid wide damage every 1 sec until killed. While the damage taken from 1 single treant does not feel bad, it ramps up pretty fast depending on how many treants you spawn. Plus, it overlaps with other abilities.
Players now need to be dispelled one by one, with a delay, because the entire raid takes 5000% increased damage from this ability for 2 seconds after a dispel. Additionally, the player affected by this ability takes heavy ticking damage until dispelled.
In addition to Blazing Mushroom (Red) you now have another type called Poisonous Mushroom. Tanks need to soak a different type every soak, so they just alternate from one mushroom to another. Failing to soak one Red Mushroom per set is often doable, but failing to soak the green mushroom will always wipe the raid.
Tindral spawns 6 feathers on the ground that can be picked up. Picking it up allows the player to fly up and soak one of the 3 bombs. Once the bomb is soaked, players need to crash down into Tindral and the Roots to deal extra damage to both. Players can only soak 1 bomb each, unless you have an immunity. Failing to soak a bomb will lead to a wipe.
While the shield is active, Tindral will pulse raid wide damage that ramps up with each tick. This ability starts to hurt at 6+ stacks, so your aim is to destroy the shield before the 8th stack.
Strategy
Even after all the nerfs, Mythic Tindral Sageswift is still arguably one of the hardest boss fights in World of Warcraft history. You will need patience, resilience, good preparation and the right raid comp in order to defeat this boss.
As this boss relies heavily on WeakAura usage, we recommend you to download some of the public packages (Liquid, Northern Sky, etc.).
The Setup
First of all, we need to cover all the setup, regarding several aspects of the fight.
Let's start with WeakAuras.
The two important WAs are the Dispel assignment WA that will give a number to a player and assign which healer should dispel.
The spot list should look like this:
- Priest Healer (or other ranged healer)
- Evoker DPS
- Hunters > Mages
- Locks (needs Freedom)
In most comps, guilds play 1-2 priests, in that case you can be sure that 90% of the time the Priest will always get Dispel debuff on them and should always pre-run to that Number 1 spot.
Evokers want that Number 2 spot mainly so they can always rescue the priest on the way there if needed and to be done with the dispelling quickly, meaning they can get back in the range of the boss.
Number 3 and 4 will always be a little random and will come down to your comp, but mostly it will be the lock or the mage in spot Number 4. Healers will always need to pay extra attention to the Health of the last 2 numbers because they hold the debuff longer than anyone else. Especially the last player to get dispelled, they will always need an external for extra safety.
The dispel assignment list should look like this:
- Priest (dispels himself)
- Priest
- Paladin
- Monk
You do have the freedom to assign this however you like, this is just a general recommendation. The reason why you want priests to go first is because they are mostly busy ramping (if Disc) and high damage always comes towards the end of the dispel cycle. Also, a Priest will always get it, so it makes sense that they prioritise themselves.
Dragon Teams
You will need 2 teams of 3 players. You are free to decide whoever you want to send up, but you have to prioritise melees. If you are lacking melee options, you can use an Evoker, because they can make it from the Number 2 dispel spot. You should also put most of your melee immunities in Group 2 because they can use the Immunity in Phase 3 to survive the beams.
Note: if you run 2 Demon Hunters, do not send both to the same group, because you want the extra 5% spell damage on the roots that are on the ground.
The feathers will spawn around the boss in this formation.

I encourage you to let your players decide whichever feather they want to pick up, and what bomb they want to soak as everyone plays different positions and hard forcing some specific feathers/bombs might be very awkward.
It is not a complicated mechanic by any means, so after a few pulls it should be very clear who takes which feather and soaks which bomb.
TIP: It’s worth using a 4th player for bomb soaks early in progression. This is because often players will miss the bomb, die to some other ability, or get hit by a beam. The 4th player ensures that there is always someone who can backup a bomb at any time. This especially becomes very useful later in Phase 3, where you potentially want to send a 4th person up on the last 2 sets of bombs because those are very hard to soak due to the amount of beams in the sky, and a bomb going off will instantly wipe your raid.
Freedom Setup
Most of the freedom gameplay happens in Phase 1, but there is a lot of it, so it's important that you do things right from the start.
As mentioned in the WeakAuras setup section, when it comes to dispels, you will most likely need only 1 freedom (external), which will be on the player at spot Number 4. That can be fully covered by a Holy Paladin and a Prot/Ret Paladin.
However, things get very wild when you reach the 0:50 seconds root set in Phase 1. Here, the strategy is to remove as many roots as possible in order to dodge the fire beams, and kill all the Treants as fast as possible. You will also commit immunities for players in melee that can’t unroot themselves.
Things that you will need to assign here are mostly Hunter pet root removals, Spellward (if you have a prot paladin) and Tiger’s Lust.
TIP: Evokers should play Waystone. There are several spots in the fight where it is very useful for several reasons. While the Waystone does not remove root, it will teleport the Rooted Evoker on top of the person targeted. This is best used on the 1st root in Phase 1, 2nd root in Phase 2, and 3rd root in Phase 3. Using it will make more space around the boss (because the Evoker is not stacking there) and thus reduce damage taken from overstacking with the roots. The moment the Roots are applied, the Evoker uses Waystone and is now on top of everyone without taking any damage from root circles. The more Evokers you have, the more benefit you will gain from this ability.
With this out of the way, we can start with the step by step guide through all the phases.
Phase 1 Strategy
Note: the 3rd Fire Beam has been removed from the fight.
First of all, you never hug the walls of the platform at any point of the fight. Players hugging the wall will get an arrow above their head and die shortly after. If the dispel targets feel like they have no space between the wall and the boss, this simply means the tanks are moving the boss way too close to the wall.
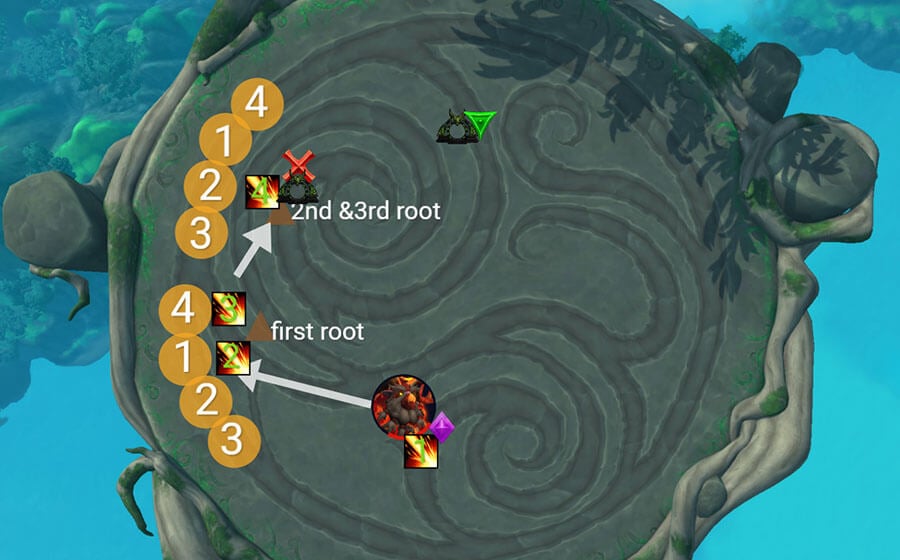
Pull the boss towards the Purple marker and wait there until the first Fire Beam spawns. You move the boss a bit to the side, towards the wall and position yourself for the 1st root cast.
At the same time, dispel debuffs will go out and the 1st Dragon Team will go up.
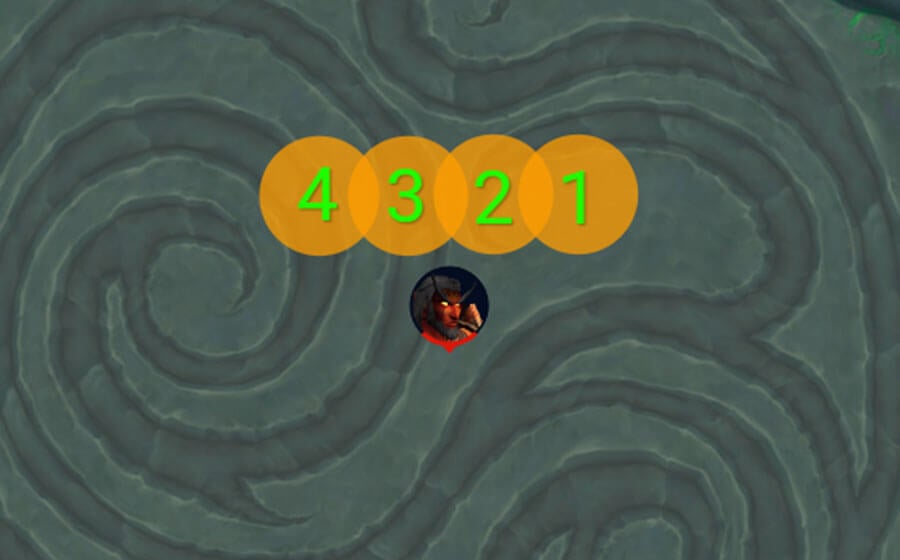
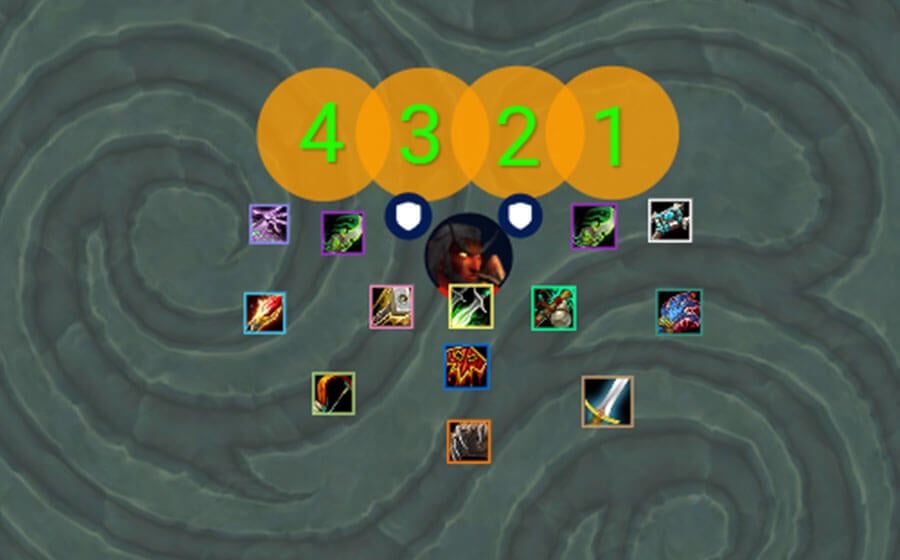
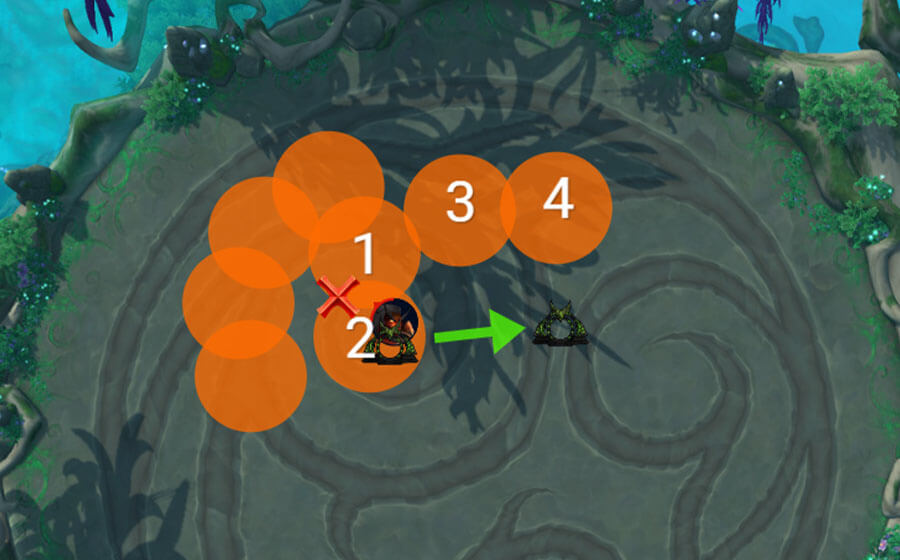
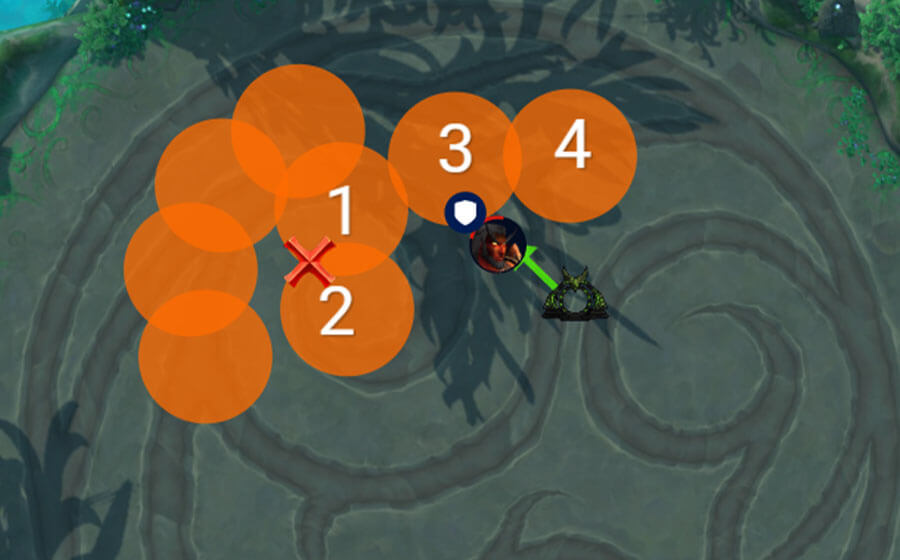
As you can see on the picture, the formation of 4 - 1 - 2 - 3 is used. The reason for this is that often, especially early into progression, players tend to go to the wrong spots. If you are to follow standard formation of 1 - 2 - 3 - 4 (where 4 is the last player in the line) you will most likely encounter dispel range issues simply because the player is too far away. The simple fix for that is to have 1 - 2 - 3 in their regular spot, and then the 4th player next to Number 1 dispel puddles. This will ensure that the player is in a spot where the raid is moving towards and you won’t encounter any range problems.
The Dragon team should quickly pick up the feather. You can stand in the swirl before it becomes a circle, it does not deal damage. That way the feather will spawn on top of you and you can instantly fly up. The reason why you want to do this fast is because Dragon teams do most of the damage to the roots when they hit the ground. So if you fly up fast, soak and crash down then you get out of the roots much faster and you can easily dodge the follow up mechanics. This is especially important in Phase 2 and Phase 3.
Everyone else is simply stacking up around the boss, as close as possible (without over-stacking) and just AoE the roots until everyone is free. When stacking, you are totally fine overlapping with 1-3 circles, so pay attention to your surroundings. Often players will try to find a cosy free spot and end up getting clipped by 5 rings instead. If there is a player next to you who is standing solo with the root ring, it's often better to simply stack on top of that player; that way you both get hit by 2 circles rather than trying to move around and getting hit by 5 instead.
00:50 Phase
Before the nerf, this point of the fight was a hot mess (literally) and was one of the hardest points of the fight. Now it is much more manageable, but will still require clean gameplay to prevent unnecessary deaths.
You can check out the pre-nerf version here:
While this will look much cleaner now, It’s good to see all possible directions Fire Beams can come from, and the movement needed to overcome this ability.
So this happens just after you get out of Root 1 and you just did all of your dispels. Usually the tanks would wait for the 3rd Fire Beam spawn and then move towards the red maker, but that Fire Beam is now removed. Regardless, your tanks should still simulate this movement to avoid any potential shenanigans from happening. Simply move out of Fire Beam 2, wait 3 seconds next to the dispel puddle, and then aggressively run towards Red Marker.
Once there, place the boss at the marker and this mini phase begins.
What happens here is a solo root set, meaning you do not have dragons to destroy this set.
There are two simple rules here:
- If you can remove the root, stay within 15 yards range of the boss (but do not stack in melee) and remove your roots the moment you get it. Classes that can Immune this, need to pop the immune before roots are applied, otherwise it won't work. This also counts for players that get external root removal spells. Simply stay close enough that Mass grip can be used to get every single Treant on top of the boss.
- Melees that can use an immunity, should not remove the root! They simply stack up close to the boss and get rooted. Melee space will be pretty empty, so they should have no problem finding a free spot. Once rooted, they AoE the roots and use the Immunity only if a Fire Beam is about to go through them. The immunity won’t remove the root but will remove the damage from the Fire beam. The reason why those players do not want to pre-immune the root is because you would simply spawn extra Treants and that is just unnecessary raid damage in this particular scenario.
Make sure you have plenty of AoE damage here; usually Demon Hunter, Lock’s and Warrior are blasting hard on this set.
If you survived this and killed all Treants, you now get another set of Dispels and Roots, but this time with Dragon Team 2.
You follow the same 4 - 1 - 2 - 3 formation, send dragon team 2 up, and everyone else stacks around the boss. Your warlock should place a Gateway in front of the red marker before the pull, because you will use it here to get out of the Fire Beam once roots are killed.
TIP: Use personal defensives on this set to reduce the amount of random deaths at the end of Phase 1. You will get those back again in Phase 2 when you need them, so no reason to hold.
Shortly after, Tindral will fly away, so make sure to reapply DoTs just before, and spread out instantly whilst dodging the fire beams. The wind is pretty strong, so you need to be extra careful not to get pushed into a Fire Beam and spreading out is very important for faster Feather pick-up.
Intermission Strategy
In this section we will cover both intermissions, because they are very similar and you should know some things regarding the 2nd intermission before getting there in order to prepare for it while doing the 1st intermission. The 1st intermission acts like a practice session for the 2nd one.
The core difference between the two intermissions is the speed and execution. To put it simply, the 2nd intermission forces your raid to fly to the other platform as soon as possible, while still getting the 10 stacks (although possible to do with less stacks).
1st Intermission
There is a misconception that you need to set routes for Healers and DPS when it comes to collecting orbs. In fact, you want your healers to prioritise getting to the platform quickly, especially since you will need to do this in the 2nd intermission.
The DPS will collect a few orbs on the way, but their main objective is also just getting to the other side as quickly as they can.
The majority of your orbs will be collected by tanks. This is mainly because they don’t deal much shield damage and also do not have ramp up time, but more importantly, they can sustain taking damage in the air far longer than others (damage from red orbs or supernova ticks).
Here is an example of a Tank route:
You can see he picks up 3 orbs this way, but has an option to go for a 4th and 5th. The other tank is following a similar route, but on the other side.
So, as long as DPS/Healers pick up 3-4 orbs on the way, it should be no problem for tanks to pick up the remaining ones.
Your aim should be that every healer/dps is on the platform before the boss lands. If you arrive later than that, this indicates that you are doing something wrong and you need to be faster.
TIP: If you are low health already, or you get hit by red orbs, you should abandon trying to catch orbs/vigor resets and simply fly towards the platform. It's not worth the risk that you hit another red orb and die for basically no gain.
When the boss becomes targetable, as he lands, pop Hero/Lust and deal some serious damage. This hero is very good because almost all cooldowns are back and you will gain boss damage that will come in handy in Phase 3. However, for the sake of progression it is maybe better to use hero in Phase 2 (just after the 1st seeds) for extra healing and to get more raw intermission practice, because in the 2nd intermission you do not have the same luxury. Feel free to experiment with this.
2nd Intermission
As mentioned, during this intermission you do not have the luxury of time. So your main objective is to get to the other platform as fast as possible without getting hit by Red orbs, which are now moving.
DPS/Healers will collect only a few Green orbs that are on the way and tanks will do the rest.
You will notice right away that even when you reach the other platform super fast, the boss will be landing already and cast supernova. This means that players that are still in the air will take damage without being able to get healed. This can also get problematic for the tanks, especially if they soak a few red orbs and it takes them a while to pick up the remaining green orbs.
You need to understand that when you start damaging the boss, it is unlikely that you will have 10 stacks already, it will take 2 - 4 more seconds for tanks to get the last ones. So do not think you are doing something wrong, this is simply part of the 2nd intermission.
With all that in mind, you can expect to get 7- 8 Supernova ticks throughout this intermission, so be ready to pop some personals towards the end.
If tanks are struggling to get 10 stacks for the raid, this means that the raid is way too passive and is simply not soaking anything on the way. In that case, just set 1-2 players to go for the awkward corner orb that always gets ignored and it should be fixed.
Phase 2 Strategy
Once you break the shield, you are in Phase 2. You want to keep the boss where he is standing and deal damage until the first set of abilities.
Phase 2 is very similar to Phase 1, but now the Fire Beam is replaced with Seeds.
Your first combo is Dispels + Roots + Dragon Team and then the Seeds.
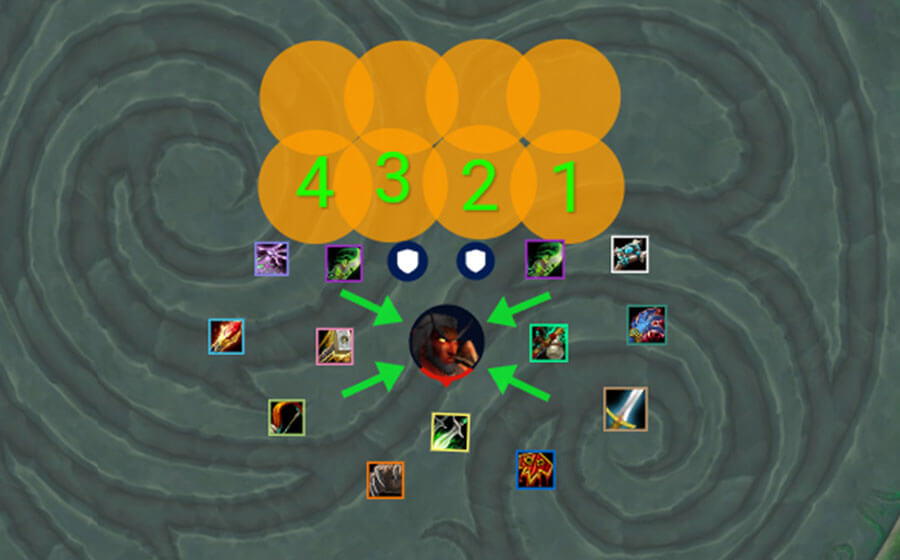
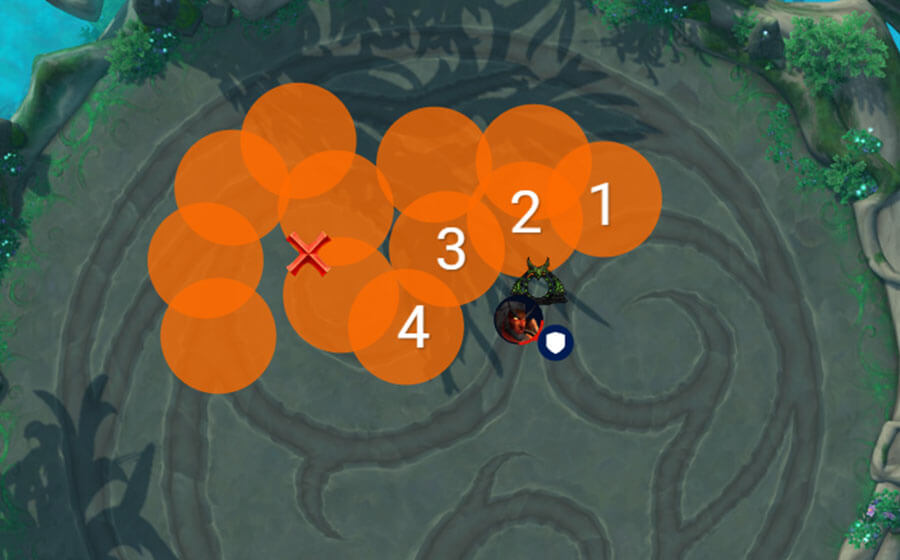
You will now do the dispels behind the boss, in a normal 1 - 2 - 3 - 4 order as you won’t be moving the boss to the side or similar.
Dispels and Dragon teams should be done around the same time and seeds will then spawn.
Let’s take a look at how to deal with the seeds.
1st Seed
So this is a typical “formation” for soaking the seeds. The formation's sole purpose is that after roots are broken, players run to the same spot every time, so there is no randomness in how players move around the soaking zone. This can be altered in any way you prefer, especially now after the nerfs, but there are some things you should consider.
As you know already, Priest and Evoker are most likely getting dispel location 1 and 2, and Lock + Mage + Hunter are getting 3 and 4. So if they have those spots set, they will naturally already be in that area.
Based on the picture above, let's talk about how players should handle soaking.
First we start with Tanks and the Demon Hunter. They will always prioritise the melee area closest to the dispel puddle. When there is nothing there left to soak, they will move out to a free seed. DH are very good for this, because they can Fel rush towards the end, once the area is clear of seeds. However, after the hotfix, this does not matter as much anymore as you can’t really pop a tree if you double soak, but their last second fel rush is still very useful.
Then we have the “edge soakers”; they are players that will always try to soak the furthest seed on their designated spot. That way you have some sort of a traffic rule. In the picture above, edge soakers are the ranged players around the melee stack (plus the warrior because of the leap).
Everyone else in between will go for whatever seed they can grab that is leftover.
2nd Seed
Just after you deal with the 1st seed, you will get another set of dispels. Player 1 and 2 needs to be prepositioned already to get the dispels underway as soon as possible, but this is usually not a problem, because those players are already in that area because their seed spot was there.
You then have a Falling Star cast (blue swirls) and this serves as your “go” signal to spread around for Seeds 2.
You will move the boss forward, creating a gap so that another set of dispels can fit in there; this is the set that happens during seed 3, so you are just prepositioning the boss while dealing with seed 2.
The 2nd seeds are the easy seeds, mainly because the raid does not have to get out of the roots first, but it is very important that players actually pre-spread properly. Your aim is to catch the seeds as they spawn (so stand in spawning swirl animation). If done properly, this set can be fully soaked within 2 seconds which will make the follow-up mechanic much easier.
The moment you catch the seed, or the soaking is done, you want to run to the boss and spread around for Roots 2.
This is the 2nd hardest point of Phase 2 and you want to make sure to use defensives and strong healer cooldowns whilst dealing big AoE damage to quickly get out of the roots (because you do not have a Dragon team on this set). This is a great spot to use Waystones! You may also want to Freedom your Priest at this point, so they can run to Dispel 1 position as soon as possible.
3rd Seed
Once out of the roots, you are essentially doing the exact same set as at the start of Phase 2, with Dispel + Roots + Dragon and then the Seeds.
The boss should already be in the proper position, dispel targets are just doing their thing and everyone else is stacking around the boss for the roots and Dragon Team 2 goes to soak the bombs.
Once out of the roots, you instantly go to your spots to soak the seed.
However, even though this sounds simple enough, it is actually the hardest part of Phase 2. Why? Because you get Falling Star cast as you are soaking the Seeds, so the damage taken is massive! You really need to make sure to dodge the blue swirls here, because getting hit by one will most certainly lead to death.
Intermission 2 Strategy
Now you wait for feathers and Intermission 2 will start.
Picking up feathers here can actually become tricky due to the randomness of how they spawn. Therefore you also want to make some sort of formation for this, just to reduce the amount of potential issue you may have, especially because its already late into the fight.
The area will look approximately like this.

You want your healers to take whatever feather spawns close to them, prioritising the ones close to the puddles, and tanks just want to run ahead a bit and take those.
Ranged dps should just be in the same area where they were before feathers spawned and the Warlock should place a gateway towards the top; this means that if all feathers (or most) spawn there, everyone just takes the gateway.
Melee should start running towards the top, even before the feathers spawn. Worst case scenario, all feathers spawn behind them and they simply take the gateway back
We covered the 2nd intermission already in the Intermission section of the guide, so we can now start with Phase 3.
Phase 3 Strategy
In Phase 3 you have to do some boss movements right at the start to make the initial part of P3 easier.
You can use the floor markings for orientation.
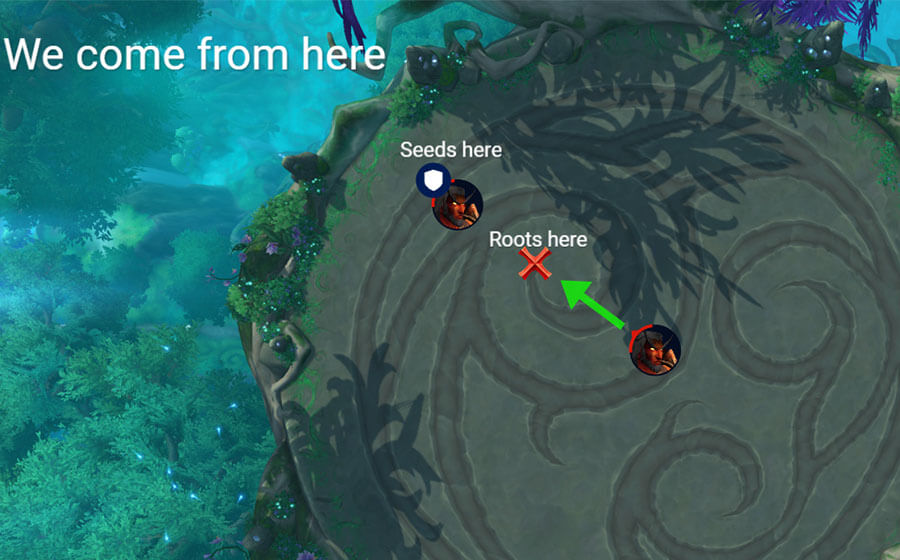
You move the boss towards the direction you just came from, and place Tindral on that “tip” (can also just place a marker here).
You want to do Roots(1) + Dragon Team 1 here.
As soon as you are free, you move the boss to the last drawing on the floor close to the wall, then seeds will start spawning and Fire Beam will come from the location you just did the roots at.
This is probably the hardest point of Phase 3.
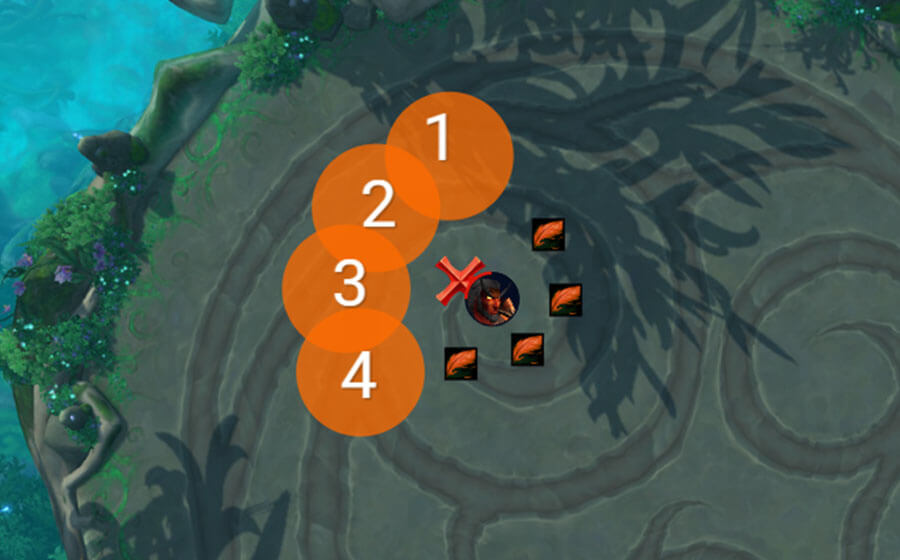
You now need to soak the Seeds and dodge Fire Beams at the same time. But you have one advantage! You can pre-spread on this set just like you do on Seed 2 in Phase 2. Because you are not rooted when they spawn. So spread around, following the same formation you used in Phase 2 and just try to catch a seed as they spawn. If a Fire Beam is on the way, don’t panic, you generally have more than enough time.
You now move the boss back to the Red Marker (tip) and get ready for the same set that you get at the start of P2. Dispels, Roots(2), Dragon Team 2 and Seeds.
After you finish seeds, you will get Roots(3) but this time without Dragon Team and Seeds! This spot does get a bit more complicated.
So you want everyone to stack up tightly, and use defensives/waystones just like when you do the 2nd Roots in P2. However, the issue here is that this overlaps with dispels.
You should do the following:
- The entire raid stacks up and pumps AoE to get out of roots ASAP.
- Dispel 1 gets freedom and moves to the side for instant dispel
- As soon as everyone else is free, take the gateway.
- Dispel 2 waits till everyone takes the gateway, gets dispelled and then takes the gateway
- Dispel 3 and 4 go to the side (towards wall) and get dispelled there
Everyone has to dodge some Fire Beams afterwards and then instantly get into position for the Roots(4), Dragon Team 1 and Seeds combo.
On this one, the Dragon team really needs to pay attention to the beams in the sky, and should use immunities if they have some.
After the seed soaks, move the boss forward slightly to create a gap for Dispels. This is a strange point in the fight, as this time you do not overlap dispels with anything (well not really).
So what happens is, you do the dispels and then everyone stacks up for Roots(5). While this sounds simple, this is actually the 2nd hardest point of P3. The problem here is that you do not have a Dragon Team to kill the roots, but you have a “dps-check” for those roots because they overlap with the Falling Star cast. So if you are slow, chances are half of your raid will die due to falling star swirls hitting players that can’t dodge because they are rooted.
Once past this point, you move the boss aggressively towards the empty space on the platform.
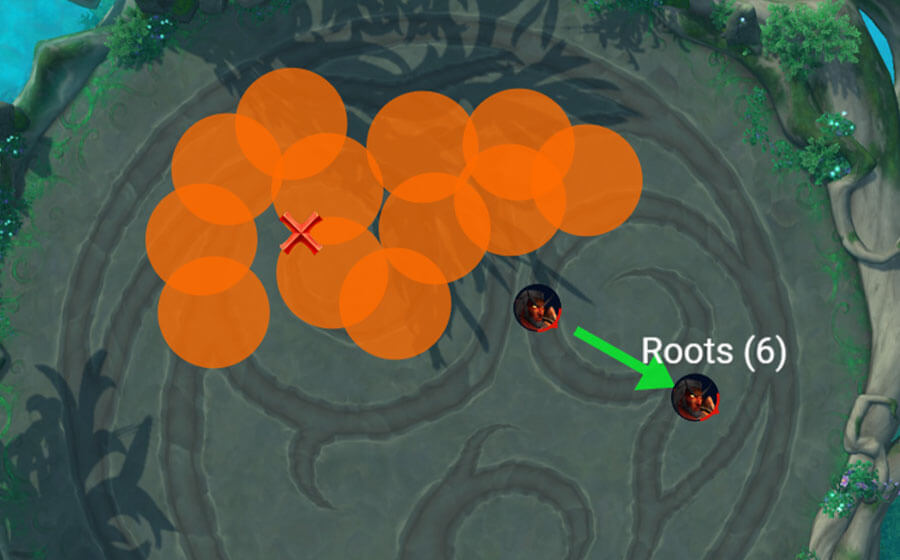
You will get Roots(6), Dragon team 2 and Seeds. Depending on your dps, this should be the last thing you need to do in this encounter, and in some cases you might be able to simply skip attacking the roots, sending players up in the sky and just blasting the boss before seeds spawn and expire. You have around 15 seconds time to kill the boss here if you opt for that.
Otherwise, you want to use all immunes in the Sky, and potentially send extra players up because it is very common that Dragon Team players die in the sky (due to beams) before they soak the bombs and that is a horrible way to wipe.
Soak the seeds and if the boss is still alive, you only have to do 4 dispels before enrage. Just make sure to heal those players so they don’t tick down and pop the debuff too early.