Raid Setup
Introduction
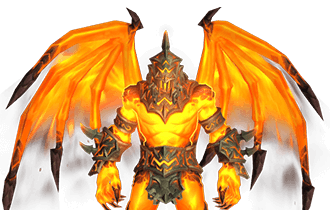
Ever since the early days of Dragonflight, when we all became amateur dragon riders, acing those flying courses, and fine-tuning our drakes with cool talents and skins... There was a hunch it was building up to something epic. So here we are, folks! Welcome to the Heroic Tindral Sageswift boss brawl, where you'll finally discover who secretly fails at dragon riding and who's the true master of the skies. Oh, and let's not forget the shrooms – tons of 'em! It's like a Super Mario adventure in World of Warcraft, but with more dragons!
Fight Style: Single-Target fight with occasional burst AoE
Recommended Setup: 2 Tanks / 5 Healers / 13 DPS
Useful utilities: Tiger’s Lust, Hand of Freedom, Roars/Speed Totem, Personal Root removal abilities, experience with Super Mario games.
Hero/Lust usage: Phase 3
This guide has been updated for ![]() Awakened in Season 4 of Dragonflight.
Awakened in Season 4 of Dragonflight.
With the item level curve of Season 4 and there not being any affixes means that the fight should be quite similar to when it was first released. Any further updates needed for Awakened tuning will be made as soon as possible.
Mechanics
Every player is targeted by a small circle that explodes after 6 seconds dealing a medium amount of damage to all players standing within 3 yards.
Additionally, the player will be rooted and take a low amount of damage every second until the roots are destroyed or removed. All root-breaking abilities work.
Inflicts a medium amount of damage to the entire raid and spawns swirls that have to be dodged.
Targets 3 players with a large circle, they take a medium amount of damage every second for 20 seconds.
If dispelled, it will drop a fire puddle on the ground and remove the DoT.
Move away from the raid (behind or towards the middle) to get dispelled, and do not stack on others.
Spawns a big mushroom that needs to be soaked by the tanks. Each mushroom will explode after 3 seconds and inflict lethal damage to the entire raid if they are not soaked.
Soaking a mushroom increases damage taken from a mushroom by 500% for 3 seconds. Tanks need to alternate soaking mushrooms. For example, the main tank takes Mushroom 1 and 3, and the off-tank takes Mushroom 2 and 4.
Simple DoT that stacks up on each melee hit. You should tank swap when the damage becomes too high to survive.
Massive shield that deals a low amount of damage every 2 seconds to all players. If not broken within 30 seconds, it will explode and wipe the raid.
Blasts the platform (where the boss is standing), dealing high damage to players standing in the beam.
Additionally, several smaller beams will move in random directions inflicting high damage to all players getting hit.
Several players get a medium sized absorb that stacks up if not healed up quickly.
Spawns a bunch of flaming mushrooms and sets the platform ablaze, inflicting a low amount of damage every second for 10 seconds.
The mushrooms have to be stomped (run through them) by players. Stomping one mushroom deals low damage to the player, and this effect stacks up.
If a Mushroom is not stomped within 10 seconds, then it spawns a Flaming Tree that inflicts medium damage to all players until killed. This becomes problematic if several Flaming Trees spawn at once.
Tindral spawns feathers that allow players to dragon ride once you interact with them.
Green orbs, scattered around in the air, that when flying through one of them grants the entire raid 5% increased Damage and Healing, and it stacks up! Leaves behind an Emerald Gale that gives passing players 3 Vigor.
Strategy
Heroic Tindral Sageswift is a long fight with several phases (3) and intermissions (2). The boss features a fairly large number of abilities, but they can be easily remembered based on the form the boss is currently using.
Additionally, this fight will test your dragon riding skills, so make sure all players have their Dragon Riding keybinds prepared and Dragon Riding talents unlocked!
Phase 1
Forms used: Tindral and Searing Moonkin Form
You can use the following positioning on every platform, in each phase.
Pull the boss to the side of the room, just make sure not to hug the edge, otherwise you get hit by Flame Surge.
The fight starts off very fast and abilities happen in quick succession.
Tanks will first need to deal with the first set of Blazing Mushroom. He will spawn 4 Mushrooms, 1 every 3 seconds. The Tanks simply need to decide who soaks first, and alternate on every other mushroom. For example, the main tank takes the 1st and 3rd mushroom that spawns, and the off-tank takes the 2nd and 4th mushroom. Make sure to use some speed boosts during this, as reaching the mushrooms in time can be tight.
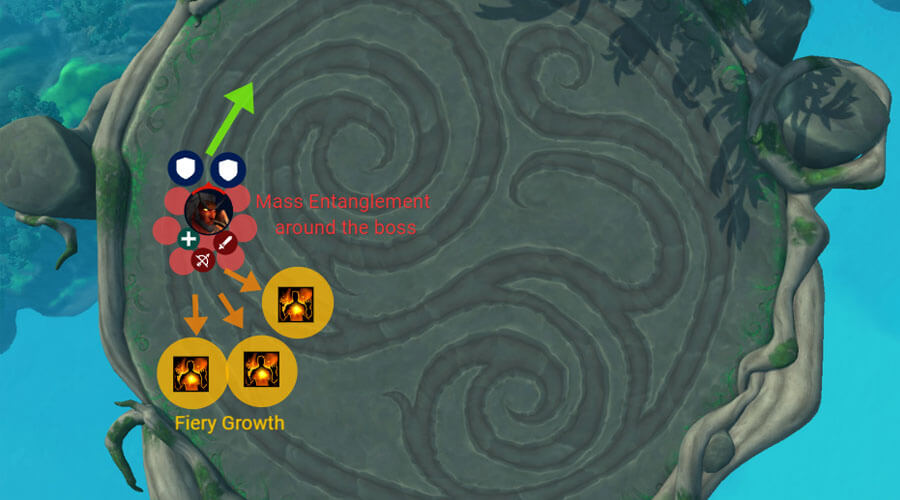
Afterwards, you will almost instantly get Mass Entanglement targeting every player. You want to position the circles as close as you can to the boss for extra AoE damage, without overlapping with other players.
Players that can prevent the root or instantly remove them should do so, to minimise the dps necessary to free all the rooted players. Keep in mind that some classes, like Warlocks, need to use Soulburn or Teleport before the roots are applied, that way they will simply be immune to roots. You want to make sure every player is free from roots by the time Tindral casts Fire Beam, because otherwise players won’t be able to dodge it and will most likely die.
At the same time, 3 players will be targeted by Fiery Growth. Those players need to either instant remove the root themselves, or get externals on them such as Tiger’s Lust or Hand of Freedom. That Fiery Growth DoT ticks fairly hard, so you want to dispel it as soon as possible. When you are free from roots, move out of the raid (behind or towards the middle) and call for a dispel.
The dispel leaves a fire puddle on the ground, so make sure nobody is standing next to you, as it deals a fair amount of damage.
Once the Fire beam is used (it always targets boss/largest clumps of players), move away from the initial impact point, and then dodge the circles.
Note: The small circles actually do more damage than the big impact swirl, so dodging them is the highest priority.

Tindral will now repeat all his abilities until he has completed his entire set of abilities twice, or when he reaches a certain HP (will be updated when raid is live).
Intermission 1
When Tindral starts the intermission, he will swap to Flaring Owl form and drop feathers on the ground. Every player needs to pick up a feather, once you do, you will be able to use your Dragon Riding abilities (like mounting up).
Fly up and fly towards the next platform, picking up as many Dream Essence as possible (Green orbs). Picking them up gives the entire raid 5% increased damage and healing done, and will give you and anyone else behind you passing through them 3 Vigor.

But if you thought it's this easy, sadly it's not! There will be fire orbs everywhere that you need to dodge, which inflict damage and remove 3 Vigor from you.

It seems that 10 green orbs (stacks) is the cap in this phase, so that's a total of 50% damage and healing increase for everyone.
Once you reach the platform and land, Tindral will just be standing there and begin to cast Supernova! It’s a massive shield that needs to be nuked down within 30 seconds. The raid will also be taking damage while the shield is up.
After you break the shield, Phase 2 will start.
Phase 2
Forms used: Tindral and Burning Treant Form
Tindral Sageswift will start the Phase with the same abilities as Phase 1, in his Tindral form, but now in a different order.
Now you will get the Tank Soak during roots, but dispels will happen before. This changes the dynamic a bit; the players dropping the fire when being dispelled, must return to the raid before roots are applied, otherwise they will get rooted outside of the raid and will need extra targeted DPS. This isn’t ideal, because you will be saving externals mostly for Tanks at this point, because they need to get freed as soon as possible, otherwise the raid will wipe due to a missed tank soak.
If we assume that the boss does in fact end up using Searing Boomkin form, shortly afterwards, you will get the fire beam that spawns the circles that everyone needs to dodge.
The core mechanic of this phase is the mushrooms! After you are done dealing with the Tindral set of abilities, he will enter Burning Treant form and spawn a bunch of Mushrooms around the map.
Your absolute highest priority in this phase is to collect the Mushrooms, all of them!
Why? Because if you fail to soak a mushroom, a Burning Tree will spawn, which deals raid wide damage until you leave the platform. With 2 trees up, they do well over 200k raid wide damage every 2 seconds, so you really want to avoid them spawning!
You now rinse and repeat everything until Tindral does the entire set of abilities twice, or when he reaches a certain amount of health.
Intermission 2
This intermission seems to be exactly the same as the first one, but Tindral shapeshifts into a Flaming Owl now. This might indicate that there is an additional ability to dodge mid flight or that the raid might take increased damage during the flight, forcing everyone to get to the platform as soon as possible.
Once you land, you will have another Supernova shield to burst down and Phase 3 will begin!
Phase 3
Forms used: Tindral, Burning Treant Form and Searing Boomkin Form
The boss should now use all of his forms correctly, meaning you are going to fight his entire set of abilities from all phases.
This is the phase where you want to use Hero/Lust and all DPS cooldowns.
Given the behaviour in Phase 2 during testing, we can expect the boss to create some nasty overlaps. For example, Tindral might use his Fire Beam during the Tank soak, meaning that the tank will have to take all the damage from soaking the mushroom and the beam. This would call for some heavy externals and personal defensives.
You also may encounter overlaps like small mushrooms and fire beams or roots. All those combinations simply force you to deal with the ability as fast as possible, so you do not fall behind.
It is a very hectic burn phase, so it's unlikely you will manage to soak every small mushroom for example. Ultimately making this the point of the fight that you simply aim to kill the boss before you get overrun by mechanics.