Raid Setup
Introduction
Warning: This fight has been heavily altered with recent nerfs, making it much easier and more forgiving. Therefore, we recommend that you watch recent kills over RWF editions if you need to check certain moments of the fight.
Easy Mode
Phase 1:
- Place Firestorm properly
- Place Darkflame Shades properly and split the damage (6 players per circle)
- Bait Frontals and dodge them
- Move as a group during Dream Rend to bait the shadow orbs
- Use personals during Blaze + Frontal + Wildfire overlaps
Intermission:
- Fire players soak fire orbs
- Shadow players soak shadow orbs
- Use a personal if you get blaze and try not to move the line
- Use immunities for the 3rd set
Phase 2:
- Heal up Kaldorei adds quickly
- Avoid hitting Kaldorei adds with Blaze or Colossus AoE
- Purple circles stack on a marker (2 per marker)
- One player with fire circle per marker
- Stack Screaming adds in the middle, stun and kill ASAP
- Nuke down Burning Colossus before 2nd cages cast
- Kill Dark Colossus before 100 energy
Phase 3:
- Pop 2 seeds on the first set
- Players with seeds should play on the opposite side of the raid
- Pick up Corrupted seed and stay away from the raid
- Exchange Corrupted seed with your partner after every Apocalypse Roar
- Pre-move for Firestorm so you can drop it in a perfect spot (on the edge)
- Dodge the Breath and swirls on the ground
- Always be at max range of the boss if you do not have a seed
Mechanics
3 random players will get marked by a large circle that deals lethal damage to the player unless shared with several other players.
You want to assign 6 players per circle to reduce damage taken to reasonable levels.
During Dream Rend, the portal will shoot shadow orbs towards random players that deal lethal damage to anyone hit. You will need to kite this properly to fully negate the ability (check strategy section).
3 images of Fyrakk will spawn near random players, fixating on the nearest player and targeting them. After a few seconds it will fire a frontal attack that deals heavy damage to anyone hit.
Your goal is to turn those away from the raid before they fire.
On Mythic, half of the raid will get affected by a shadow debuff and the other half with a fire debuff. This simply means that you can only soak your assigned type/color. So Fire soaks Fire Orbs and Shadow soaks Shadow Orbs.
The exception is when using an immunity, but keep in mind that once the immunity is gone and you still need to soak again, you won’t be able to soak any color because the moment you touch the opposite color and survive, you gain both debuffs.
Darnassian Ancient
Big Friendly Treant that needs a personal Mistweaver healer to get healed. Adds more percentage to the Life-Tree.
Marks 4 random players with a large shadow circle that upon expiration, Stuns/Locks the player and anyone standing within the circle.
This stun can be broken by fire circles (check strategy section).
Marks 4 random players with a fire circle that is used to break the shadow cages that are cast by Dark Colossus.
You will only need 2 per set, so the other 2 players affected by the fire circles can simply move to the side as the circle deals damage to anyone standing inside.
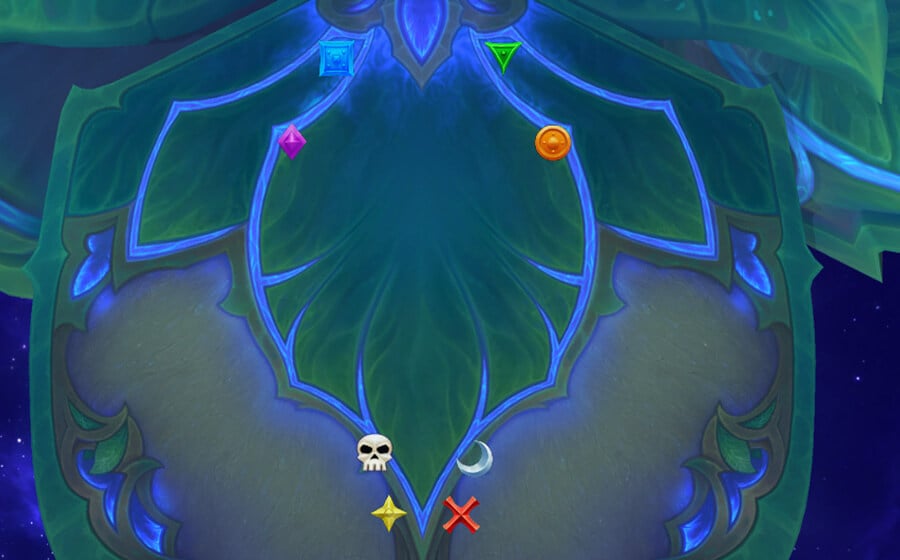
Phase One Strategy
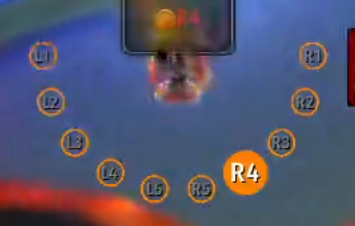
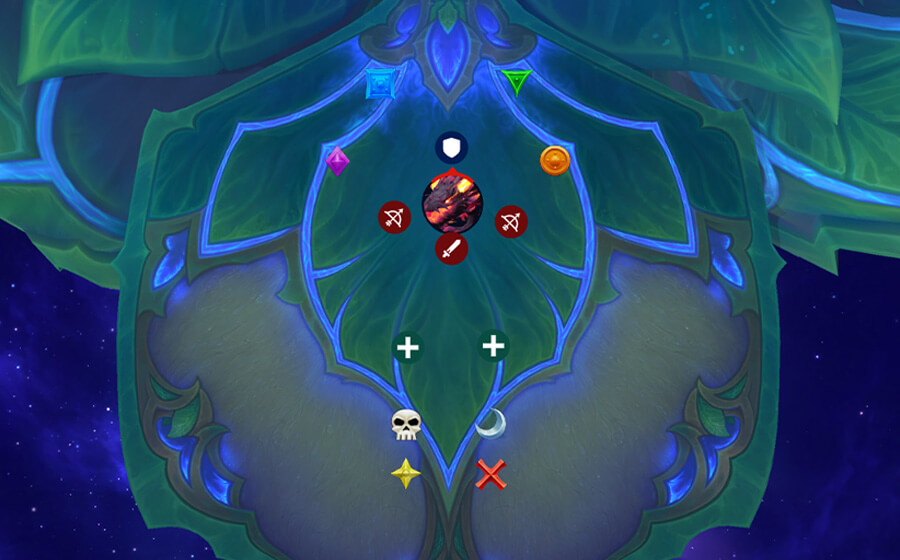
Let’s start with all the relevant markers that you will need throughout the fight.
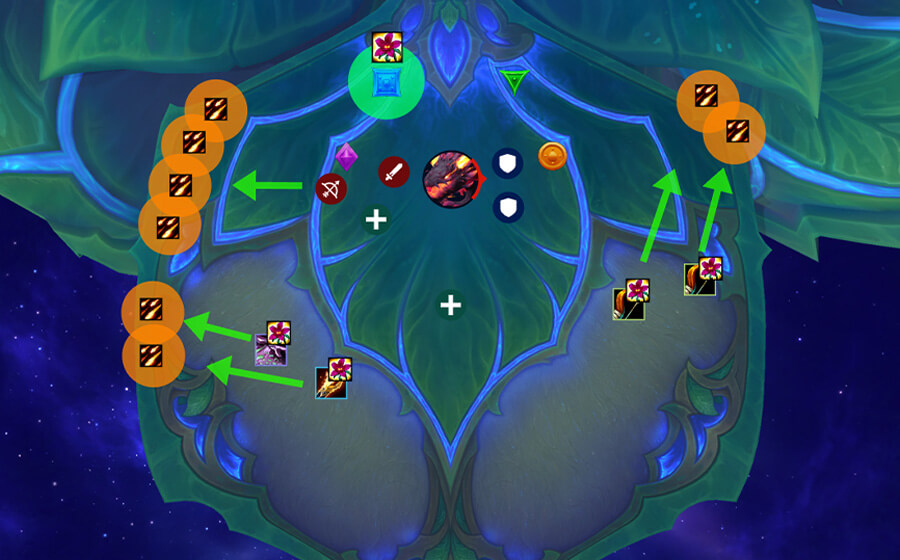
Blaze
Next, we want to talk about Blaze because it's the only ability that is present in every phase of the fight, and it's very important that everyone learns how to deal with it properly from the start.
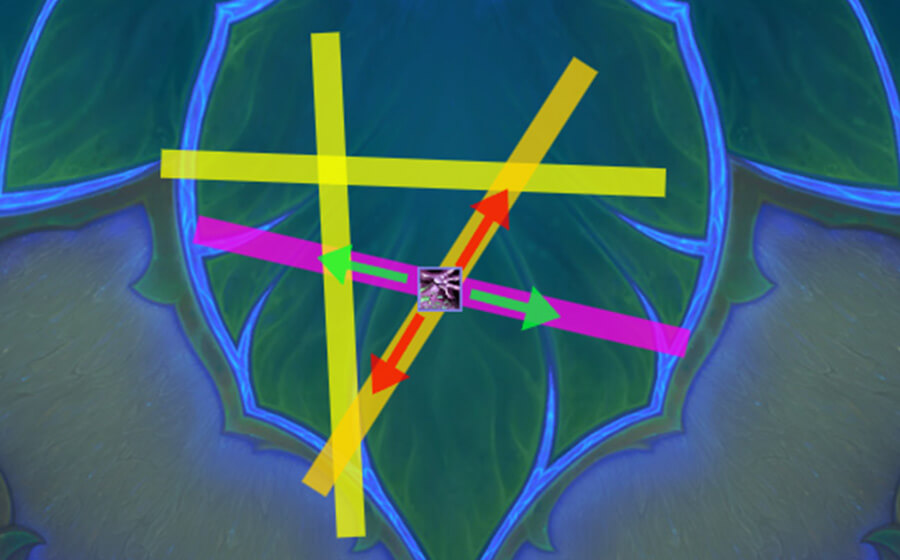
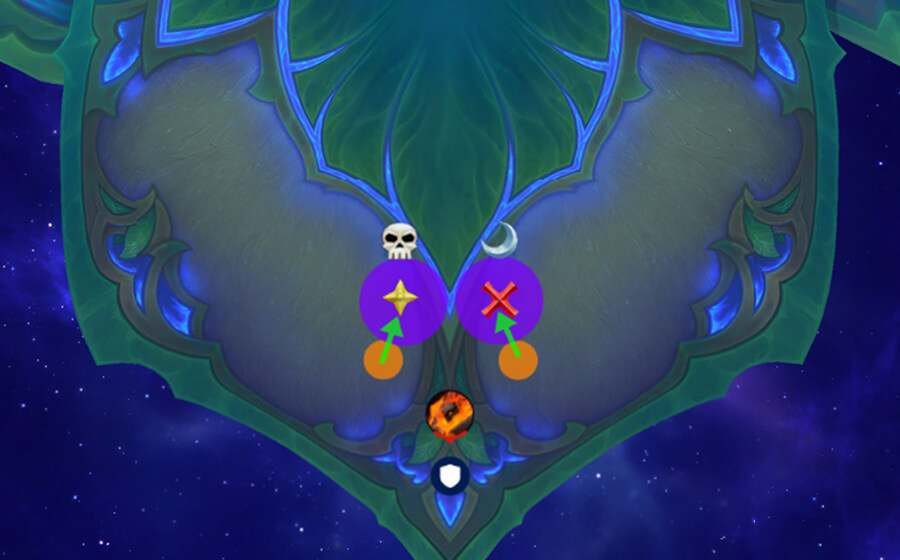
Let’s say that the purple bar is you. Moving in the direction of the green arrows will enable you to dodge other blazes without moving the bar sideways. However, keep in mind that you are anchored to the middle of the Blaze, meaning that even if you move in the green direction, the blaze is following you, therefore the tip of the blaze will not be at the spot where it initially spawned.
The reason for highlighting this is because this is very relevant in P2 and P3 when you will often want to out-range Spirit Adds in Phase 2 and Seeds in Phase 3.
In an ideal scenario, it's possible to deal with a set of blazes without having a single blaze move away from their initial spawn spots. Now of course this is not mandatory, but the more players that understand that they should simply run in the proper direction, the less blaze related deaths you will have over the course of progressing this boss.
As you can see in the clip above, the blazes are not moving much at all, and players who are standing in a blaze cross-point will simply move up and down, within, their line.
Shade Frontals
Shade Frontals (Fyr'alath's Flame) is the ability that will cause the most deaths during P1 progression. Baiting this and properly turning them is the key to making your P1 experience as smooth as possible.
3 images of Fyrakk will spawn in random locations, close to a player. The closest player to the image will get fixated, and is able to turn the images for about 2 seconds, after which they fire in the direction they are facing.
The best way to deal with this is to have ranged players always stand a bit on the outside, not grouped up together. Once the image spawns, turn it away from the boss because that's where your entire melee camp is. Keep in mind that the images have a maximum fixate range, so if a player who is fixated, runs away from the image, it will automatically fixate on the next nearest player and cause it to turn abruptly, often creating unavoidable beams.
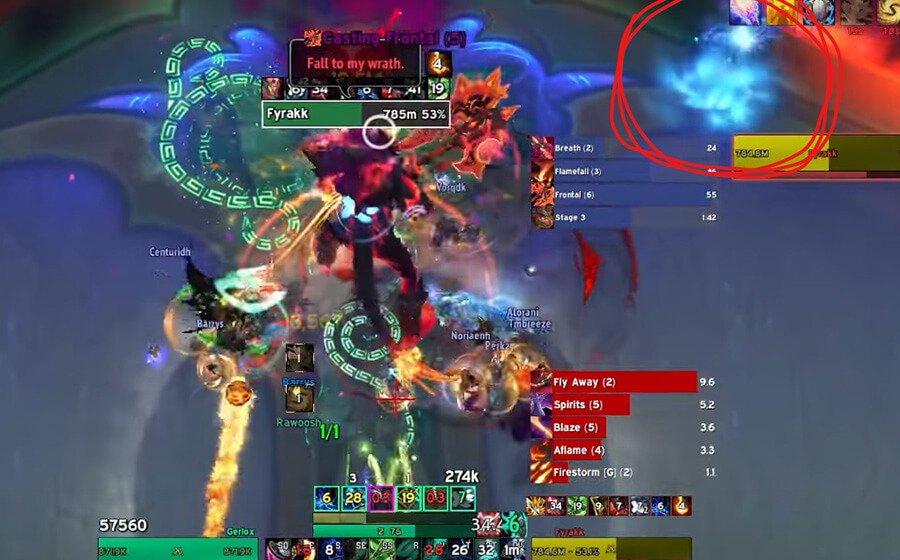
Here’s an example of a very good Frontal bait:
Darkflame Shades
Darkflame shades is another ability that happens only in P1, but this one is not as problematic. 3 players will get a circle that needs to be placed in the correct spot, as it creates a puddle afterwards. Additionally, you need around 6 players per circle to split the damage.
You want to position one circle towards the edge of the room, one in the middle, and the other on the opposite side. Simply set groups of players based on that and you should be fine (see images below).
Keep in mind that on rare occasions, you might get 3 players from the same group with the circle, this will automatically make it so that one soak is missing 2 players, and you will take more damage and potentially lose someone. This happens very rarely so it is not something you should worry about but in case you have some random deaths, that might be the reason why.
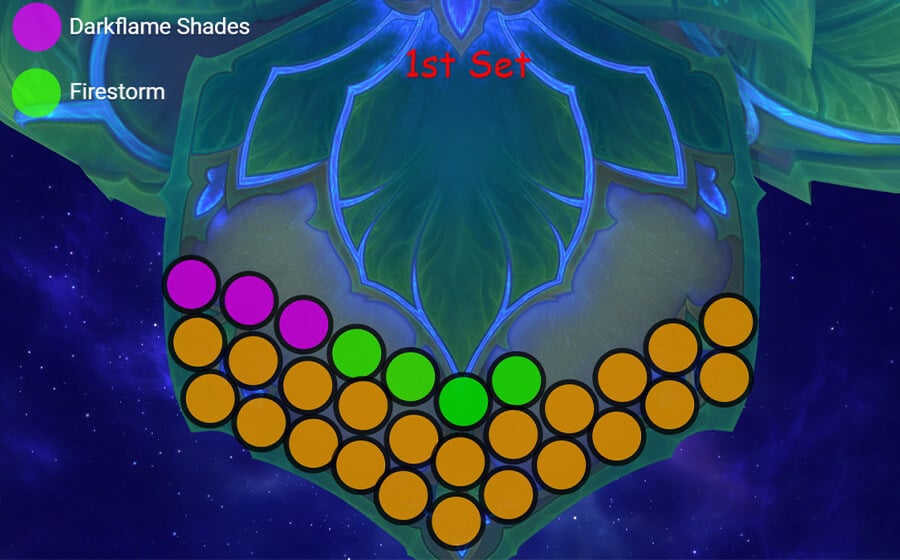
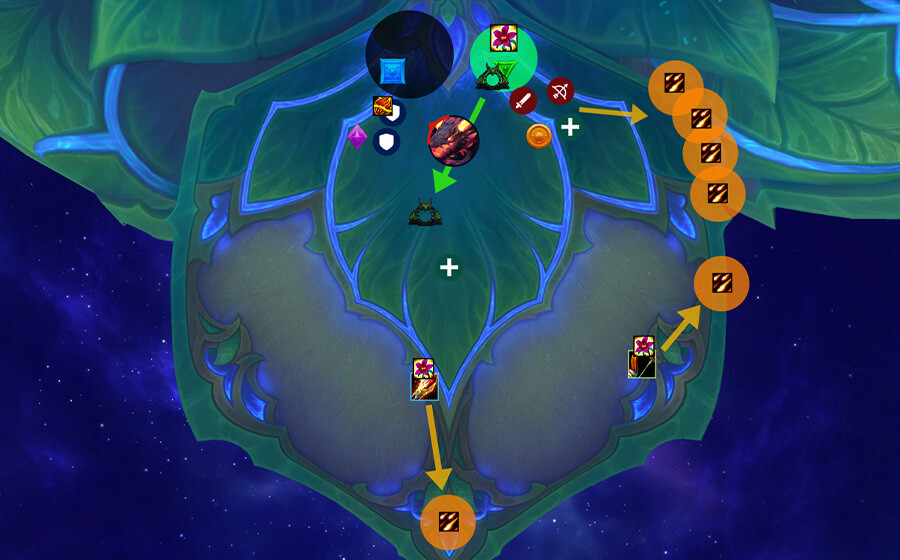
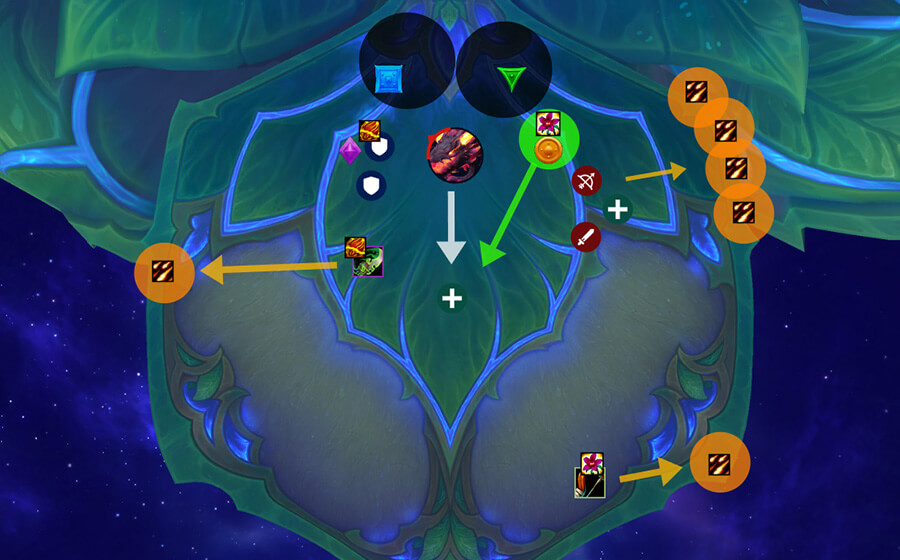
Firestorm and Darkflame Shades Placement
Pre-nerf, misplacing several puddles would in most cases lead to a wipe towards the end of P1. It is way more forgiving now, but early in your progression you will want to do this as clean as possible, otherwise P1 will last longer with several players dead, creating issues with wrong placement.
Every set is essentially the same, but in a different place on the platform. 4 players will get firestorm circles, place them and then the raid will move to a specific side to place 3 Darkflame Shades circles (Darkflame Cleave).
On good pulls, you will do this only 2x in P1, on bad pulls probably 3 times, but without the 3rd Darkflame Shades set.
Set 1
Set 2
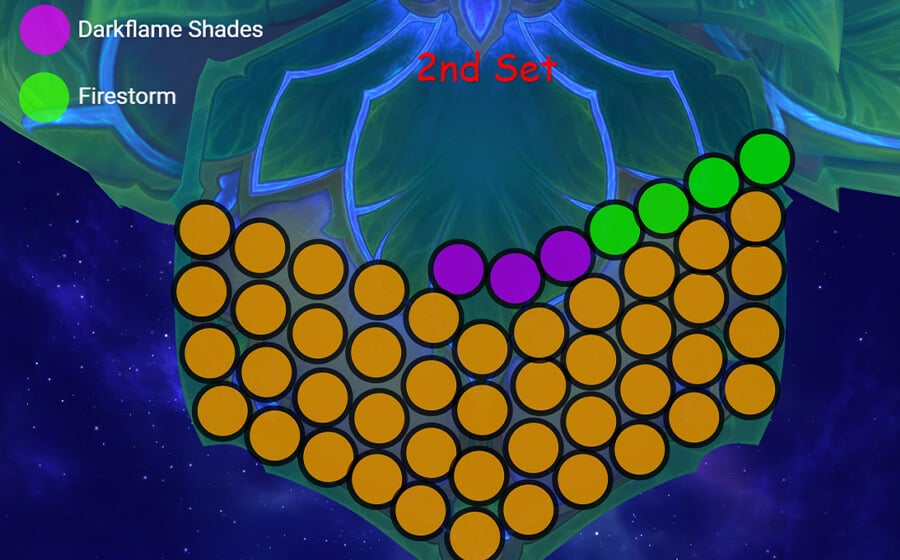
If you get a third set, place them next to the existing fire pools on the left of the platform, a mirror of the 2nd set on the opposite side. Make sure to not hit the roots when they drop, otherwise you will wipe.
Dream Rend
Lastly, the signature ability of P1 is Dream Rend. This ability behaves similar to the heroic version but with a twist. When the damage starts ticking, shadow orbs will come out of the portal, targeting a random player. This forces your raid to stack up and move as a unit in order to bait and dodge them properly.
You will want to get a WA that shows you when to start moving, and when it’s safe to spread out.
It is very important that everyone sticks to this, no pre-moving, because if one person starts to pre-run either at the start or at the end, it’s enough to send an orb in the middle of the raid killing several players.
This is how this should look like:
Putting it all together for Phase 1
Now that we covered all the major abilities of P1, we can talk about how all this comes together.
You will pull the boss in between the Yellow and Red marker and the 1st Firestorm cast will happen.
Have your 4 players place the puddles as shown in the Set 1 picture above. At the same time you will get 1st set of Frontals, but keep in mind that those come every 15 seconds, so it's simply something you have to deal with at all stages of P1.
Once Firestorm puddles are placed, Fyrakk should be moved towards the 3 purple spots marked on the picture and you will get your first set of Darkflame Shades. Place them correctly and split the damage between the assigned players for each.
Now something very important to remember is that after every Darkflame Shades cast (and you only get 2 in the entire P1) you will have to spread around fast, and use strong defensives and healer cooldowns. This is because you get Blaze, Frontals and Wildfire explosion at the same time. Players often tend to ignore the combo because they feel safe at 100% health, but getting Blaze and Wildfire (unavoidable) will already get you to 30-40% health, taking a frontal will most certainly kill you and those are often random because of so many things happening at the same time, so simply using a strong defensive there will ensure that you survive the combo.
Afterwards you will get Dream Rend and you should stack up at the Blue marker, then move together as a unit. This is another scary moment of P1 and you will want your players (especially ranged) to spread around the room as soon as it’s safe to move after Dream Rend, because this overlaps with Blaze and Frontals; so, if everyone is to simply follow the boss/large stack of players, chances are you will have too many blazes to dodge and most frontals targeted at the group.
From here, P1 effectively resets and you get to do exactly the same things that you did when you pulled the boss, but on the other side of the room; Firestorm > Darkflame Shades > Spread + Personals > Dream Rend (note that after the nerf it is possible to push the boss before the 2nd Dream Rend cast, but is unlikely whilst you are first progressing the boss).
If you do get the 2nd Dream rend, stack up on green and move to the other side of the room (same as 1st Dream Rend, just starting from a different side).
Fyrakk will enter intermission at 70% health, but if you push the boss to 70% while he is casting a spell, you will gain some extra % because he will finish the ability first.
Intermission Strategy
If you haven’t progressed Fyrakk before the nerf, congratulations! You managed to skip one of the most annoying phases in WoW history, not because of the difficulty of the phase, but because of the WeakAura experiment Blizzard did in this tier.
Post-nerf, you can find a simple intermission WA and it will auto-assign all the spots for you.
This phase is very similar to the heroic, but you now get 2 debuffs instead of 1; Shadow and Fire.
You can only soak the same colour orb as the debuff you have. Fire players can only soak Flame orbs and Shadow players can only soak Shadow orbs.
Soaking a different color with immune or cheat-death will apply both debuffs, so if you then soak any color on the next set, it would kill you.
Intermission Breakdown
You will start this phase by taking a gateway and spreading to your designated side. This can be set in the WeakAura, and you should get the same side assigned 90% of the time.
This is how the start of the phase looks like.
The suggested formation should be like this:
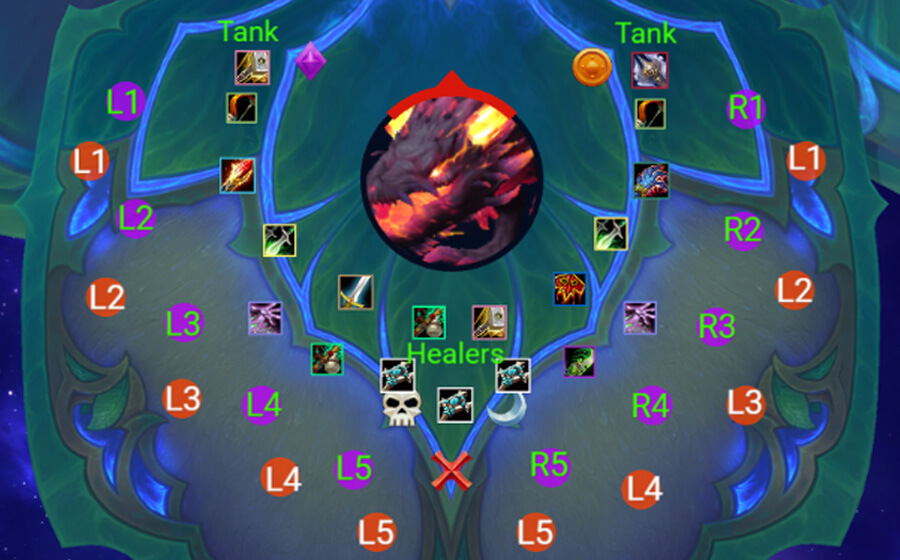
And most WeakAura’s look like this:
You will want tanks to go separate sides, because they can soak multiple orbs of the same color with strong defensives, and often even the opposite color if needed.
You then want to send a Hunter to the side that lacks an immunity tank (if you have more than one hunter then both should go to opposite sides). The 3rd set is an immunity soak, meaning that a Hunter with turtle can soak up almost an entire side alone.
You then want to have classes with Cheat Death or a Stationary Immunity around that L/R 2-3 area so they can react to some missed orbs in the worst case scenario.
Healers and low mobility classes without immune or a cooldown will all take the middle area and soak up whatever comes their way. Those are usually marked L5 and R5 and they often don’t even get to soak anything because someone just takes it instead.
Now, if you look at the picture, you will see that Fire soaks are marked on the outside, and shadow soaks are on the inside. This has a small benefit. Basically what you can do is, have your fire players try to catch the orbs on the outside (max range from the boss), and you let the shadow orbs just come to the players, standing closer to the boss. This has an advantage of staggered damage taken. Imagine this, if every single player stands in the perfect line close to the boss, and every single orb reaches the player at the same time. Your entire raid will get to low health and in combination with random blazes, making it very stressful for healers. So by having some players stand on the outside and take the orbs earlier, it will ensure that healers do not fall behind on healing.
Let’s take a look at the sets:
1st set
This set has less orbs then other sets and is often free for all. Obviously players should still try to soak their designated orb, but don’t get surprised if R5 takes your R3 orb.
2nd set
Here 1- 4 will all have their orbs, so make sure to count them properly and soak yours. You will also get blazes here and it’s very important that you do not move with those, instead dodge them properly, as explained in P1.
3rd set
Same as the 2nd set, but because everyone has soaked a fair share of orbs already, damage taken becomes high, and you want to pop all immunes and soak as many orbs as possible that way. Hunters/Tanks start clearing from the bottom, and usually number 3-4 is left to soak, 5 is often cleared by a Holy Paladin bubble. You also get blazes here so just be careful with those.
TIP: If you get blaze at any point of the intermission, use a personal defensive, even if you are at 100% health.
Once the shield is broken, the boss flies away for a few seconds, everyone gets pushed away (so don’t get pushed off the platform) and then you should run to the middle of the room. Phase 2 will start once Fyrakk lands again.
Phase 2 Strategy
Before we get into the step by step P2 progression, let's get one thing out of the way first.
The Spirit adds
Before the nerf, this was a rather tricky mechanic that had some hard comp requirements and precise external usage. With the nerfs, this is way more forgiving now and does not require much tinkering.
Some healers in certain moments will have to play closer to the adds in order to be able to reach them and the raid. This means that during some Blaze sets they will need to be extra careful not to hit the adds.
You should assign strong healer Externals like Guardian Spirit, Cocoon, Lay on Hands, Void Shift etc. for the big adds, because those require more healing. After the changes you will need only 1x Rescue/Grip for the Big add on the 2nd set of Colossus adds. The Big add spawns in the middle and you need to move him away to the side (clip example linked later in the guide).
Note: that once you heal up the adds and they get shielded, on mythic this is just a 50% damage reduction and they can still turn hostile if hit by abilities.
Opener
You will start the Phase in the middle (upper part) of the room, facing the boss towards the Tree. Everyone except for a few of your ranged healers should be close to the boss. This is because you will get your first set of Spirit adds and by standing in the middle of the room you will outrange them on the 1st blaze cast. Healers who are standing in the back, are doing it so they can start healing them ASAP, but that also means they have to be extra careful not to hit adds if they get blazes.
After the Blaze, everyone runs down towards the bottom of the platform and Fyrakk gets positioned for the Firestorm and Blaze combo that spawns the 2 Colossus adds.
Now there is a very good trick here that will reduce the amount of time progressing P2 by a lot; as you run down, you will pass a set of several Spirit adds and a Big add.
The trick is to have your entire raid play on the side where the group of adds is. So once you reach your position, the entire raid should be playing on the Skull side of the room (in this example).
The reason for this is because once the Blaze and Firestorm happens, you will be playing on the side where only 1 big add spawns, while outranging the stack of spirits on the opposite side. It is much easier to avoid hitting 1 Big add vs a group of small adds.
Note that it is random where the adds will spawn at the start of P2, but the next set will always be on the opposite side. You have got plenty of time before the Blaze to adjust the positioning, so it’s really nothing to worry about. Players still need to watch out to not hit the big add on the “safe side”.
Both tanks will stack up together with the Colossus circles and spawn them on top of each other.
Your first objective here is to target the correct colossus. The Burning Colossus has to die first, then Dark Colossus. Most of your raid should be attacking Burning, but set 1-2 strong ST players to attack Dark Colossus instead.
It’s advised to use target macros for this just to be sure you are attacking the correct one:
/tar burning colossus
/petattack
/tar Dark colossus
/petattack
Your objective is to kill the Burning Colossus before the 2nd cast of Cages. Note that even if you get the circles, you still have time to kill the Colossus before players get stunned.
Cages (Purple and Fire Circles)
4 players will get marked with a purple circle. Then, after a few seconds, they will “explode” and start to levitate, being permanently stunned until they are freed by using the fire circles.
At the same time, 4 players will get marked with a small fire circle. Standing under levitating player(s) will free them. You need 1 Fire circle per stacked group of stunned players (purple circles).
There are a few rules that both purple and fire circle players have to follow in order to avoid random deaths and players missing the ‘dispel’.
Purple Players:
- Run to one of the markers as soon as possible
- Stack 2 players per marker (2 on Yellow marker, 2 on Red marker)
- Be stacked on top of each other
- If you are 3 stacking by accident, always use a personal defensive
- Never try to move to the other marker at the last second in order to “fix” stacking
Fire Players:
- Make sure that you are already pre positioned towards one of the markers (even before you get the circle)
- Do not delay running to the marker the moment purple circle is gone
- Pay attention to players up in the air, often they are not properly stacked so you might miss one if you just try to clip the marker
- If you are using a WeakAura, always follow the assignment, no matter what
Speaking of using a WA, if you want to use one for this ability, you will have to use a macro to tell the WeakAura that you got a Purple or Fire circle because this ability is still a PRIVATE WA, so it won’t work without player input via a macro. See the description of the WA pack you use for details on the Macro to use and how it functions for that specific WeakAura.
You can see the WA in action here:
Once this is done, tanks should move the Colossus adds instantly to the edge of the breath animation.
Screaming Adds Spawn (Breath)
Take a look at this clip and I will highlight several things that happen at this point that are often hard to spot.
So firstly, and most importantly is that every single one of your players actually moves into the middle of the room; this movement should be as soon as the breath animation is gone. The reason for this is that you have fresh Spirit adds spawning in the back of the room, and by moving to the middle, most of them will be out of range of your Blaze lines. You can see in the clip, that only 1 or 2 players actually have a line that can reach the edge of the platform, those are mostly healers or a greedy ranged player. These players just need to pay extra attention to not hit anything with their line.
Now let's take a look at how the grouping up works. This will be different for everyone because of the comp differences but you will get the picture of how it should approximately work.
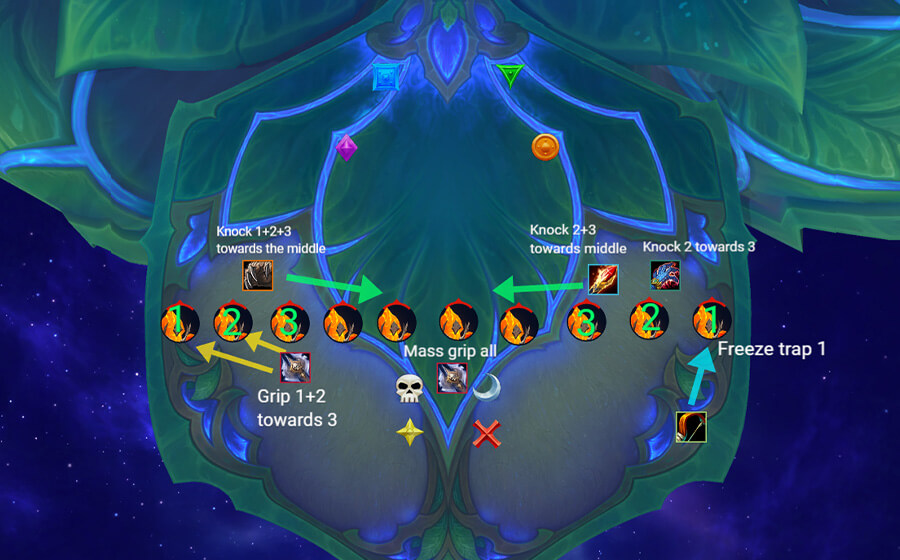
As mentioned, this will come down to your comp and knock abilities. You can always get the Engineering belt enchant (Belt Enchant: Personal Space Amplifier) for extra knocks if needed, but mostly the standard comps should have plenty of options.
The reason you should Freezing Trap the add on the side is mainly due to its bad positioning, meaning that without the trap a player would have to go all the way to the edge to knock it, and you will need an extra knock for it. Using CC on it (does not have to be a hunter trap) makes it easier, as the DK tank can simply grip that one once you are done with Colossus adds.
Note: Your DK tank needs Blessing of Autumn after Mass Grip to get the Cooldown back for the 2nd set of adds.
You also need a few Interrupt assignments and stuns here.
When the adds spawn, you want your melee team to interrupt the 3-4 adds in the middle, because those won’t get gripped/moved instantly. You will only really need to kick once, because you will Stun them all after Mass Grip.
When everything is grouped up, you will need 3-4 stuns before all adds are dead. DH, Evoker, Shaman, Mage are all good options; feel free to decide based on personal preference of what works best for your team.
Everything should be dead by the time Fyrakk lands again. You might have Dark Colossus at 10% at that point, but that is fine, just cleave it down.
Remember to pick up the CC’d add from the side, and tank it on top of Fyrakk.
After landing, Fyrakk will instantly do a frontal, make sure you do not hit spirit adds with it, because there will be some at the Tree, and freshly spawned ones.
After the Frontal, move Fyrakk to the exact same spot in the middle of the room where you started P2 and do blazes there. From here you are doing exactly the same thing that you did so far with 2 small changes.
Identifying the "Safe" Side
The “safe side” tech is a bit different now, you do not have the luxury of saying in advance which side is the safe one, instead you have to keep an eye out for where the adds spawn. The moment you see the blue spawn animation, you want to play on the opposite side of it. You will have 3 seconds to move before the blazes come out.
Big Add Spawn
The 2nd change is that you will get a Big add spawn in the middle, that needs to be either gripped or rescued to the side. If it walks into the stack of Colossus and Small adds, it will turn hostile. You can see an example in the clip below.
Everything else is exactly the same, so at any point in your progression when you manage to do the 1st set of Colossus adds cleanly, you are pretty much done with P2 in terms of learning the mechanics.
Small tip: Early into P2 progression, it will be common to hit an add or two. Grip the add in and keep kicking it, or just have your ranged players swap to it and nuke it down quickly. You might still wipe to the Tree running out of energy, but it will keep the pull alive for a while so you can practice other things. However, hitting a big add equals a wipe.
Phase 3 Strategy
With all the changes to P3, this has now become the easiest phase of the fight, and should not present much of a challenge for your team!
While the entire phase could be played with one simple rule of “Don’t hit the seeds” there are some ways to make this easier and less random.
Before we get into positioning, first you need to understand how certain mechanics interact with the seeds.
Blaze
The Blaze line will pop a seed if it's exactly on top of a seed. So if a player with Blaze does not drop the seed and gets hit, kaboom, it explodes. This is common knowledge, however, if the seed is dropped on the ground, clipping the seed circle will NOT pop the Seed. This is not something you should be aiming at but it can save you some pulls in case you are boxed in and have to make a last second decision.
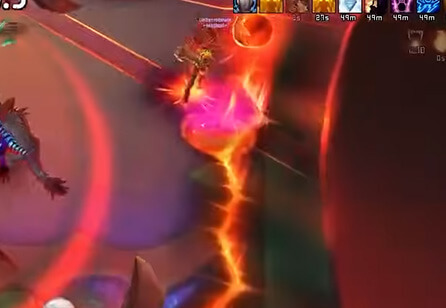
Example:
Firestorm and Swirls on the ground
The most important thing about this mechanic is pre-moving. This goes for everyone, regardless of if you are a seed carrier or not. Certain classes with very good mobility (like warrior leap) won’t need to worry about pre-moving as much, but slow players need to do this, otherwise you will have bad tornado placements and that will be a huge problem, probably more than you can imagine right now. Follow the timers, and have your raid-leader call it out. It always happens after the 1st Blaze set of the “mini-phase”.
For the Seed carriers, this ability is a bigger issue than Blazes (in my opinion). The problem is that you have to run to your drop-off location, drop the seed before Firestorm hits you, but close enough so the firestorm does not clip it, and you can quickly pick it up afterwards, because random swirls might spawn on the seed (this feels somehow not so random and it seems like it prioritises seeds).
Now this would not be so hard if it wasn’t for the awkward interaction with range when the seed is dropped. Basically, when a seed is on the ground, both Firestorm circles and Swirls have a larger range than indicated. The safe play is to make sure there is at least a 5 yards gap between the circle-swirl and the seed on the ground. You might be thinking “But I do not know where the swirl is going to spawn”, and that’s true, but I am saying this for another reason.
There are 2 scenarios where this knowledge is important.
- You are running to drop Firestorm and you drop the seed far away because you can blink/teleport back. You then see a swirl that spawns next to your seed and you think it’s safe, but your entire raid is now dead.
- You are holding a corrupted seed and want to perform a swap with your partner. You drop the seed on the ground as the swirls spawn, you think it’s safe because it’s not clipping the seed, but your entire raid is now dead.
So the key to all this is not having a seed sit on the ground for long, especially the corrupted one because that one pulses raid wide damage if on the ground. If you can drop a firestorm, and pick up your seed again within 2 seconds, you are doing it correctly.
Corrupted seeds
After every apocalypse roar, you will get 1 bad seed spawn that needs to be picked up as soon as possible.
- The 1st seed always goes to tanks, because they take little to no damage from holding them. They do have to perform a swap and can’t take a tank hit when holding the seed. If you do end up holding the seed, and a tank hit is about to happen, just drop the seed, take the hit and pick it up again.
- The 2nd seed wants a tanky melee (like a Demon Hunter) to pick it up and swap with another tanky melee. Depending on how much you want to pressure healers, you can perform the swap just before apocalypse roar or just after.
- The 3rd seed, Warlock and Evokers are a good option.
You can also do this based on your own preference, it does not make a lot of difference.
Surviving P3 tips for everyone
This phase is very healing intensive and can quickly spiral out of control. Often players will feel really safe at 90% health and then just die 3 seconds later.
A player that is holding a corrupted seed for example, will drop the seed and run to the edge. While on the edge the seed is pulsing raid wide damage, and the player is most likely out of range of some (or all) healers, takes damage from the Eternal Firestorm hit and is additionally taking damage from the Corruption DoT.
The simple rule for this phase, with or without seed, is that whenever you get targeted by any ability (Blaze, Firestorm, etc) pop a personal. If you do not have one, use a healthstone/pot. If everyone does this, you will not fall behind on healing and your healers will love you.
With this out of the way, let's look at all the positions that you should be playing for each “mini-phase”.
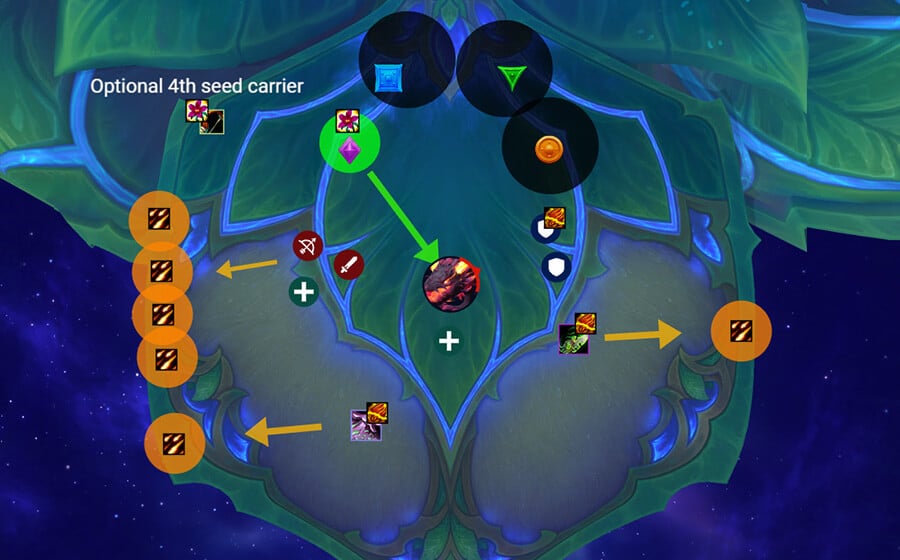
Phase 3 Start
Note: seed carriers should be your own preference.
Your entire raid plays around the purple marker. The 2 seed carriers (lock, mage) will play bottom left, and the 2 seed carriers (hunters) will play on the opposite side of the room.
The raid drops Firestorms behind them, all the way to the edge, and the seed carriers drop in the marked spots.
One healer should play in the middle of the room, so they can reach everyone from there.
After the 2nd Blaze, the entire raid runs to blue and pops 2 seeds.
NOTE: Due to changes, it is unlikely you will get to use the 4th seed, but if you have dps problems, you can always keep it. In the case that you decide to play the 4th seed, that player will always play close to the hunter marked on the pictures below.
Everyone then runs to between the Green and Orange marker.
2nd set
Your entire raid plays between Green and Orange, while dropping the Firestorm behind them on the edge.
Tanks are on the opposite side holding 1x Corrupted seed, so make sure you do not go too close to the boss with blazes.
A Mage holding a good seed is chilling at the bottom, and if targeted by Firestorm, drops at the bottom tip of the platform.
Hunter plays bottom right and just drops Firestorm to the right edge of the platform.
After the 2nd Blazes, everyone runs to the green marker and Mage will pop seed there.
Everyone should then use the gateway as soon as you get the seed buff.
3rd set
The raid now plays below the orange marker, but trying to stay max range away from the boss in order to outrange blazes.
Hunter holding the last good seed is playing bottom right.
You had another corrupted seed spawn, and that one gets picked up by a DH. They play on the opposite side of the room and drop the firestorm also on that side.
After the 2nd Blazes, everyone runs to the orange marker and Hunter pops the seed. You want to use strong defensives and Barrier/AMZ on this apocalypse roar as it tends to hurt a lot. Then, everyone runs to the bottom of the platform and Fyrakk also gets moved towards it.
4th set
You should be very close to killing the boss here, regardless, you still have to play the mini phase properly because one fail will instantly wipe the raid.
The entire raid plays Middle-Left of the platform, so below the purple marker, and everyone drops firestorm behind them, on the edge.
Tanks and the Corrupted melee carrier are on the opposite side of the room, keep in mind that before this point your initial DPS Corrupted seed carrier should have swapped their seed with someone.
You get another corrupted seed spawn, this one is picked up by Lock/Evoker. They will play bottom left.
From here you just deal with mechanics and hope that the boss dies. If you struggle with dps, and you are playing 4 seeds, the 4th seed is popped on the purple marker.