Raid Setup
Introduction
Dive into the inferno with Heroic Fyrakk the Blazing, a boss whose visual effects rival the intensity of the latest maps in Call of Duty Warzone! The veterans who enjoyed encounters such as Raszageth, Halondrus and Anduin are in for a treat, Fyrakk's scorching battle promises a nostalgic journey. But beware, tempting fate near the portal might transport you straight back to the fiery realms of Firelands (best avoided). Let the flames of excitement and nostalgia blaze on (but no blaze on the Kaldorei adds please)!
Fight Style: Single Target fight with Cleave/AoE in Phase 2
Recommended Setup: 2 Tanks / 5+ Healers / 13+ DPS
Useful utilities: Mass Dispel, Revival, Grips, Solar Beam, Knockbacks
Hero/Lust usage: Phase 3
Mechanics
This mechanic targets 3 players with a large circle that needs to be placed in the empty corners of Wildfire. It leaves behind a puddle that acts like Wildfire and deals a medium amount of damage to the players placing them, and anyone standing in 9 yards.
Unavoidable mechanic that fills up a large portion of the room, creeping towards the roots. Deals high damage to players standing within the swirls, and medium damage to the entire raid when it hits.
Fyrakk creates a rift at his location, pulling players in and dealing distance based damage. Players standing at least 20 yards away will take medium damage for 8 seconds.
Targets several players with lines that can be moved, but cannot be dodged by the player with the Blaze. Players take medium damage, but this can quickly become lethal if hit by several lines at once. Take the hit from your line and make sure you are not standing in any other.
Try to avoid other lines by running within your own line and not moving it side-to-side.
Turns Spirits of the Kaldorei hostile if you hit them later in Phase 2.
Targets several players with a debuff that quickly ramps up in damage. Your healers will have to use dispels on cooldown, otherwise it will spiral out of control. Deals high damage at 10+ stacks.
Using Mass Dispel, Revival, racials and single target dispels on cooldown in Phase 1 should make things easier.
Hits the current tank and leaves a mark on them that deals damage on each melee attack, even if you are not tanking the boss.
Simple frontal with unusually small range, we could almost call it a laser. Simply dodge.
Fyrakk leaps into the sky and crashes back on the platform, dealing medium damage to the entire raid and knocking them upward.
Fyrakk gains a massive 6.6% of his total health as a shield that needs to be destroyed within 30 seconds. Deals pulsing raid wide damage that ramps up in intensity.
Spawns orbs all over the platform that move towards Fyrakk. Players need to pick up the orbs, because each orb reaching Fyrakk will inflict high damage to the entire raid. Orbs deal medium damage to players soaking them, so make sure to use personals when doing so.
The Heart of Amirdrassil is stationary at the back of the platform, slowly losing health. If it reaches 0, it will trigger a wipe mechanic. To heal up the Heart, healers must heal Spirits of the Kaldorei that are trying to reach the Heart to heal it. Spirits spawn in sets of 5, and each spirit will heal the tree for 5.5% health.
Targets both tanks with a large circle, after a few seconds, the circles will explode, spawning 2 Burning Colossus adds. These pulse damage around them, dealing low damage to anyone within 15 yards. Additionally, if the Colossus reaches 100 energy it will explode and wipe the raid.
The pulsing AoE will turn friendly Kaldorei adds into Screaming Soul adds (bad).
Fyrakk crashes into the tip of the platform, inflicting distance based damage. Simply move away from this.
Fyrakk will fly through the middle of the room, dealing lethal damage to all players standing within and spawning a line of Screaming Soul adds.
4 Seeds will spawn on the ground that need to be picked up by players. The seeds are used so you can survive the Apocalypse Roar. Getting hit by any ability while carrying the seed, or if the seed is on the ground and gets hit by something, will turn the seed into a Blazing Seed that deals massive damage to the entire raid for 6 seconds.
Players holding the seed can drop it on the ground via an extra action button, and they can also ‘activate’ the seed when the button changes (bloom). This happens shortly before the Apocalypse Roar cast.
Inflicts 1.3 million damage to all players and pushes them away. Players standing in the grass that spawns after one of the seeds is used will absorb 1 million damage.
Stand in the Seed that is used!
Several players get a circle that inflicts medium damage to them and spawns Tornadoes that move around, deal high damage to anyone hit and knock them away.
Targets a random player with a breath that deals lethal damage. Needs to be dodged.
Strategy
Heroic Fyrakk presents a dynamic 3 Phase encounter, featuring a single intermission and an array of abilities that rivals a Death Knight's spellbook. Several abilities persist across phases or are clever variations of the preceding ones, contributing to a seamlessly smooth and exhilarating flow throughout the entire encounter.
Before we begin, I would recommend bringing an extra healer for this fight to help out with dispels in Phase 1 and healing the Kaldorei adds in Phase 2.
Phase 1 Strategy
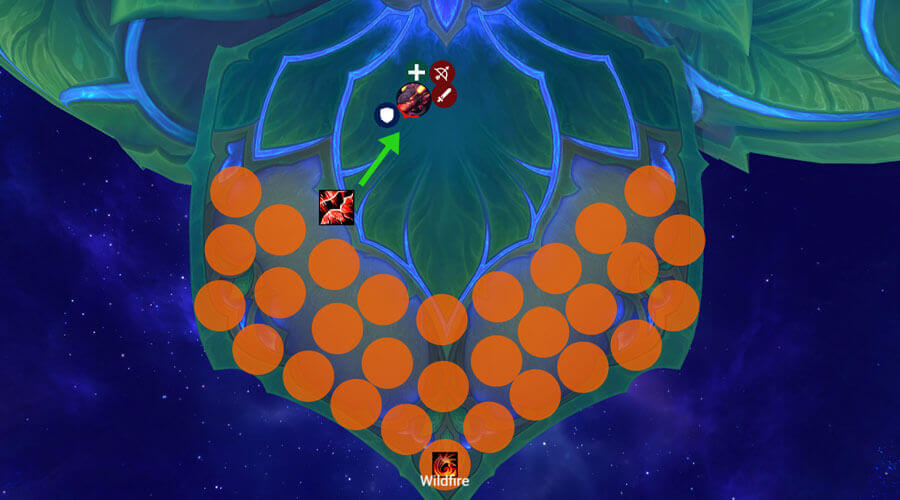
Pull the boss close to the edge of the room, while standing in the middle and avoid standing in front of the boss at all times. He will periodically cast his frontal ability on the tank.
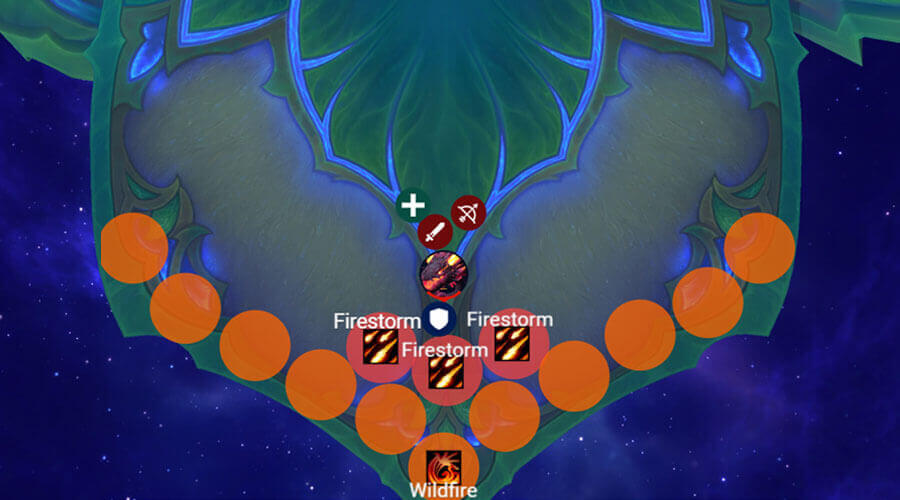
3 players will get targeted by the Firestorm ability, just place the puddles close to Wildfire puddles; it doesn't really matter where you place them since Wildfire will simply fill the gaps anyway. Keep in mind that Wildfire cannot be baited and it simply serves as a soft enrage for Phase 1.
Shortly into the pull, you will get two main abilities: Blaze and Dream Rend.
The first ability is Blaze, which puts a laser-line on several players (8). The players cannot avoid getting hit by their own line, but can move around and avoid taking additional hits from other player’s lines.
Also, Blaze does not hit all players at the same time, it pops in sets of 2, making it important that players do not move as soon as they see one blaze go off.
This ability does not hurt much, but will kill players if they are standing in several lines at the same time.
The second main ability of this phase is Dream Rend. Fyrakk will create a portal on his current location that pulls players in and deals massive damage that is reduced based on distance. The entire raid needs to move away from it and use some healer cooldowns.
Afterwards, move the boss back, close to Wildfire puddles and place the new Firestorm puddles there as well.
At this point you are just repeating all abilities and trying to push the boss to 70% before Wildfire reaches the roots.
Intermission Strategy
Fyrakk will disappear for a few seconds and crash into the platform in his dragon form, knocking everyone up in the air.
While not fully necessary, you can skip the knock up and gain a few seconds of DPS/HPS by using warlock gateway when that happens. Simply use the gateway stone the moment the boss lands and your entire raid will just go through the gateway instead of flying up in the air. If you chose to do it without the gateway, simply run to the other side when you land.
Once on the other side, you want all your players to spread around the boss, forming a line of defense.
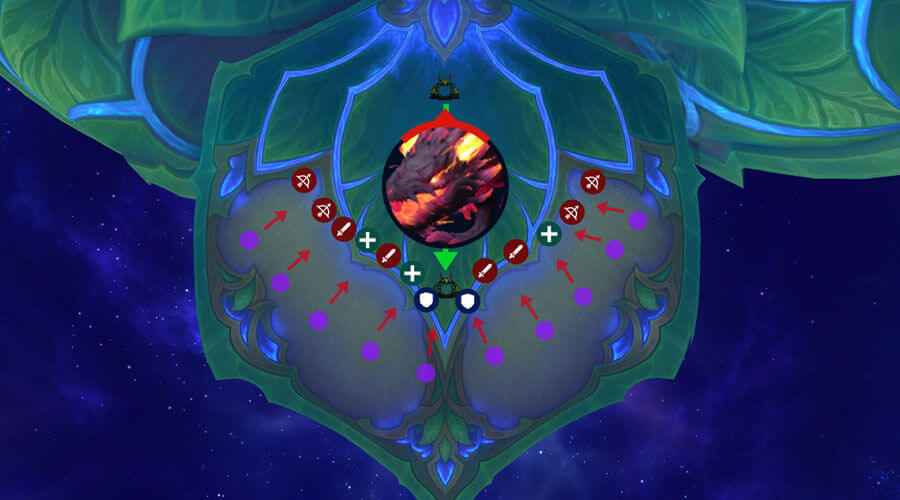
Shadowflame orbs will move towards the boss in sets. So you will get all the orbs at once, then pause for a few seconds, then another set of orbs, and so on.
Players need to intercept them (soak) before they hit the boss. Each orb hitting the boss will deal massive damage to the entire raid and will most likely lead to a wipe. Make sure each player is soaking as those orbs do a good amount of damage and will kill players trying to soak several at once.
Additionally, the passive damage during this phase ramps up fast, so you want to destroy the shield as soon as possible, when you do, Phase 2 will start.
Phase 2 Strategy
When the shield is broken, Fyrakk will push everyone backwards and the landing animation will appear on the tip of the map. Fyrakk will land there in his Super Saiyan Evoker form. Make sure to avoid standing in the landing circle, as it one-shots.
Pull the boss to the middle of the room, standing a bit to the side of it.
You will notice that the Heart of Amirdrassil now has a Health bar. This cannot reach 0, otherwise you wipe.
To fill it up, you will need to heal the Kaldorei adds that spawn in sets, spawning at the edge of the map. Once you heal the adds up, they will gain a shield and become immune to any abilities that could potentially hit them.
The first ability you will have to worry about is Blaze (lasers) from Phase 1. While you still deal with them the same way you did in Phase 1, you now need to make sure not to hit any Kaldorei adds with them.
The second thing you have to worry about are the Colossus adds that spawn shortly into Phase 2. They do an AoE around them, in a 15 yards range, and will turn any Kaldorei adds hostile that they hit with it.
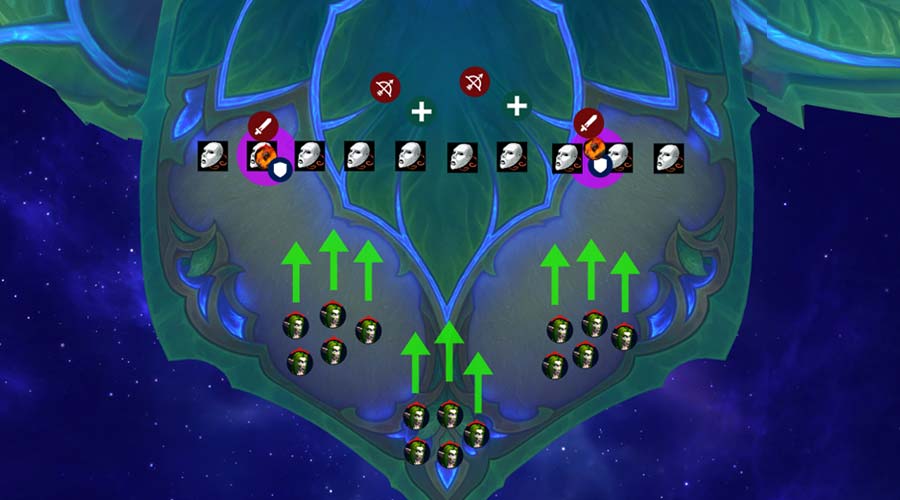
Let’s take a look at the opening setup in Phase 2.
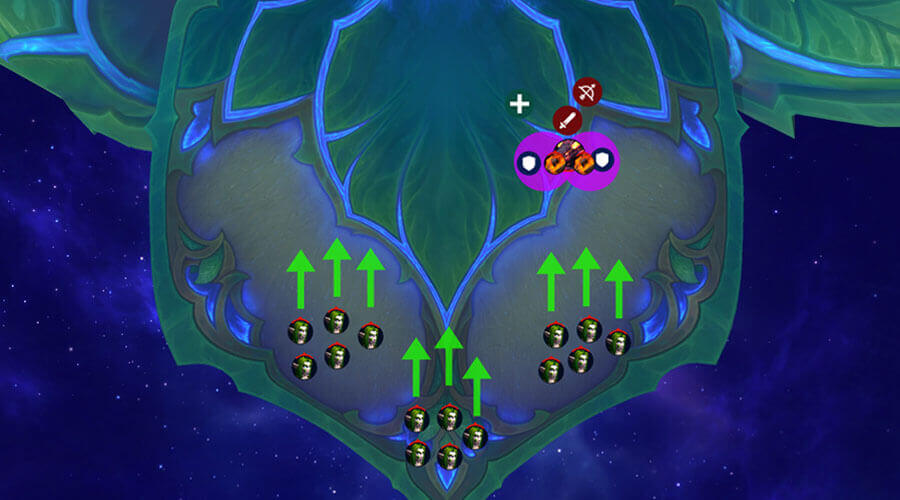
The Kaldorei adds will spawn in sets, one set at a time in one of these 3 spawn locations.
If they spawn in the same line where the raid is standing currently and your healers are fast and they get the shield before they reach you, it is safe to let them pass through the raid/colossus; otherwise, just move out of the way and make sure to avoid hitting them with Blaze lasers.
Shortly after, Fyrakk will cast his Shadowflame Devastation ability (flying through the middle breath).
Your entire raid will want to be behind the breath when this happens, because this will give you a natural distance from freshly spawned sets of Kaldorei adds.
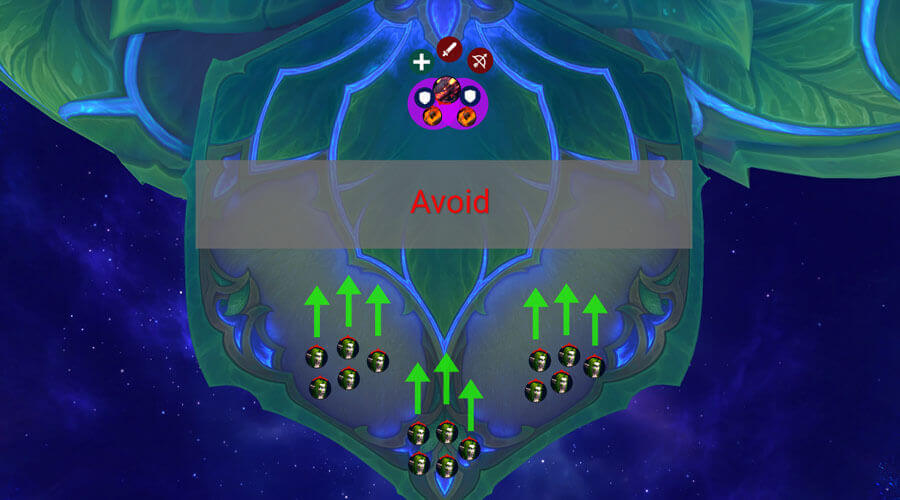
As soon the breath is done, you want to have your raid split into 2 equal groups, making sure both groups have enough grips, knocks, silences and similar for the adds that spawned.
Group the adds up, then interrupt, stun, silence and kill them as soon as possible.
Healers should prioritise healing the Kaldorei adds here because you will have a set spawn, and if not healed, they will turn hostile the moment they reach the Screaming adds (unless stunned or interrupted) and the Colossus.
Note: Both Colossuses have to die before they reach 100 energy.
Shortly after, Fyrakk will crash into the tip of the platform again. And the phase will repeat from here. You will have to do 1 more set of Colossus and Screaming adds the exact same way you did the first time. Once done with it, Fyrakk will again crash into the platform, be idle for about 20 seconds and then Phase 3 will start.
Phase 3 Strategy
Fyrakk will disappear for a few seconds, and crash back into his Dragon form, knocking everyone up just like going from Phase 1 to the first Intermission. You can again use the gateway tech, but you really don’t have to, because you ideally want a natural spread of players anyway.
You will get 4 seeds spawn (Seed of Amirdrassil) on the ground, behind the boss.

Select 4 of your best players to deal with those.
If the seed gets hit by any ability in Phase 3, it will turn into a Blazing Seed and deal massive damage to the raid. It also removes the seed from being usable, taking away the total time available in Phase 3 because you will eventually wipe once you run out of seeds to counter the Apocalypse Roar ability.
Players who pick up the seed, will still get targeted by Blaze, which is unavoidable. If this happens, they can drop the seed on the ground using the extra action button, step aside, get hit by blaze and pick the seed back up afterwards.
A few seconds before the Apocalypse Roar cast, the players carrying the seed will have a different action button (bloom), using it will create a small puddle of grass that protects players from Apocalypse Roar. Everyone needs to be standing in these when the Roar happens. Use one seed per cast of Apocalypse Roar.
Additionally, to make this phase harder, 3 players will get targeted by Eternal Firestorm.
Those players will spawn a puddle and send out tornadoes that move around the platform. These players will need to move far away from the group, avoiding hitting any seeds.
There is also the Shadowflame Breath ability that will target one player and Fyrakk will send a breath in that direction. Simply dodge the frontal breath.
The best way to ensure the safety of the seeds, we suggest using the following positioning:
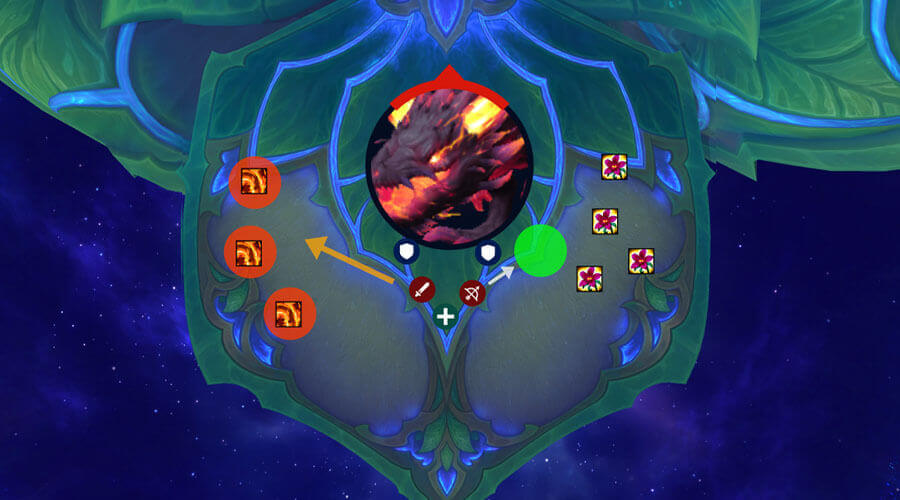
- Have your entire raid stand behind the boss except for the seed carriers, who will move to the right side.
- Players targeted by Eternal Firestorm should move to the left side, as far as possible.
- Players targeted by Blaze behind the boss should simply play it there, it should be easy for Seed carriers on the right to dodge those.
- Seed carriers that get targeted by Blaze, should have no issues dodging those as they are only 4 players in that corner.
- Seed carriers that get Eternal Firestorm should simply drop the seed and run as far as possible away from the seeds.
The Raid leader needs to call one player who will pop the seed. You will most likely need a total of 3 seeds to kill the boss. However, depending on your DPS, it could also be 2 or 4 seeds. If the boss is low enough for you to kill it before the next Apocalypse Roar, use all available seeds on the last Roar just to ensure nobody forgets to use it and to remove the risk that it gets hit by an ability afterwards.