
Raid Setup
Introduction
Single Target Fight
Recommended Setup: 2 Tanks / 4-5 Healers / 13+ DPS
Useful utilities: Druid Roar/Shaman Totem, Warlock Gates, Immunities
This guide has been updated for ![]() Awakened in Season 4 of Dragonflight.
Awakened in Season 4 of Dragonflight.
With the item level curve of Season 4 and there not being any affixes means that the fight should be quite similar to when it was first released. Any further updates needed for Awakened tuning will be made as soon as possible.
Easy Mode
- Triangle Formation to deal with all abilities (check strategy section)
- Tank Swap every Concussive Slam, destroy Awakened Earth Pillars with it
- Players drop Awakened Earth to the right of the Ranged camp, in a line or very close together
- Player targeted with Rock Blast, move in front of the Ranged camp, other players help split damage or immune it if possible
- Dodge Shattering Impact and Fractured Rubble (circle + swirls)
- Use Speed boosts and Warlock gates to move out of Resonating Annihilation (100 energy)
- Healers be prepared for large damage spikes when Awakened Earth Pillars are destroyed
- Repeat
Mechanics
Terros will target a random player and launch a swirling vortex, inflicting 961,298 Nature damage split evenly among players within 12 yards and causing eruptions of Awakened Earth.
Afterward, an Aftershock occurs at the impact location.
This is a simple soak to split damage ability with an added twist. It triggers 2 other abilities at the same time which prevent you from assigning specific people to deal with it, and it also makes positioning a bit more complicated. You can also immune this but make sure to call it fast.
The Aftershock of Rock Blast inflicts 115,356 Nature damage to players standing in it, knocking them upwards.
It will create a puddle of earth (Stone-Legion Generals eruption) instantly after soaking the initial hit from Rock Blast. A few seconds later it will explode. The best way to deal with this is to have people soaking Rock Blast stand on the edge of the soak-circle. That way they only have to move 2-3 yards to dodge the puddle.
The earth erupts beneath several players, inflicting 27,637 Nature Damage to players within 2 yards and knocking them back. Upon erupting, the Earth Pillars will inflict 7,210 Nature damage to all players every 2 sec until destroyed. Upon destruction, it triggers a Seismic Assault.
Players are marked with a Yellow arrow and will have a small circle around them, you should make sure to place the Pillars in a line, or very close together. Do not stack with other players.
This ability comes pretty much at the same time as Rock Blast, which forces players targeted by Awakened Earth to skip soaking Rock Blast and deal with placing Awakened Earth in a proper spot.
Never place this in melee!
Inflicts 24,032 Nature damage to all players when an Earth Pillar is destroyed. Inflicts an additional 2,403 Nature damage every 1 sec for 10 sec. This stacks.
The important thing to understand here is that each Earth Pillar will give you a DoT. Meaning if you have 4 Pillars up, you will take 7,210 x 4 Nature damage every 2 seconds. If those pillars get destroyed, you will receive a different DoT (from Seismic Assault tooltip). However if you happen to destroy several Pillars, but miss some.. You will have two different dots hitting you at the same time. This is the worst case scenario and it will hurt the most, since not only will you take extra damage from two different dots, you will also eventually destroy all Pillars with Resonating Annihilation and trigger a much stronger Seismic Assault.
Terros discharges a line of tectonic energy (laser beam) that inflicts 242,728 Physical damage to players hit and increases damage taken by 30% for 45 sec. This stacks.
It will also destroy any Awakened Earth (Earth Pillars) caught in the blast. You should probably tank swap every Concussive Slam.
Basically the same laser from Halondrus which you now use to destroy Earthen Pillars. If done correctly, the Tank should never have to move with it. We will discuss more about it in the Strategy section.
Terros fractures the earth, inflicting 252,341 Nature damage to players within 12 yards of the impact location, and knocking them upwards. This will also trigger Fractured Rubble.
On testing, this ability would mostly target the largest clump of players which is 90% of the time the melee camp. Ranged are often split due to puddles on the ground and because they are dropping off Awakened Earth. So this ability mainly exists to keep melee players awake (he he).
It’s a large yellow circle, just move out of it.
When Terros reaches 100 energy, he will unleash a brutal slam a la Sire Denathrius (aka Pizza Slice). This slam inflicts 478, 246 Nature damage to all players caught in it, and destroys Awakened Earth Pillars. It will also trigger Fractured Rubble.
Rubble falls from the ceiling, inflicting 96,250 Nature damage to players within 6 yards of the impact location and leaving behind Resonant Aftermath.
Swirls will spawn on the ground that need to be dodged. It leaves a puddle behind, just don’t stand in it.
Both Frenzied Devastation and Tectonic Barrage abilities serve as a soft enrage and do not require special attention.
One will trigger if you manage to fill the entire room with Resonant Aftermath (puddles) and the other will trigger if no player is in boss range. Both will deal massive damage and most likely cause a raid wipe.
Strategy
Proper positioning from the start is the key to success here! If you start the fight correctly, it will be easy for you to move with the natural flow of the fight. Essentially repeating the same things all over again.
Opening position:
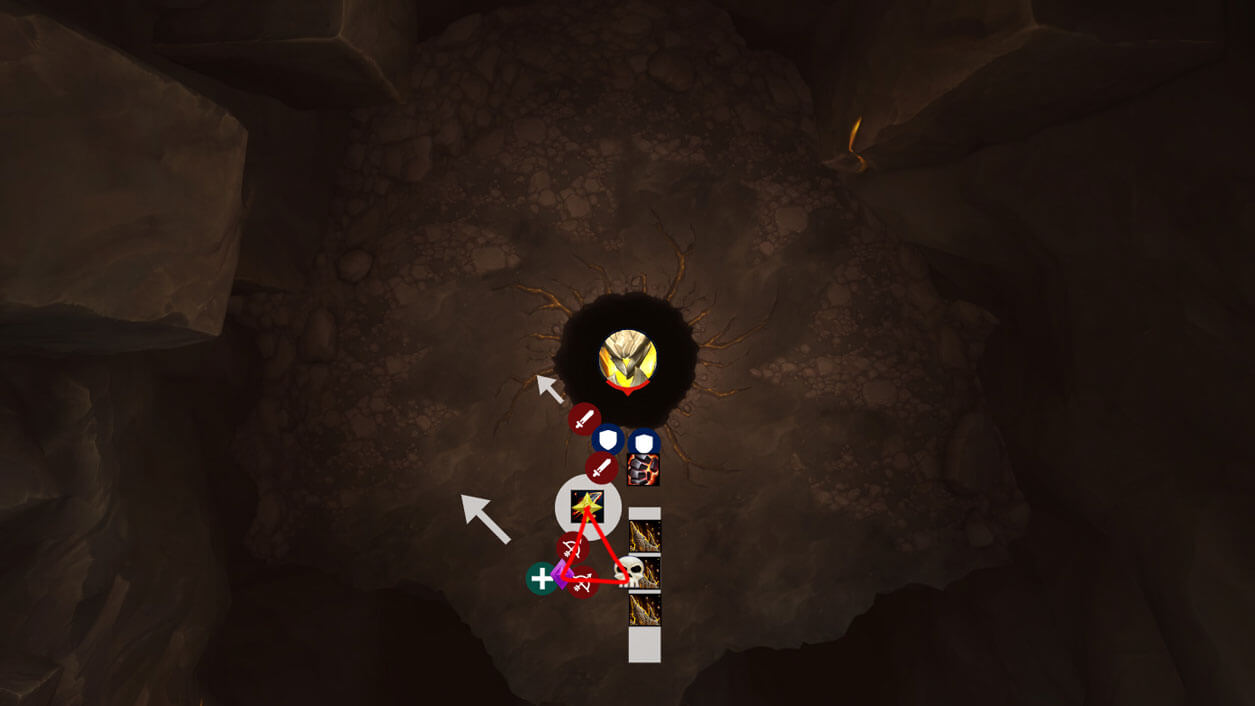
Place 3 markers of your choice in a triangle formation. The left side (Purple) is the Ranged camp, the right side (skull) is the Awakened Earth Pillars drop off location (either in a line like in the picture or simply close together so that they can fit into 1 laser beam cast). The tip of the triangle (yellow) is where the Rock Blast targeted player should go. Ranged and Melee camp should help soaking (splitting the damage) by simply touching the tip of the soak circle.
Make sure that melee camp is always standing to the left of the current tank. Tank should never have to move to avoid hitting players. When Concussive Slam is cast, the Laser should already be in position to destroy all/most pillars without any heavy movement.
As abilities like Fractured Rubble / Resonating Annihilation happen, you simply move clockwise away from the puddles and always recreate the initial positions as best as possible.
The simple rule:
- Awakened Earth goes to the right
- Rock Blast goes forward
- Ranged camp stay stacked, make sure you are at least 15 yards away from Pillars drop position
For Resonating Annihilation (at 100 energy), you should use speed-boosts and Warlock Gateway (Demonic Gateway) to get to safety fast. It will always target the largest clump of players. Meaning if you are standing correctly, everybody will be mostly in the middle of the Pizza slice, so you need extra speed/gates to avoid getting hit.
After you successfully dodge Resonating Annihilation, re-create the initial positions. This time it's actually easier, since now your new Awakened Earth is the edge of the previous Resonating Annihilation (edge of the pizza).
Dodge Fractured Rubble that always happens after Shattering Impact / Resonating Annihilation.
Rinse and Repeat.
Something important to mention is that healers need to pay extra attention to the situation on the map. You can predict approximately how much damage you're going to take based on how clean the Awakened Earth Pillars are placed, how many are up and so on. Do not hesitate to call for strong Raid-CD’s/Personals when you have a bad combo/situation.